Clark Kent Creations -- Swarthmore, PA. Landscape Design and Construction, Hardscaping, Patios
  • Home
  • Services/Photos
    • Hardscaping >
      • A Flagstone Walkway -- The Process
      • Stone Steps -- The Process
    • Wood Fences
    • Exterior Carpentry
  • About
  • Community

How I Spent my Summer Vacation.  (Or You Can’t Get Rid of Me that Easily)

9/5/2014

8 Comments

 
Picture
Two months of my hard work = Many years' client enjoyment
Hey folks!  Remember me?  I used to run a successful hardscaping and landscape construction company before making the decision to return to school and pursue my teaching certificate?  Well I’m back.  Sort of.

Just to recap, I’ve been going to school full-time taking graduate level classes in pursuit of my PA teaching certificate.  I was taking classes full-time through the end of June, and just recently started back up with fall term classes.

That left me just under two months to squeeze in two family vacations, and – you guessed it -- an awesome patio project that I wrapped up just in time for the clients to enjoy a Labor Day weekend party.

With a full plate of school work, teaching and family life, my original plan was to take on a series of small projects over the summer break that could easily be completed with no crew.  But when a prospect came calling with a full-on patio project, for which all the work fell directly in my sweet spot, well, it was hard to pass up.  And just like that, my summer was booked.


Picture
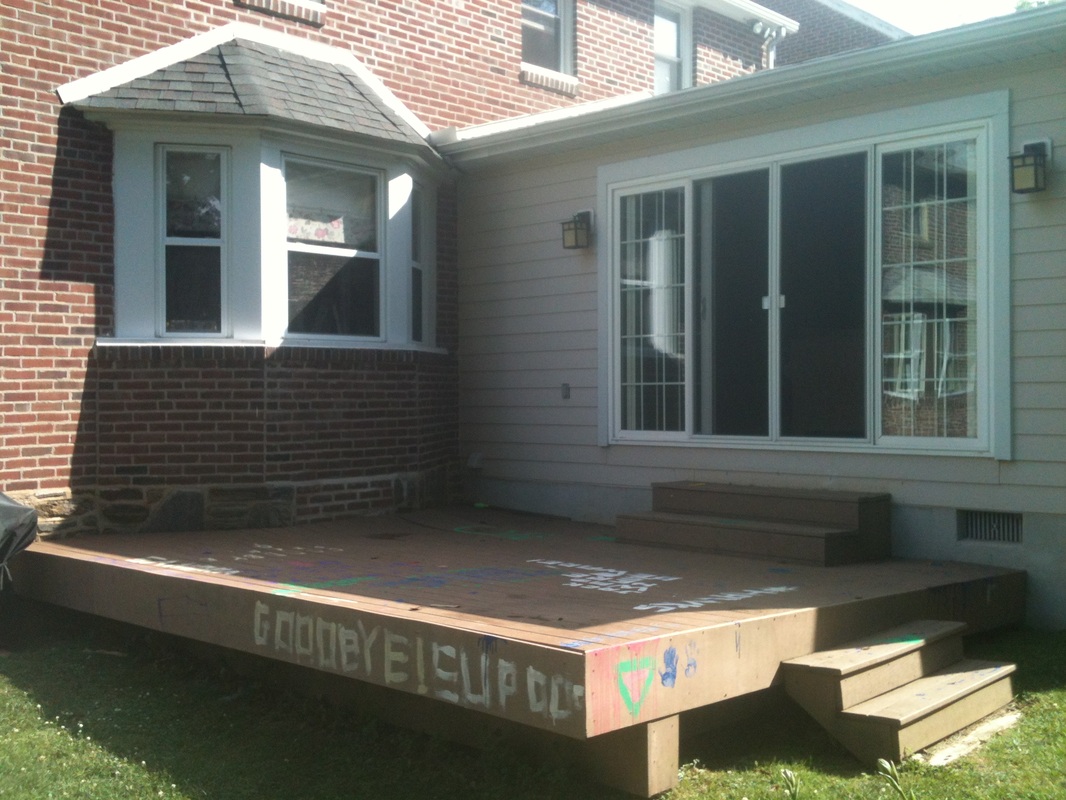
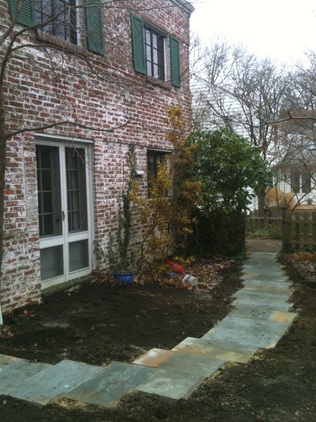
"Before". The original deck just before demo.
Picture
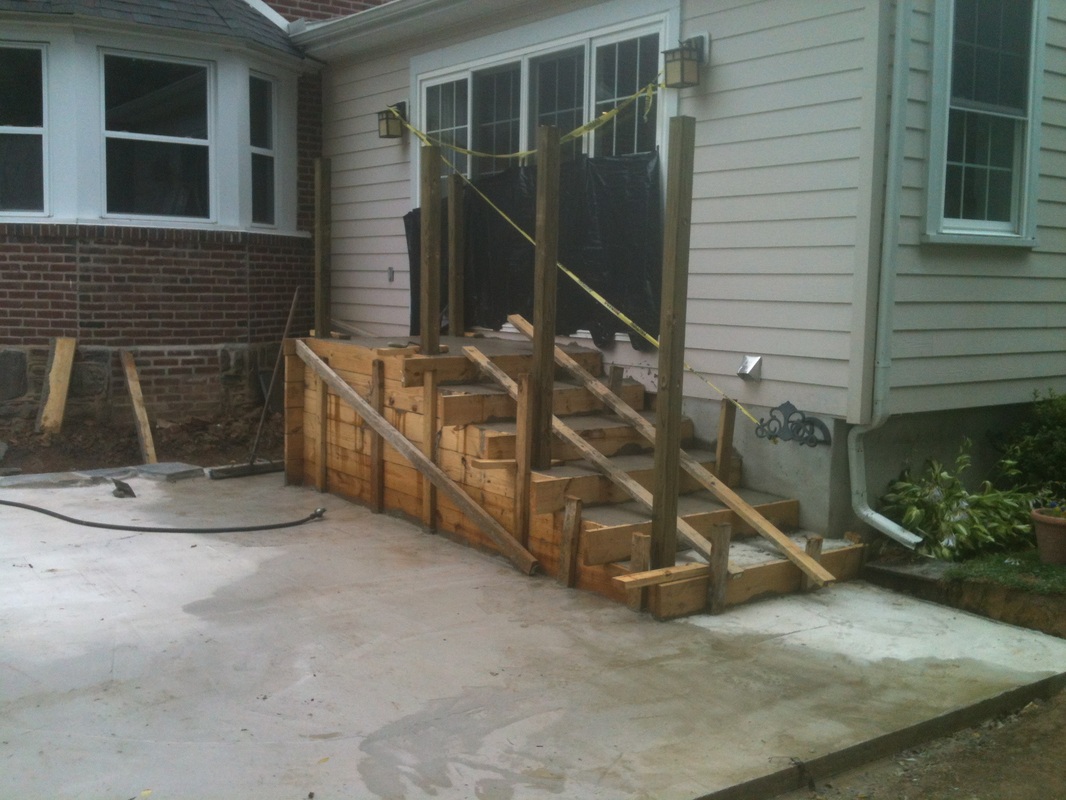
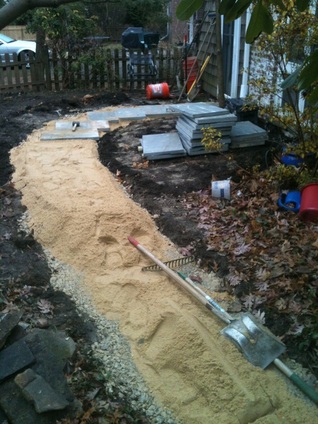
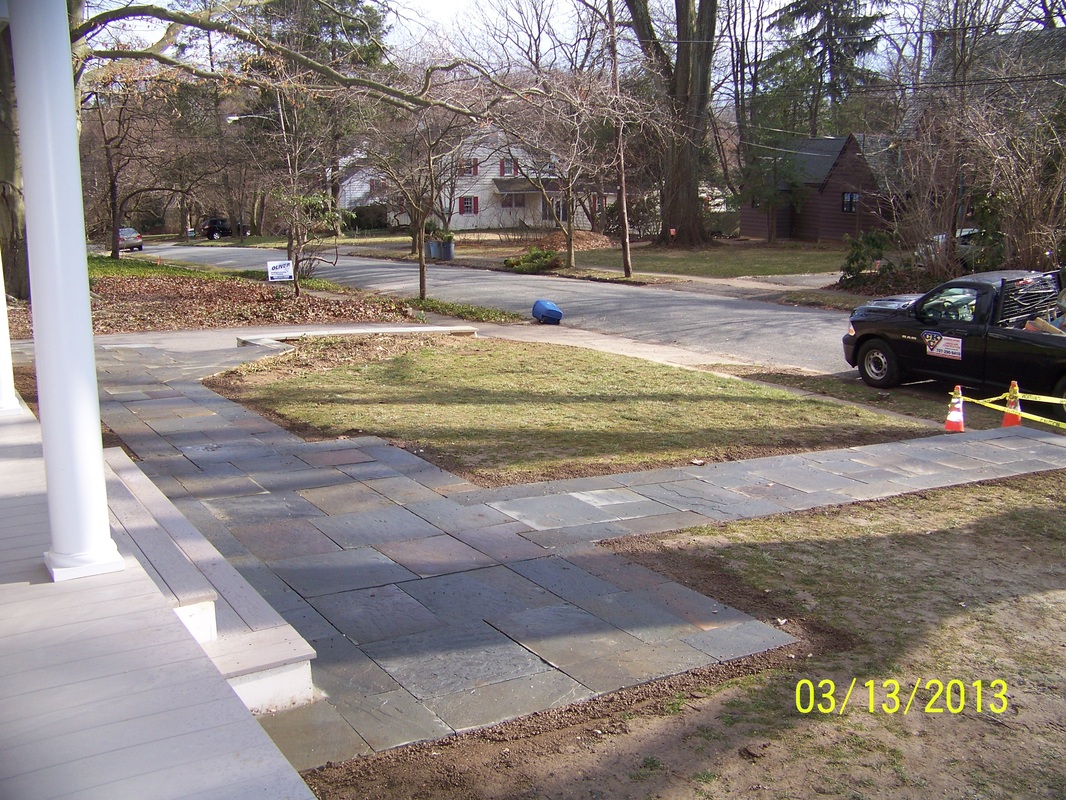
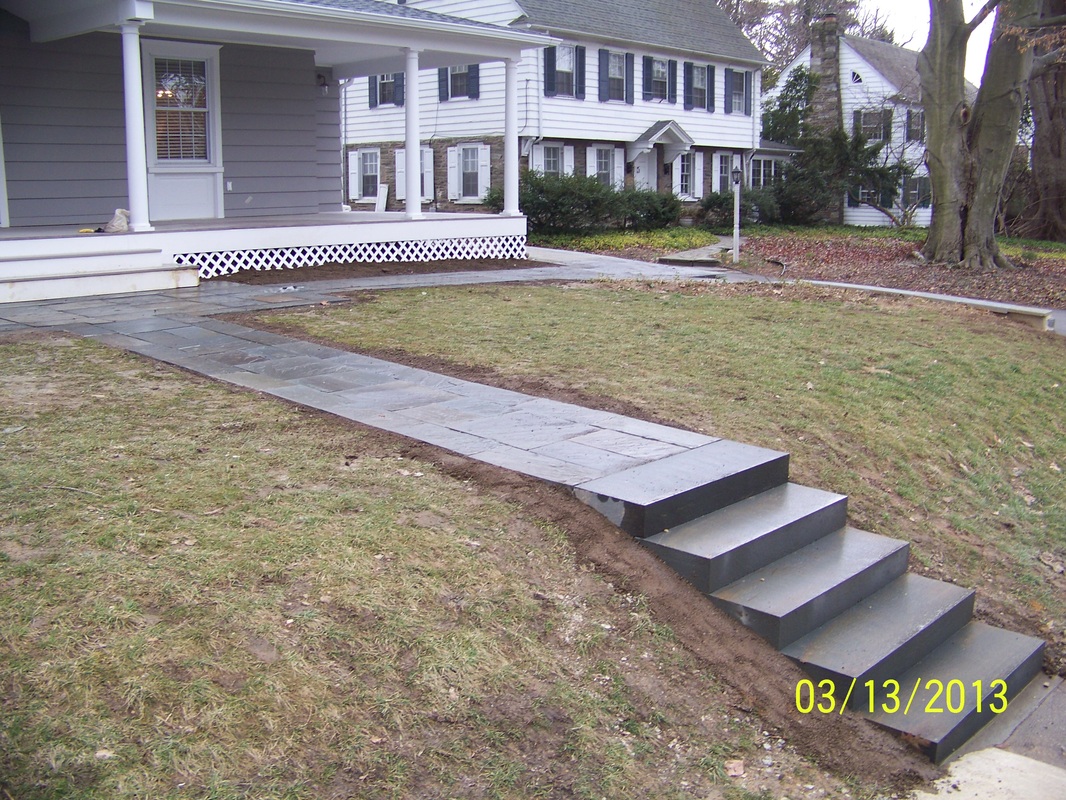
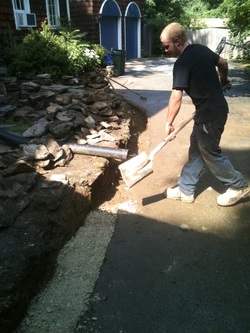
The completed rough pad, just as the steps are poured.
It had been at least five years since I undertook any big projects without any labor help, so I was a little curious, for lack of a better word, how this 44-year-old body would respond.  Proud to say, I still got it!
PictureDid I mention I was still able to squeeze in vacation?
The clients were great.  I gave them the full run-down of my situation -- downsizing the business, working summers only, one-man show, working around previously scheduled vacations, etc.  Despite my honesty, they still wanted to go with me, explaining that I had been highly recommended by a previous client.  As long as the work was completed by the fall, they were 100 percent on board.

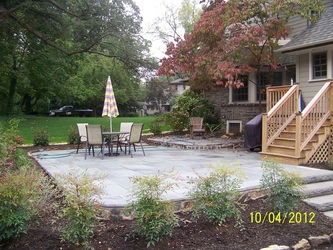
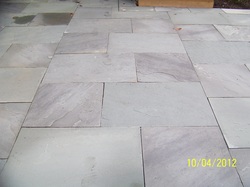
As for the project itself, it included removing a very poorly installed deck that was sagging and pulling away from the house, and installing an approximately 450 square feet wet-set irregular shaped flagstone patio.  It was also necessary to install a set of steps and landing to accommodate the rear entrance, approximately 42” off grade.


Demo work started the last week in June just as I was completing my spring classes.  Foundation was poured the week after the Fourth of July, and the rest of my summer was spent cutting and mortaring stones, short of a week in Memphis to visit the wife’s side of the family, and a week kicking back amidst the lakes of Northern Michigan.
Picture
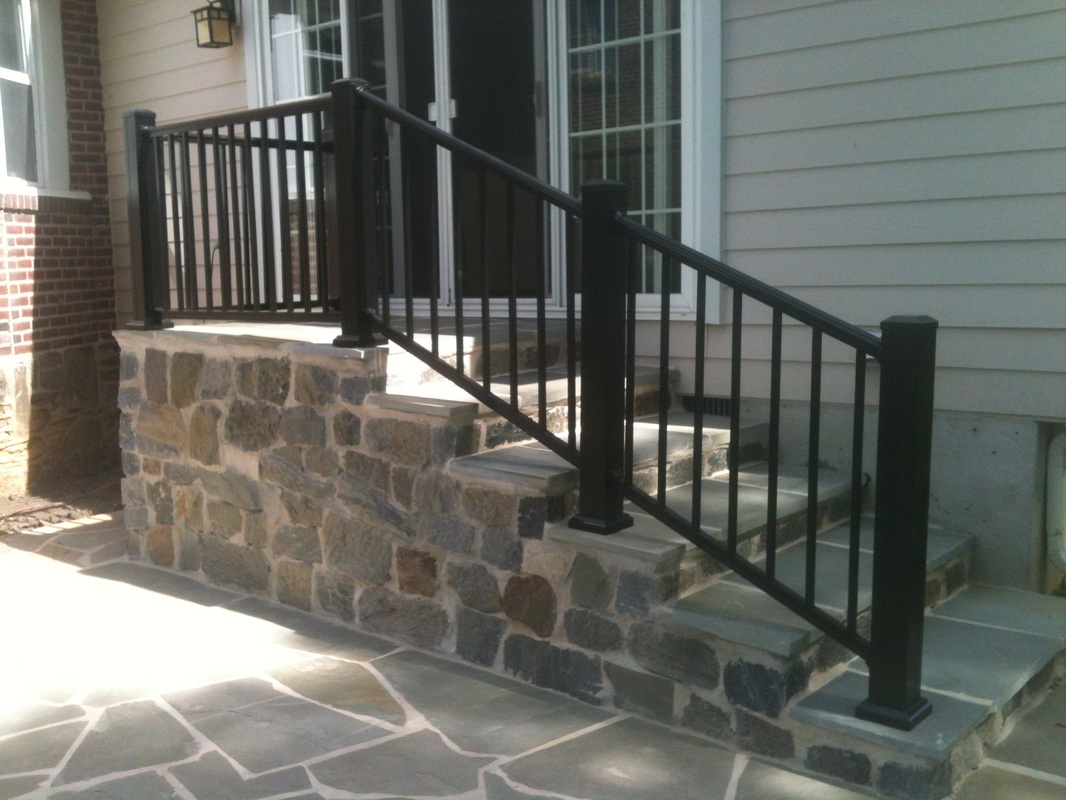
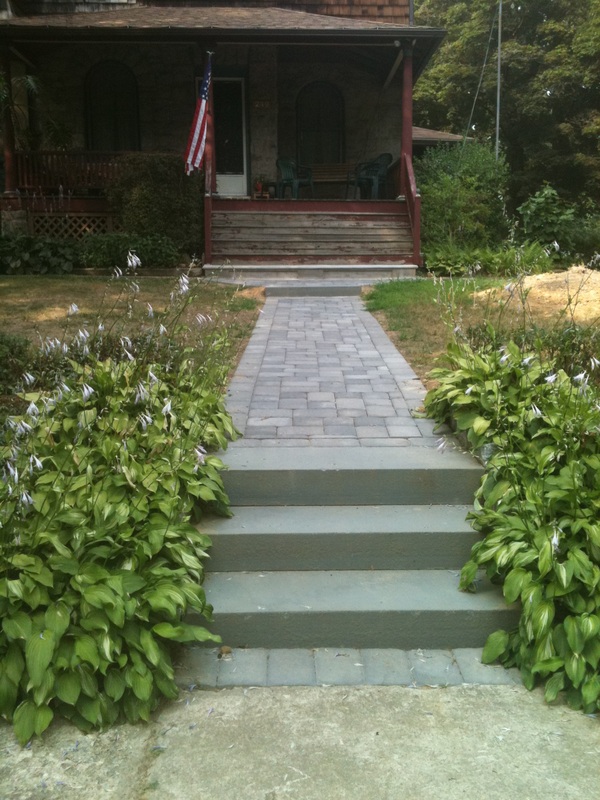
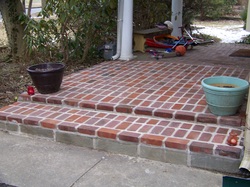
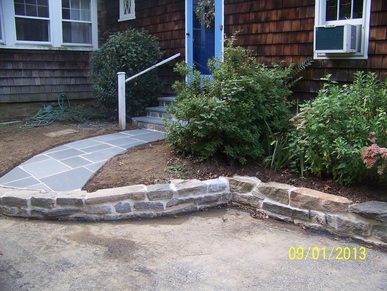
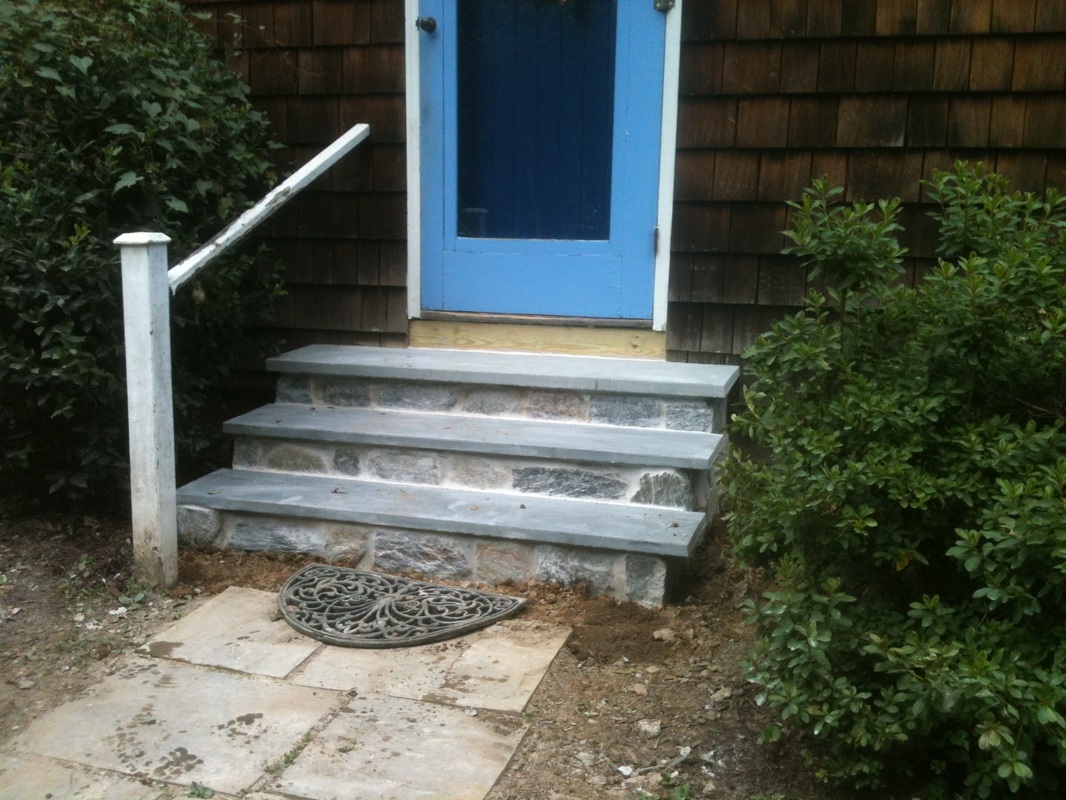
The finished landing and steps
Picture
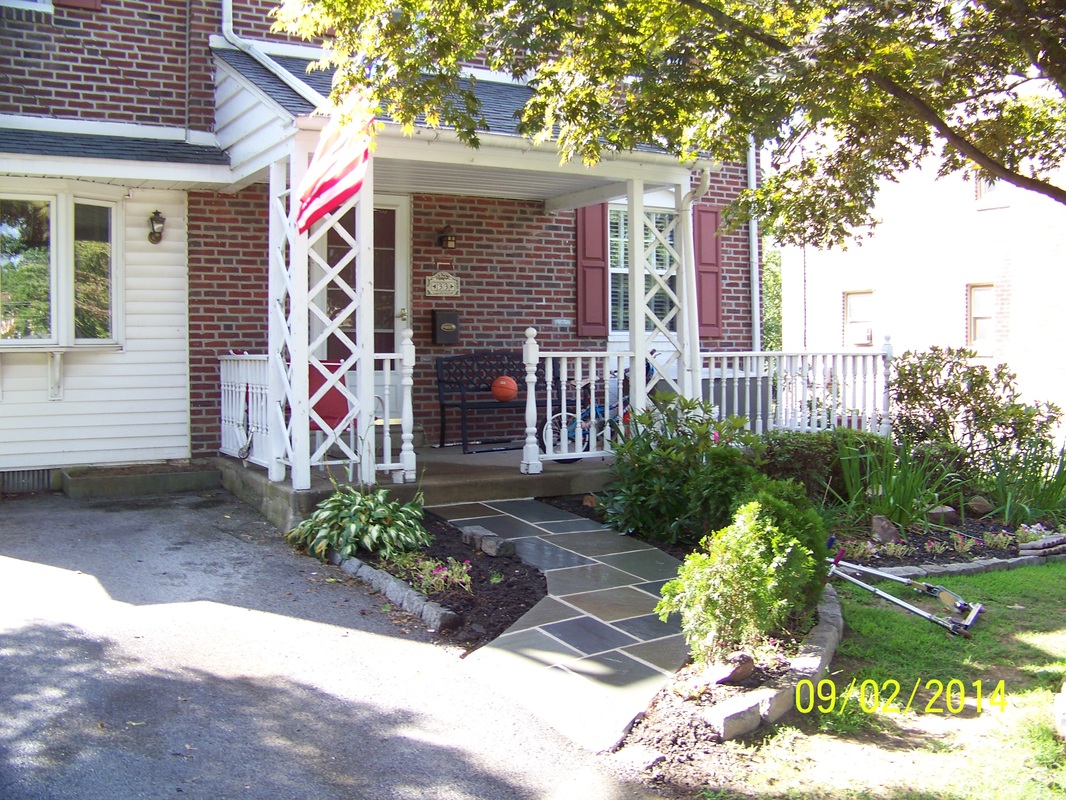
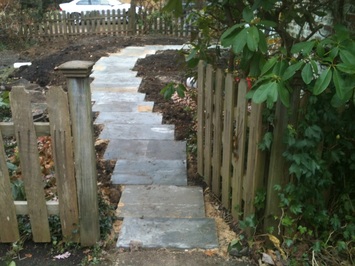
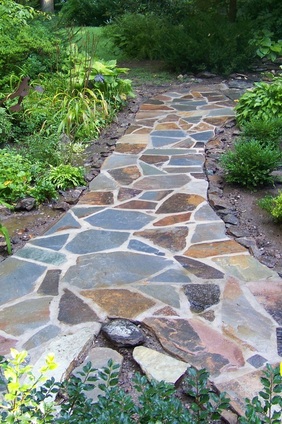
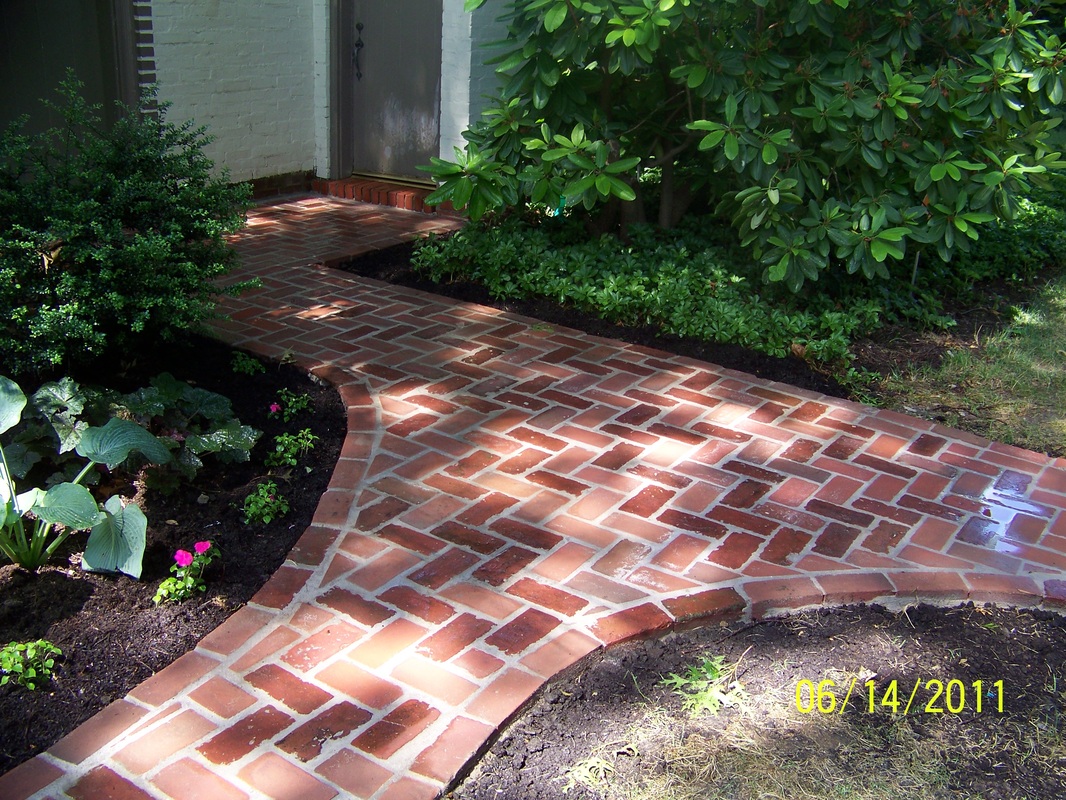
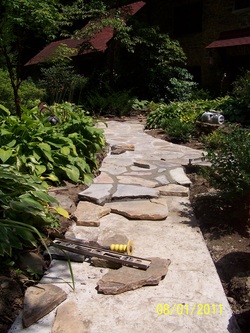
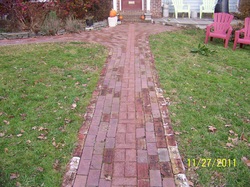
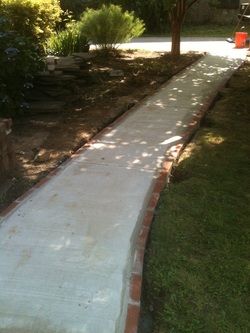
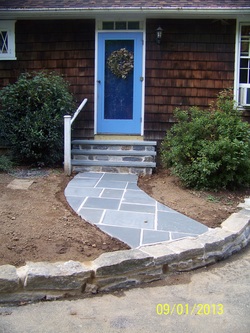
The new front pathway
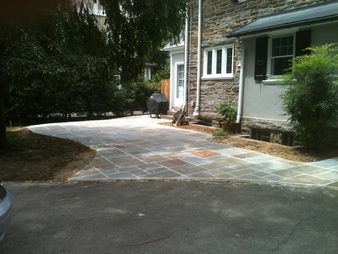
The client liked the work so much, they even added a small front pathway replacement to the overall project scope.  And everything was wrapped up the Friday before Labor Day weekend, just in time for the client to have a bow-breaking party over the long Holiday weekend.

Happy client, busy summer, big project, able body.  Proud to say, it was a very good summer.  Now it’s back to classes and teaching as the school year has begun.  I still have a few small projects that I plan to squeeze in on a few days off here and there through the fall.  But mostly its school and classwork from here on out.  Definitely good to keep in touch with my roots though.

Time to get back to work.

8 Comments

Keeping Patios and Sidewalks Ice-Free.  Hint:  Rock Salt Bad

1/17/2014

6 Comments

 
Picture
Editors Note:  This is becoming an annual repost, but for anybody who wants to protect their hardscaping investment, I think it's more than relevant.  I've seen way too many sidewalks, walkways and patios ruined or compromised because of poor winter-proofing habits.  Take a few basic precautions as follows:

It’s approximately 30 days until pitchers and catchers report to spring training.  That countdown is what gets me through the winter.

But in the mean time we have to survive the cold temperatures and most likely a fair amount of ice and snow.  And so does your hardscaping.

I get asked all the time what the best way is to keep walkways and patio surfaces ice-free during the winter months.  No matter what the surface material is, just a little bit of ice or compacted snow can really be a safety hazard.  Even a well-shoveled surface can become slippery quickly as the surrounding snow melts and re-freezes.  Something needs to be done.

But first, what not to do.  Remember these three words:  “Rock Salt, Bad.”  Sure it’s relatively inexpensive, and yes, it does keep the walkway ice-free.  But it also will destroy nearly any hardscaping surface.  Rock salt, or sodium chloride to be more precise, is extremely corrosive.  It will cause mortar joints to deteriorate, cause flagstones to flake, discolor bricks or stones, eat away at concrete, and potentially harm nearby vegetation.  And it’s bad for the overall environment.  And it can wreak havoc on your four-legged friends’ paws.  To summarize again, “Rock Salt, Bad.”

There are however a number of alternatives that can help keep walkways safe without harming the hardscaping, your pets’ health, or the environment. 

Most hardware stores, home centers, and even pet stores will sell some version of “chloride-free” de-icers.  The active ingredient in these products is generally Calcium Magnesium Acetate, or “CMA” as it’s sometimes referred.  A 20-lb bag typically runs in the neighborhood of $20, -- yes, it is slightly more expensive, but considering how you’re saving that big ticket patio you just had installed, a few extra bucks is well worth it.  There’s a number of CMA-based products out there, and they’re often marketed as pet-friendly de-icers.  Just ask your local supplier what they have available, and be sure to stay away from the chloride-based products.

And speaking of pets, another chloride-free alternative is good ol’ fashioned kitty litter.  Kitty litter does lack some of the ice-melting qualities of CMA-based products, it tends to work a little slower, but it is inexpensive and provides welcome grit and traction to any icy surface.

Basic sand is another inexpensive, environmentally-friendly alternative.  And since that dry-set paver or brick patio was swept with sand upon completion anyway, it certainly won’t hurt things as the snow disappears come spring.

Of course, there’s also my favorite strategy – keep your fingers crossed for a mild winter and repeat this mantra, “pitchers and catchers, pitchers and catchers, pitchers and catchers…”  Spring training (and warmer weather) is getting closer by the day!  In the mean time, stay warm and stay safe.

6 Comments

A Dryset Flagstone Walkway Project.  And a Cautionary Tale About Hardscaping and Stump Removal

12/6/2013

13 Comments

 
PictureAn English Cottage Walkway -- The Finished Product
A few months back I got a call from woman who was quite excited.  "We finally had the giant Silver Maple in the backyard removed!," she exclaimed.  "Now we can move forward with the patio I've always been wanting!"

I hate being the guy to squelch anybody's enthusiasm, especially when it comes to a nice size patio project, but unfortunately things aren't always that simple.  My first site visit confirmed my suspicions.

I never saw the tree while it was standing, but based on the woman's description and the enormous crater just off the back of the house, it must have been massive.  What I saw was a crater approximately 10-15' in diameter, with a depth of at least 2' where the stump had been ground out.  The center of the crater was filled with woodchips from the grinding process, and the perimeter of the crater showed the remains of the root system, with a network of large 6"+ roots spidering out from the center of the crater.

"I hate being the bearer of bad news," I told the woman, "but I have some serious reservations about putting in a patio this soon after the tree was removed."  The problem is that all those woodchips and all the remaining root system will soon begin decomposing.  And as it decomposes, the area will settle.  And no matter how much gravel is put in, no matter how well its compacted, it will soon settle once again, wreaking havoc on the patio.

That decomposing/settling process can take years to complete.

So what's a person to do? 

In most cases when a tree this size is removed, it's in an area far from the house.  Planting another tree in the spot is often the easiest and best solution.  Or turning the area into a garden can work great as well.

The problem in this case was that the tree was originally planted much too close to the house.  The crater was literally right outside the back door.  We certainly couldn't just leave a muddy crater there.

Picture
In Progress
Picture
And the Finished Product
We decided to go ahead with a simple dryset walkway -- one that could serve a functional purpose now, and one that could be lifted and reset as the area settles.  Additionally, we elected to keep all the stones in their full rectangular shapes with no cuts.  That will allow the stones to be reused in additional functions down the road once enough time has passed and the area is ready for a full patio.

But for now we excavated the woodchip/soil/root footprint as best as we could, compacted approximately 8" of crushed gravel, screeded a thin layer of sand, and set the 1.5" thick bluestones atop the sand.  A very typical dryset installation.  How long will it last before some settling occurs?  Tough to say for sure, but my guess is we'll most likely need to do a little bit of resetting in the next two years or so. 

But with the dryset technique we used, any future maintenance or repairs will be minor, and the stones can be used again without incurring additional material costs.  And the client gets a great walkway in the mean time.  Not a bad compromise. 

Quick.  Simple.  Effective.  And expert advice too, if I do say so myself.  Got a problem area in your yard that you're looking to do something with?  Give us a call, and let us know what we can do for you!
13 Comments

Patio Construction in Delaware County, PA

11/29/2013

4 Comments

 
PictureDryset PA Blue Flagstone
A quick, picture-heavy post this week as we break for the Thanksgiving Holiday and spend some quality time with loved ones and friends.

Just a reminder that as we approach the end of the 2013 season, it doesn't mean you have to put your outdoor plans on hold until the spring.  The winter months are a great time to spend planning and thinking about next spring's projects.  Spend the prep time now,and you'll be ready to hit the ground running come the return of warm weather and longer days next spring.

We service all of Delaware County, PA and parts of The Main Line and West Chester.  Whether its natural flagstone, manmade pavers, clay brick or concrete, we are experienced in all hardscaping mediums.

Here's a few pictures of some various patio projects we've done over the past few years -- hopefully they can serve as some inspiration!

Picture
EP Henry Pewter Blend Pavers with Natural Stone Steppers
Picture
Wetset Irregular Flagstone, Blended Mix
Picture
Wetset Brick, Herringbone Pattern
Picture
Inset Chess Board, Red and Black Slate
Picture
Wetset PA Gray Flagstone, Irregular Shape
Picture
EP Henry Coventry Pavers, Harvest Blend
Picture
Dryset PA Gray Flagstone, Linear Shapes
Picture
Dryset Flagstones with Natural Stone Steppers
PictureWetset Flagstone, Linear Shapes
And keep in mind, consultations are always free!  No matter what type of outdoor living space you're thinking about -- flagstone, pavers, wet or dry set, a new deck -- you name it, Clark Kent Creations is here to help!

A new outdoor living space might be just the ticket for that perfect Christmas gift you've been trying to think of too!

Give us a call and lets get that ball rolling for next spring.

4 Comments

Dry Set vs. Wet Set Hardscaping.  Which One is Right For You?

11/15/2013

8 Comments

 
PictureWet-Set Installation in Progress
** Editors Note -- The following is a reposted article from part of a larger hardscaping series we ran last year.  But it is perhaps one of the most commonly asked questions during the sales cycle.  Certainly worth revisiting.

As I've stated in the past, there are a lot of decisions that need to be made in conjunction with planning for a new outdoor living space.  This week I’d like to discuss the differences between a wet-set installation and a dry-set installation, and the advantages and disadvantages of each.

First, a quick lesson.  Hardscaping projects generally fall into one of two basic categories; Wet Set or Dry Set.  While there are a lot of options to consider when selecting materials, no matter what material you choose they will be set using one of these two techniques. Wet set refers to setting the materials in a bed of mortar.  (The mortar was mixed and was wet when we set the stones, get it?)  Dry set refers to setting the stones atop a bed of compacted crushed gravel and sand.  No mortar, no concrete, thus the “dry” label.

In either case, the process begins with excavating out the footprint a minimum of 8”.  What happens from there depends on the technique.

A wet set application includes a base layer of gravel to separate the native soil from the new install.  Forms are then set at the necessary grade along the perimeter of the new install, be it a path, patio, or combination of the two.  A 4” thick rebar-reinforced concrete pad is then installed to serve as the base.  This pad is typically rough-finished, as the finish will be concealed by the eventual installation of the flagstone.  The grade of the concrete should be approximately 2” below the desired finish grade, to accommodate the flagstone and mortar thickness.

Once the concrete has set, the perimeter forms are removed and flagstones can begin being mortared to the surface.  When all is said and done, you will have a solid, rigid, impermeable surface.  It is long lasting and durable, however it can be more difficult and/or costly to repair or reset if necessary.  The technique is also subject to any impermeable surface requirements that many municipalities are requiring for stormwater management purposes.

On the other hand, a dry set application includes approximately 6” of compacted crushed gravel as the base, in lieu of a concrete foundation.  Once the base gravel has been compacted (typically compacted in a series of three-inch lifts), a thin layer of sand is spread evenly across the gravel base. Flagstones are then set atop the sand bed, allowing for a slightly permeable installation that offers some degree of flexibility.  We typically use thicker heavier stones on dryset installations, as the weight of the stones offers strength and weight to hold the stones in place.

PictureDry-Set Installation with "Butt" Joints
Because of the flexible nature of the installation, dry set installations are less likely to crack, and can be easily lifted and re-set if necessary.  The flexible nature is slightly more prone to frost heaving and settling however.

As for costs, typically the dry set technique runs about $5 to $6 cheaper a square foot then the wet set technique, assuming the stone selection is comparable.

So again the question becomes which one is right for you, and again the answer is that it depends on your personal taste (I’m not going to make all the decisions for you, you know!).  I can tell you that we don’t do too many irregular shaped dryset installations, mostly due to the wider joint widths and the potential of joint material washing out.  But we have done them, and we can address the joint material issue as well if that’s where your heart truly rests.  Linear designs lend themselves quite nicely to either dry or wet set applications, and you do have the option of “butt” joints (meaning near-zero joint widths) on the dry-set option as well.  

If you'd like to discuss which application is right for your project, just give us a call.  Consultations are always free, and I'm always open to discussing ideas and how to make sure your project best fits your needs.

8 Comments

Brick Patterns for your Hardscaping Ideas

11/8/2013

8 Comments

 
PictureCommon Brick Patterns
Last week we talked a little bit about bricks – the good old kiln-fired clay kind, and their use in hardscaping applications.

The main focus of last week’s post was to discuss orientation of bricks – the way they’re set lengthwise, height-wise etc.  This week I want to talk a little bit about the patterns that can be created using bricks.

Before we begin discussing the patterns, I do want to revisit brick dimensions.  As we’ve established, a basic brick measures 4” x 8” x 2.5”.  A key element to recognize here is that the width (4”) is exactly half of the length (8”).  That sets up perfectly for some of the basic patterns.

Bricks used for paving are often called “paver” bricks (not to be confused with paver stones – a totally separate material).  Paver bricks are designed to measure a true 4” x 8”, allowing for tight joints with no spacing in dryset applications.

Why is it important to note this?  Because there are other brick dimensions that are meant to be used in wet-set applications where joint widths come into play.  “Modular” bricks measure approximately 3 5/8” x 7 5/8”, allowing for
joint spacing, and “standard” bricks measure roughly 3 5/8” x 8” allowing for joints in one dimension.  Additional sizes are also available based on your design and installation.  I’ll get back to these size bricks later in the post.

PictureA Custom Running Bond Pattern
As for patterns, the most basic and perhaps versatile pattern is the running bond. Bricks are set length-wise with continuous seams.  This pattern lends itself to bricks that may be slightly irregular in dimension, reclaimed bricks, or flatwork when modular or standard bricks are used rather than paver bricks.  As long as the width is consistent, you don’t have to worry about the length matching up exactly.  I also like to use this pattern in curved pathways, where we can set our running seams to mirror the curve of the path.
 
Similar to the running bond, the jack-on-jack allows for continuous seams running not only lengthwise, but across as well.  The important part to keep in mind when setting this pattern is to make sure all of your lines in both directions line up and stay straight.  You’re basically creating a grid of bricks, and the eye will pick up any slight imperfections to the grid.

PictureJack on Jack
The next two standard patterns are the basketweave and the herringbone.  The basketweave consists of two bricks placed horizontally set next to two bricks placed vertically.  All of your bricks will be set in pairs, with each pair of bricks running on one direction surrounded by four pairs of bricks running the opposite direction.  Again, it’s important to make sure your brick dimensions are true (two 4” = one 8”), and that your lines all stay straight.

The last of the basic patterns is the herring bone.  There’s a variety of ways of describing this pattern – I’ve always thought of it as sets of corresponding steps running vertically and horizontally.  The truth of the matter is the chart at the top will probably do the pattern more justice than me trying to describe it verbally.  It’s not an overly complicated pattern, but again it’s important to make sure the brick dimensions are true, and the lines stay straight.  I like this pattern because the eye is drawn not just to the linear x and y axis, but also to the diagonal nature of the bricks and the way they’re set.

Now, about the standard and modular bricks I mentioned earlier. As you can tell from the patterns and descriptions, it is important that our brick dimensions match up to keep the patterns straight and true.  Two 4” dimensions = one 8” dimension.  That works great for a dryset application when there are no mortar joints between bricks.  
 
But what happens when we add a mortar joint to the end of each brick? Let’s try it and find out – two 4” bricks, plus one ½” mortar joint (between the two bricks) equals 8.5”. One 8” brick with no joint equals 8” Not equal.

That’s where the modular bricks come in.  Remember the modular dimensions?  3 5/8” x 7 5/8”.  If you’re setting the bricks in a wet-set fashion, and plan to include mortar joints it’s important you take this into account when purchasing your bricks. Let’s try the same example as above, but using modular bricks this time.  Two 3 5/8” bricks, plus one 3/8” mortar joints equals 7 5/8”.  One 7 5/8” brick with no joint equals 7 5/8”. Ba-da-boom, good to go.

So that’s about it, perhaps a bit too much math there at the end for a Friday morning, but that’s what we’re here for, right?  Even if you’re not quite sure what pattern to go with, or how all those bricks will fit together in a nice clean pattern, give us a call or drop us a line.  We’ll be glad to help!

8 Comments

Brick Lingo 101 -- The Orientation of a Brick

11/1/2013

4 Comments

 
PictureBrick Orientation Terminology
With the year heading down the back stretch and starting to gear up for the run to the finish, it provides a good opportunity to look back at some of the projects we’ve done so far this year.  
 
The year’s projects thus far have been a diverse assortment of flagstone work, paver stone work, decks, fences, and natural stone work, in a wide range of shapes and sizes.  And one material that has presented itself in a number of projects is good old-fashioned kiln-fired brick.

I’ve always viewed brick as kind of the forgotten stepchild of the hardscaping family.  It seems like when people mention their ideas to me they’re always talking about flagstone or manmade pavers, sometimes concrete, but rarely brick.

But to be honest, brick is perhaps one of my favorite materials to use for any hardscaping project.  Or at least one that deserves fair consideration.

And if you decide to go with brick, you should probably be at least familiar with some of the basic terms. 

PictureCircular Concrete Wall Capped with "Rowlock" Bricks
A basic brick measures roughly 4” x 8” x 2.5”.  Yes, there are some minor dimensional differences depending on the type of bricks you choose, but for the purpose of this discussion we’ll go with the rounded-off dimensions.

Most people don’t give bricks much thought when they see them in use.  But take a look more closely and you’ll notice there are a number of ways of setting the bricks.  Are the bricks placed horizontally or vertically?  Is the 4” side exposed?  The 2.5” side?  The 8” side? Believe it or not there are distinct terms for how the bricks are set.

And when discussing a hardscaping project, it can be useful to know the terms. Perhaps you want the field of the surface to be set one way, with the borders set another?  Perhaps you want a certain look for the bedding edging, but another for the raised planter beds and another for the walkway borders and yet another for the main field of the walkway.

PictureConcrete Walkway with "Shiner" Edging.
So to avoid confusion, here’s a basic primer on how to refer to the bricks once they’re set.  The above chart also shows the terms as they relate to each way the brick can be set.

Stretcher:  A brick laid with its long narrow side exposed

Header:  A brick laid flat with its width at the face of the wall, or parallel to the face of the wall

Soldier:  A brick laid vertically with the long narrow side of the brick exposed

Sailor:  A brick laid vertically with the broad face of the brick exposed

Rowlock:  A brick laid on the long narrow side with the short end of the brick exposed.

Shiner:  A brick laid on the long narrow side with the broad face of the brick exposed.

So the next time you’re talking with a hardscaping contractor or brick mason, drop a term or two.  You’re likely to impress, and show that you know a thing or two about what you may be paying for.

Next week I’ll talk about a few of the basic brick patterns as they apply to hardscaping applications.

4 Comments

When is the Best Time of Year to Start My Hardscaping or Fencing Project?  (And How Long Will it Take?)

10/11/2013

3 Comments

 
Picture
If you’re thinking about a new patio, fencing project, or any other landscape construction project, there’s a lot of information to absorb and a lot of decisions that need to be made.  No doubt, it can all be a bit overwhelming as you begin the planning process.

One question that I get asked quite regularly during prospect phone calls and sales meetings is when the best time of year is to undertake a landscape construction project.

Are there advantages to doing it during certain times of year?  Are there times of year to avoid?  Does it matter at all?

Let’s start with the third part of those questions;  Yes, it does matter.  But how it matters really depends on your priorities, what’s important to you during the construction process, and when you want the project completed.

First, let’s take a quick look at the calendar.  Generally speaking, we’re working outside completing landscape construction projects beginning usually around the first of March, and typically ending about mid-December.  Those dates can be tweaked a bit depending on how the year’s weather is behaving, but those are pretty accurate average dates. 
 
No matter what, we won’t be out doing masonry or fence work during January or the first half of February.  Even the mildest of winters can turn nasty in a heartbeat, and the last thing anybody wants is a half-completed construction project sitting idly while a foot of snow melts, or the ground heaves, or it turns into a muddy mess.  Better off to wait until the winter threat has at least subsided.

So take away  the winter, and you’re left with nine, maybe ten months at the most to get your project completed.  Still a pretty broad range.

Rest assured, if we’re out doing a project it’s only because we’re confident enough in the weather, and are taking any seasonal precautions that need to be made.  So at this point the “when” of the project is entirely up to you.

But there are some things to consider:
 
  • When do you want the project completed by?  If you want that new patio installed for your child’s graduation party, don’t call us on Memorial Day.  If there’s an end-goal in play, allow enough time for all the i’s to be dotted and t’s to be crossed, and the project to be completed in a thorough, detailed manner.
     
  • Are there seasonal discounts?  We don’t offer seasonal discounts, but I have heard of some companies offering discounted prices to fill schedules during slower times of year.  It’s certainly worth asking anybody you’re soliciting bids from.
     
  • Are there times of year when we’ll have to wait longer for availability?  Absolutely.  Once the really nice spring weather hits, a backlog queue of up to four months isn’t uncommon, although we certainly try to keep that time to a minimum.  Mid-to-late summer availability can often be pretty quick.  There’s  usually a bump in business around Labor Day, so fall availability can often be delayed but not as significantly as the spring.
     
  • Can customers pick their construction dates?  To some extent, yes.  If you call us early enough and leave plenty of lead time, it certainly allows you some flexibility.  Keep in mind we are busy doing other projects while your project is in the queue, and there is always some  uncertainty in project length due to weather, unforeseen site conditions, etc.  Scheduling for “mid-August” is realistic.  Scheduling for “Aug 12th” is not.
     
  • Do clients need to be home  during the construction process?  No, but it is advisable.  I’ve  had clients in the past want to schedule their projects for weeks when they’re away at the Shore or on vacation.  First, as mentioned above, picking the exact day we begin isn’t  always an option.  Secondly, there  are often day-to-day decisions that need to be made or approved during the construction process.  Sure, it’s  tempting to want to be “out of Dodge” while the yard is torn up and the driveway is full of equipment.  But as I always say, the most successful projects are the ones where there is open and frequent communication.  If  you’re available by phone, or are simply an hour’s drive away at the Shore we can probably make it work.  But if you’re going off the grid to some exotic locale, it’s probably best to wait until you return.
     
  • Can I schedule a project for next spring?  Absolutely.  From a scheduling perspective, I always like to have one or two projects in the can ready to go once the winter weather breaks.  And a March start  date means you’ll be ready to enjoy and use the final product by the nice April weather.
     
  • Entire process – sales cycle to final sweep.  How long will it take?  Wow, that’s a tough question, with a lot of factors to consider.  A lot depends on your level of responsiveness.  Are there multiple revisions and design changes? Are you first calling us in April or August?  Are we talking about a 600 square foot patio, or a simple front entry path?  There’s just too many factors to answer that question effectively, but hopefully the above points will help give you a sense of turn-around.

So, in summary, the best advice I can offer is to call us early, well in advance of the desired completion dates.  It will allow you to make sure you’re fully on board with any design layouts or material selections, allow you a bit of flexibility in scheduling projects, and allow us the necessary time to complete your project meticulously to the highest standards.

For additional questions or to begin the process for your upcoming project, give us a call.  We look forward to speaking with you!

3 Comments

Wet-Set Flagstone Walkway, Stone Steps and Stone Border Wall

9/20/2013

4 Comments

 
PictureThe Completed Project
Another quick project update this week, this one involving a rebuild of a stone driveway border wall, a replacement set of stone steps, and a new wet-set flagstone walkway.

I was first contacted by this homeowner to discuss rebuilding an old stone wall that bordered the edge of their driveway.  The old wall was falling apart, a combination of substandard original construction, having been clipped by vehicular traffic more times than is recommended, and some of the old original schist stone splitting and deteriorating due to moisture.

As we spoke about the wall, we also identified that the steps leading to the side door were quite awkward -- two risers each measuring 10"-plus, treads that were narrower than the risers were high, and constructed from uneven field stone.  Not an easy approach. So we were contracted to rebuild the wall and replace the steps.

Picture
Steps Before -- Ugh!
Picture
And After. Still Need to Replace the Path Though ...
Picture
The wall was disassembled carefully, setting aside stone that could be reused in the rebuild, and discarding stone that was deteriorating or unusable.  We dug out the trench for the wall footing, installed a footing of compacted crushed gravel, and began laying the stone.

Additional stone was purchased from a local quarry to replace the stone that was discarded. The wall measured on average less than a foot high, but we still wanted to make sure an adequate foundation was in place.  That includes about 4" of compacted crushed gravel, plus about 6" of buried stone -- much more than was in place on the original build.

For the steps, we wanted to include natural stone to match and complement stonework on the house.  But getting rid of those uneven treads was important.  So we went with a concrete foundation, with mortared natural stone veneer on the sides and risers, with full length bluestone treads.  The rebuild included installing an additional step, now instead of two 10" risers we included three 7" risers.  Much more comfortable, and we widened the depth of the treads to 14".

Picture
The homeowner was thrilled with the results.  Well kind of.  The wall rebuild looked great, the steps were even and comfortable to walk on, even the old wood trim that was rotting out below the door threshold was replaced. 

But there was a problem.  Now that the wall and steps had been replaced, the muddy homeowner DIY pathway connecting the drive and the steps stood out like a sore thumb.

Luckily, we knew just the people to help with the pathway replacement -- us!  We went with a wet-set bluestone linear-shaped walkway to match the treads on the steps. 

The old pathway was lifted and set aside for the homeowner to use as stepping stones through their gardens.  We ID'd the desired footprint for the path, excavated accordingly, poured a concrete foundation, and mortared the flagstones to the surface.

What a transformation!  Now the homeowner was officially thrilled, wall, steps, walkway and all.

Is there a part of your yard that needs a transformation?  Give us a call or shoot us an email, and see what we can do for you! 

4 Comments

What is Hardscaping?  A Basic Primer.  Act Like You Know.

9/6/2013

1 Comment

 
PictureElements of Hardscaping -- Patios, Pergolas, Stone Walls, Boulders ...
I’d like to take a small step backwards this week and talk about what I’ve always viewed as a basic term – “hardscaping”.

Being a veteran of the industry, it’s sometimes easy to forget that not all clients or prospects are tuned in to the trends and knowledge that I’m exposed to on a regular basis. Sometimes I’ll even mention a term that I assume is common knowledge, only to be met with confused looks that tell me I might as well be speaking Russian.

One term that I throw around regularly is hardscaping.  To me this is a basic term that I just assume everybody is familiar with.  But gauging from the responses I’ve seen, not everybody is.

In fact, it’s the one word that I use regularly and even my MS Word program insists on trying to catch it as a spelling
error.

But it is a real word. And it is just what it sounds like – landscaping with hard materials.  Stone, brick, blocks, concrete, etc.

Much the way that The Jeffersons were a spin-off of All in the Family or Laverne and Shirley was a spin-off of Happy Days, hardscaping is a spin-off of landscaping.

Mention landscaping to a handful of people, and you’ll probably conjure up images ranging from lawn mowing to mulching to tree-trimming to patio construction to pond maintenance – quite a wide range of services.  In fact, when I mention our company works in the landscape industry, I’m often confronted with requests to plant shrubs or mow lawns.

So the term hardscaping was developed to specifically refer to the “hard” portion of your landscape. Stone walls?  Check.  Flagstone patios?  Check. Brick walkways?  Check.  Ornamental boulders?  Check.

And if you think about it, this makes perfect sense.  Does the horticulture expert at the local garden nursery have the in-depth skills or knowledge that will help with your stone patio construction?  Perhaps they’ll be knowledgeable with a few of the basics, but just as you wouldn’t necessarily trust a brick mason with picking out the best shrub selections for your shade garden, a plant expert won’t most likely have the skills and knowledge to deliver a successful patio construction.

So hardscaping has evolved into a somewhat separate industry within the industry, if you will.

And on the flip side, the term “softscaping” has evolved to separately describe the portion of your landscape that remains “soft” – the beds and plantings to be specific.

All that’s not to say that many contractors and companies don’t do both.  Many do, but usually the larger companies will have separate divisions that handle the hardscaping and softscaping portions of your landscape.  Much the way that many general contractors have separate crews that handle the basic framing vs the finish and fixture duties for a structure or dwelling.

There’s other “scapings” that have evolved as well.  Aquascaping is the side of the business that centers around ponds and aquatic plantlife. Xeriscaping (from the Greek xeros, or “dry””) centers around landscaping with little use of water.  Roofscaping is landscaping on your roof.  Stonescaping is hardscaping to the next level, dealing only with natural stonework.  The list goes on, you get the idea.

So the next time you’re talking with someone and they mention the word hardscaping, you can carry on and perhaps even respond by telling them about that new patio you just had installed.  You’re now officially in the know.

And if you call the right contractor, you can even brag about what a great job that locally-owned-and-operated, super-responsive, personable, attentive-to-detail, company Clark Kent Creations did installing your new patio.  :)

Give us a call.  A free consultation is just a phone call away.

But just don't ask me to mow your lawn ...  :)

1 Comment
<<Previous
    Picture

    Company

    Clark Kent Creations, LLC is a full-service landscape construction company servicing the Pennsylvania communities of Delaware County, Chester County, The Main Line, and the University City, Art Museum, and Manayunk/Roxborough neighborhoods of Philadelphia.  In addition to this blog page, additional information regarding the company and our services can be found on the subsequent pages of the site.
    Picture

    Author

    Clark Linderman is the president of Clark Kent Creations, LLC, a landscape construction company based in Swarthmore, PA.  He is a proud graduate of the University of Michigan.  In addition to his passion for all things outdoors, he counts Michigan football, Phillies baseball, Superman memorabilia, Memphis R&B music, and good craft brews among his many interests.  He currently resides in Swarthmore with his wife, Sheila, two sons, his dog Krypto, and a really, really messy garage full of work supplies and toys.

    Picture
    Contact Us:
    Clark Kent Creations, LLC
    Swarthmore, PA
    Design and Construction to Maximize Your Outdoor Experience

    707-290-9410
    [email protected]
    Serving Delaware County, PA

    View my profile on LinkedIn

    Categories

    All
    Business And The Front Office
    Carpentry
    Environmental Issues
    Fencing
    Guest Posts
    Hardscaping
    Inspiration And Design Ideas
    Places & Local Interest
    Ramblings
    Seasonal
    Snack Break
    Water Features

    Archives

    July 2015
    September 2014
    February 2014
    January 2014
    December 2013
    November 2013
    October 2013
    September 2013
    August 2013
    July 2013
    June 2013
    May 2013
    April 2013
    March 2013
    February 2013
    January 2013
    December 2012
    November 2012
    October 2012
    September 2012
    August 2012
    July 2012
    June 2012
    May 2012
    April 2012
    March 2012
    February 2012
    January 2012
    December 2011

    Like my Blog?

    If you like the content of my blog posts, here are a few other blogs that I check in on regularly:

    Stone Soup:  A Master Stone Mason shares his craft.

    Arcadia Gardens:  Plenty of great tips about horticulture and landscape design.  A great blog (even though she's an MSU Spartan!)

    Revolutionary Gardens:  A Virginia-based landscape designer shares his work and ideas.

    Rockin Walls:  A certified dry stone mason from Maryland shares his projects and tricks of the trade

    If you have or know of a blog that you think I might be interested in, just let me know.  If I like it I just may add it to the list!

    RSS Feed

    All content ©2013
    Clark Kent Creations, LLC
Proudly powered by Weebly