
A New Walkway. How Do You Start?
I get asked all the time, "Just what does a new walkway or patio involve?" Well certainly there are a thousand options to consider; layout, types of material, natural or manmade, dryset vs. wet-set -- the list goes on. And as I tell everybody, each job is unique and hardly ever are two jobs the same. Each and every job has its own set of challenges and own opportunities. But I thought I'd walk everybody through the process of a new walkway project we recently completed. This is a wet-set (meaning set in a bed of mortar) walkway using irregular shaped pieces of primarily "Pocono Flag" with some mica schist and other local stones blended in to give the final product a full range of colors blending it to the site.
Layout and Prep Work
Once the overall footprint has been decided upon, the area is marked out and excavated accordingly. This is perhaps the most labor intensive portion of the project, but it also the step that will ensure its ultimate longevity. This project includes a 4" thick rebar-reinforced concrete pad which will serve as the foundation for the mortared flagstones. That means the excavation needs to be deep enough to accomodate a minimum of 2" to 4" compacted crushed gravel (more for a dryset application), the 4" concrete, a half inch to an inch of mortar, and the thickness of the stones (about an inch and a half here). Add it all up, and you get a minimum of 8" excavation, preferably even a little more. Don't skimp.
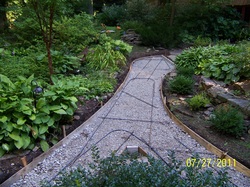
Once the excavation is complete, forms are set to accomodate the concrete, gravel is installed and compacted, and rebar is laid out (Pictured to left). When setting the forms, pay close attention to the level, making sure slopes will accomodate drainage run-off for the finished project.
Once the excavation is complete, forms are set to accomodate the concrete, gravel is installed and compacted, and rebar is laid out (Pictured to left). When setting the forms, pay close attention to the level, making sure slopes will accomodate drainage run-off for the finished project.
Concrete Footing
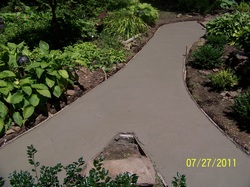
The concrete is poured inside the forms to provide the foundation for the flagstone walkway. Since this project will be covered with flagstones, the concrete surface does not need to be finished to make it look pretty. Just screed and rough-float. And make sure the rebar is lifted into the concrete as its being poured. The idea is for the rebar to be in the concrete to add strength, not just buried underneath.
Once the concrete is poured, one should wait at least a day or two, perhaps more depending on the weather conditions, before stones can start being mortared to the surface.
Once the concrete is poured, one should wait at least a day or two, perhaps more depending on the weather conditions, before stones can start being mortared to the surface.
Stone Layout
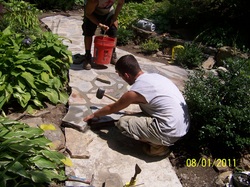
This project includes irregular shaped flagstones set together almost like a puzzle pattern. Stones are laid out on the concrete pad until the pattern is to our satisfaction. I usually like to lay out no more than 5 to 6 stones at a time, being careful not to get too far ahead of myself. A slight adjustment here, a little turn here, and all of the sudden those stones no longer fit. Get them set in the mortar, and then lay your next group.
For professional installation, we often need to make minor cuts or chisels to ensure the stones fit together to our satisfaction. If you're not experienced with cutting stone, please make sure you don't attempt anything that may put your health or safety at risk. And make sure all safety precautions are taken.
For a linear design of pre-cut squares and/or rectangles, the rough layout isn't as necessary, but a pattern should be in mind before starting to set the stones.
Setting the Stones
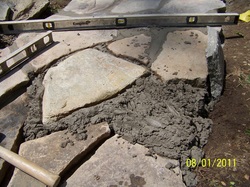
The concrete pad is cleaned off of any dirt or debris, and the stones are cleaned and sponged off to make sure all dust and debris is removed. The mortar is applied directly to the concrete pad and spread out accordingly based on the size and shape of the stone.
We typically use a Type S mortar when setting stones. Make sure the type of mortar you use suits the nature of the project you're attempting. Ask your hardscaping dealer if you have any questions.
Stones are then set in the mortar, and malleted down firmly to ensure a solid bond. Even though the level was checked during the concrete footing installation, it's always a good to double-check each and every stone during the mortar process. One little mistake and you're opening yourself up to potential drainage problems.
More Setting of the Stones
The process continues as the pathway takes shape. As stones are laid and mortared in place, the joints are smoothed out and washed down with a sponge. Don't leave mortar smears or clumps on the flagstones, they may be hard to get rid of once the mortar sets.
While laying the stones, try to keep the joint widths consistent and to a minimum width. You want the finished project to show as much flagstone as possible, the mortar is just there to hold everything in place.
With a linear design of pre-cut flagstones, joints should be kept consistent at approximately 1/2". For irregular shaped stones such as those pictured, joint widths may open up a bit based on the shapes of the stones.
The Finished Product
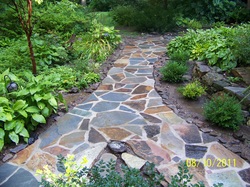
After completing the installation process, the walkway is left untouched for a minimum of three days to allow the mortar to firmly set and cure. The final step is a mild acid wash meant to remove the chalky white film that has accumulated on the stones as result of the installation process. Acid wash products vary, please be sure to follow the instructions carefully.
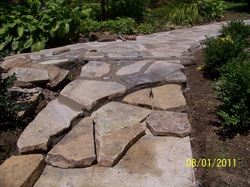
After completing the acid wash, the true color of the stones is brought to life, and you'll have a walkway that you can enjoy for years to come!
After completing the acid wash, the true color of the stones is brought to life, and you'll have a walkway that you can enjoy for years to come!
Contact:
Clark Kent Creations, LLC
Design and Construction to Maximize your Outdoor Experience
Serving the Delaware County Region of Pennsylvania
707-290-9410
[email protected]
Design and Construction to Maximize your Outdoor Experience
Serving the Delaware County Region of Pennsylvania
707-290-9410
[email protected]
All content ©2013 Clark Kent Creations, LLC