
Stone Steps, The How-To Process
Similar to my many walkway and patio projects, I also have done a fair amount of new steps. After all, what good is that new pathway if you can't get up to the front porch. And like every project, the first step (no pun intended) should be to identify your preferred materials. Whether it's a new set of wood steps to turn that isolated balcony into a useable deck, or a new set of stone steps to match the foundation, we offer a wide range of options to choose from. This is a step-by-step primer on building a new set of stone steps, from a recent project we completed. Hope you enjoy!
Getting Started
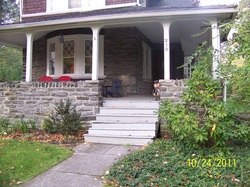
Identify just where you want the steps built. In this case our site was a grand residence with a massive stone foundation and front porch, with an existing set of wood steps that were literally falling apart. Our mission: To replace them with a new set of stone steps and sidewalls matching the stone foundation.
Once the layout is determined, the next step is to calculate the number of steps and riser height. It is important for both comfort and safety that the riser heights are consistent. Ideally the riser height should fall somewhere around 6" to 7". But every case is unique, so heights may vary. Measure the height difference from the upper surface (the porch in this case) to the lower surface (the path) and divide by your desired riser height. This will determine your number of steps. You're ready to start!
Once the layout is determined, the next step is to calculate the number of steps and riser height. It is important for both comfort and safety that the riser heights are consistent. Ideally the riser height should fall somewhere around 6" to 7". But every case is unique, so heights may vary. Measure the height difference from the upper surface (the porch in this case) to the lower surface (the path) and divide by your desired riser height. This will determine your number of steps. You're ready to start!
Layout and Prepping for Concrete
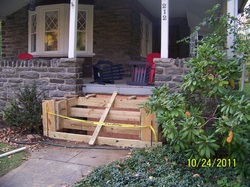
Once we completed the demo of the old wood steps, we begin by constructing the forms for the new concrete foundation. Pay careful attention to your slope and grades. Ideally you want just a bit of slope towards the bottom step to allow any water to drain off the steps. And make sure you excavate deep enough below your local frost lines. Consult your local building codes, depths vary based on climate.
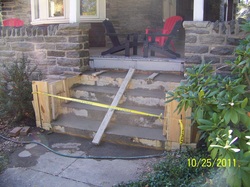
For this pour, we used just over 3 yards of concrete. That's nearly 6 tons of concrete! Make sure to reinforce your forms accordingly. My general rule is to reinforce it as much as possible, and then when I'm done to reinforce it some more. The last thing you want is to blow out a wood form during the pour. As with any concrete project, it's always a good idea to add some metal reinforcement inside the concrete. There's rebar inside those forms staked vertically inside the sidewalls, across each step horizontally, and diagonally front to back just below the riser forms.
For this pour, we used just over 3 yards of concrete. That's nearly 6 tons of concrete! Make sure to reinforce your forms accordingly. My general rule is to reinforce it as much as possible, and then when I'm done to reinforce it some more. The last thing you want is to blow out a wood form during the pour. As with any concrete project, it's always a good idea to add some metal reinforcement inside the concrete. There's rebar inside those forms staked vertically inside the sidewalls, across each step horizontally, and diagonally front to back just below the riser forms.
The Concrete Foundation
Concrete is poured inside the forms and rough floated to provide a flat surface upon which the stone will be mortared. Once the concrete is poured, step away from the project for at least a day or two, possibly more depending on the time of year and weather. Remember, this is just a foundation for the stone, so "finishing" the concrete is necessary. Just make sure the concrete is floated to be consistent with the grades set when the forms were being constructed.
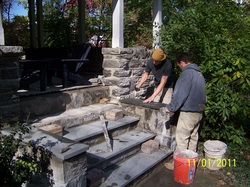
Vertical Surfaces
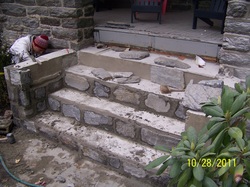
Once the concrete is set and the forms are removed, you're ready to begin mortaring the veneer stones. Start with all the vertical surfaces, beginning at the base and working your way up. That includes the risers, sidewalls in this case, and any other vertical surfaces that your design may include. We like to use a Type S mortar. For more information about mortar types, consult your local masonry supplier.
Natural Stone Veneer
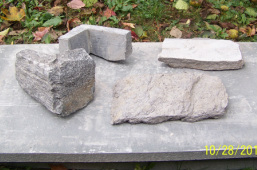
There are an overwhelming number of veneers available, and ultimately the decision of which one to use depends on your personal taste and budget. For this example we used QuarryCut Brand natural stone veneer, selecting a mica schist stone to match the home's stone foundation. These pieces have been cut to provide a smooth surface on which to mortar the stones to the foundation, keeping the front surface natural. Note the corner pieces designed to give the finished project a solid look with no joints at the corners.
In addition to natural stone veneers of many types, manmade imitation stone veneers are also available. Look around for the style and veneer type that's right for you and your project.
In addition to natural stone veneers of many types, manmade imitation stone veneers are also available. Look around for the style and veneer type that's right for you and your project.
Treads and Caps
Once the veneer stones have been set on the vertical surfaces, it's time to set the treads and caps on the horizontal surfaces. For this project we used full width bluestone treads, again set on a bed of Type S mortar atop the concrete foundation. Here on the east coast, bluestone or graystone is probably the most readily available, commonly used and affordable natural stone to choose from. If you come from another part of the planet, then other local stones may be available as well. Again, check with your supplier to see what's right for you.
The Finished Product
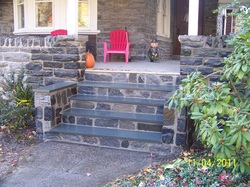
Once the mortar has set for a minimum of three days, the final step is a mild acid wash to remove the chalky film and bring out the true colors of the stones.
Voila! Your hard work is rewarded with a new set of steps! Enjoy.
Voila! Your hard work is rewarded with a new set of steps! Enjoy.
Contact:
Clark Kent Creations, LLC
Design and Construction to Maximize your Outdoor Experience
Serving the Delaware County Region of Pennsylvania
707-290-9410
[email protected]
Design and Construction to Maximize your Outdoor Experience
Serving the Delaware County Region of Pennsylvania
707-290-9410
[email protected]
All content ©2013 Clark Kent Creations, LLC