 Common Brick Patterns
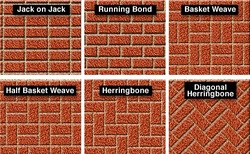
 The main focus of last week’s post was to discuss orientation of bricks – the way they’re set lengthwise, height-wise etc. This week I want to talk a little bit about the patterns that can be created using bricks.
Before we begin discussing the patterns, I do want to revisit brick dimensions. As we’ve established, a basic brick measures 4” x 8” x 2.5”. A key element to recognize here is that the width (4”) is exactly half of the length (8”). That sets up perfectly for some of the basic patterns.
Bricks used for paving are often called “paver” bricks (not to be confused with paver stones – a totally separate material). Paver bricks are designed to measure a true 4” x 8”, allowing for tight joints with no spacing in dryset applications.
Why is it important to note this? Because there are other brick dimensions that are meant to be used in wet-set applications where joint widths come into play. “Modular” bricks measure approximately 3 5/8” x 7 5/8”, allowing for
joint spacing, and “standard” bricks measure roughly 3 5/8” x 8” allowing for joints in one dimension. Additional sizes are also available based on your design and installation. I’ll get back to these size bricks later in the post.
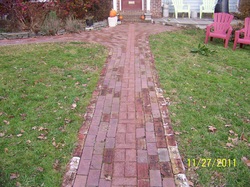
 A Custom Running Bond Pattern
 Similar to the running bond, the jack-on-jack allows for continuous seams running not only lengthwise, but across as well. The important part to keep in mind when setting this pattern is to make sure all of your lines in both directions line up and stay straight. You’re basically creating a grid of bricks, and the eye will pick up any slight imperfections to the grid.
 Jack on Jack
 The last of the basic patterns is the herring bone. There’s a variety of ways of describing this pattern – I’ve always thought of it as sets of corresponding steps running vertically and horizontally. The truth of the matter is the chart at the top will probably do the pattern more justice than me trying to describe it verbally. It’s not an overly complicated pattern, but again it’s important to make sure the brick dimensions are true, and the lines stay straight. I like this pattern because the eye is drawn not just to the linear x and y axis, but also to the diagonal nature of the bricks and the way they’re set.
Now, about the standard and modular bricks I mentioned earlier. As you can tell from the patterns and descriptions, it is important that our brick dimensions match up to keep the patterns straight and true. Two 4” dimensions = one 8” dimension. That works great for a dryset application when there are no mortar joints between bricks.
But what happens when we add a mortar joint to the end of each brick? Let’s try it and find out – two 4” bricks, plus one ½” mortar joint (between the two bricks) equals 8.5”. One 8” brick with no joint equals 8” Not equal.
That’s where the modular bricks come in. Remember the modular dimensions? 3 5/8” x 7 5/8”. If you’re setting the bricks in a wet-set fashion, and plan to include mortar joints it’s important you take this into account when purchasing your bricks. Let’s try the same example as above, but using modular bricks this time. Two 3 5/8” bricks, plus one 3/8” mortar joints equals 7 5/8”. One 7 5/8” brick with no joint equals 7 5/8”. Ba-da-boom, good to go.
So that’s about it, perhaps a bit too much math there at the end for a Friday morning, but that’s what we’re here for, right? Even if you’re not quite sure what pattern to go with, or how all those bricks will fit together in a nice clean pattern, give us a call or drop us a line. We’ll be glad to help!


 RSS Feed