Clark Kent Creations -- Swarthmore, PA. Landscape Design and Construction, Hardscaping, Patios
  • Home
  • Services/Photos
    • Hardscaping >
      • A Flagstone Walkway -- The Process
      • Stone Steps -- The Process
    • Wood Fences
    • Exterior Carpentry
  • About
  • Community

Hardscaping Series Part 5:  Manmade Pavers

10/26/2012

0 Comments

 
If you’ve been following along in my hardscaping series, then first of all thank you.  It’s good to know you’re still with me and coming back for more, and you haven’t gotten fed up with math problems and technical jargon, not to mention my witty rapport.

Secondly, you’ve probably noticed that all of my recent posts have had to do with natural flagstone, and I haven’t touched on some of the other materials available.  That’s true, although not because we don’t work with other materials or that I’m not interested in sharing my knowledge.  No, most of the recent posts have had to do with flagstone because in my experience flagstone offers the most in terms of needing to make decisions.

But I would be remiss in my series if I at least didn’t mention the topic of manmade paver stones.

Picture
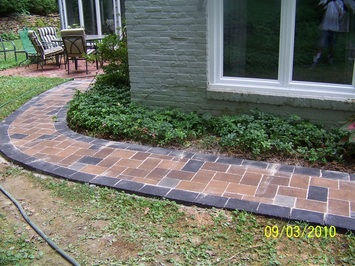
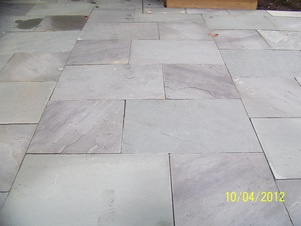
EP Henry Coventry Paver Stone Walkway
Manmade pavers are an incredibly durable, slightly more affordable and, depending on your point-of-view, equally attractive material that are versatile enough to be used for patios, walkways, and driveways.  Available from a number of different manufacturers, they are typically available in a wide range of sizes, colors and textures to fit with most landscape themes and personal taste options.

So how do they work? Pavers are designed to be installed in a dry-set technique.  The process begins with approximately 8” to 10” excavation in the desired footprint, approximately 6” of compacted crushed gravel a bed of coarse leveling sand, with the pavers installed atop the sand bed.  The edges are held in place with edge restraints to prevent the perimeter stones from migrating, and the interior stones are locked tightly together utilizing their inter-locking design.

In freeze-thaw climates like ours, pavers can make a great choice for hardscaping, as the installation allows some flexibility without the risk of cracking.  They can also be lifted if need be to access underground utility lines or install
irrigation or wires if and when your needs change. Individual pavers are typically designed with a compressive strength of nearly 7000 psi or more depending on the manufacturer, nearly twice that of a standard concrete installation.  

What that means for you is they will hold up without breaking, even in a driveway application with heavy vehicular traffic.

And if you spill that plate of greasy barbecue on your patio or your old truck slowly leaves an oil stain in your driveway, individual pavers can be lifted and replaced without having to spend hours trying to clean up a mess or spending big bucks demo’ing and replacing a large section.

And from an installation point of view, what I really like about them is that they are all manufactured to precise specifications, meaning they fit together cleanly and quickly, with very little cutting or the need to accommodate various thickness of stone. What that means from a client perspective is cost-savings on labor.

As for overall installation costs, pavers are comparable to dryset clay brick, a dollar or two per square foot less than dryset flagstones and about $7-9 per square foot cheaper than wet-set flags.  Of course, prices may vary slightly depending on the style of pavers you go with or the overall scope of each individual project, but in the grand scheme of things they are certainly an affordable option.

So there you go. Paver 101.  Next week we’ll wrap up my hardscaping series with a quick overview of the options available.  Until then, happy hardscaping!

0 Comments

Hardscaping Series Part 4:  Grading and Drainage

10/19/2012

23 Comments

 
A successful hardscape installation includes many aspects, a large number of which may not be clearly visible in the finished product.  Excavation, base preparation, and drainage allowances to name just a few.  I’d like to focus this week’s post on the subject of grading your hardscape.

First of all, just what exactly is grading?  Grading is simply the controlling or manipulation of slope to ensure that surface drainage runs in a specified direction.

In otherwords, when you go to hose off your new patio, or it rains on your new walkway the water flows in a desired direction, typically away from the house, so it doesn’t puddle or collect on the hardscaping surface.

Now most lay people will tell you that they want their patio to be flat.  Of course.  Nobody wants to feel like they’re on the slopes of Mt Kilimanjaro as they’re grilling out or kicking back on their Adirondack chairs.

But a perfectly flat patio will collect water, and just as you don’t want to be enjoying your patio on a slope, you also don’t want to feel like you’re trudging through a pond as you enjoy your patio.

Picture
This patio has a bit too much slope!
To alleviate puddles and drainage issues is where grading comes in.  The generally accepted pitch for proper drainage is ¼” drop in slope per one linear foot of run.  In otherwords, for a 12’ long patio, you would want the “bottom” edge to be approximately 3” below the upper edge.  Any more pitch than that and your patio will feel a bit “slopey”, to paraphrase a colleague of mine.

Now I will say that walkways can get by with a bit more slope than patios, based on the surrounding grades.  Some people don’t mind having a bit of ramp to their walkways, and indeed a ramp or slope can be more accommodating to disabled individuals than a set of steps. At that point it really becomes a bit of personal preference.  But just be careful – too much slope and things can get a bit slippery when the ice and snow arrive.
 
In fact, even on patios I try to cheat just a bit by reducing the slope just a tad.  But you have to be careful if you’re trying this yourself.  Any less slope than 1/8” per foot and you will have drainage issues.  I would draw the line around 3/16” per foot at the bare minimum.  And if the stone you’re using has a bit of a textured natural cleft to it, you’ll be prone to getting some little “micro” puddles in the nooks and crannies of the stone – better to err on the side of ¼” per foot.
 
All of the above having been said, on a relatively flat lot the grading can be fairly simple. Identify the natural direction the water flows, and slope your patio in that direction.  What you need to be careful of is not to slope a patio in a direction that will result in water puddling or pooling in other areas of the yard. And you need to be careful that the patio or walkway placement won’t act as a dam to water flowing across the yard.
 
Where things get tricky is when you have a sloped or uneven yard.  In these instances even the simplest of hardscaping projects can incur additional costs in the form of retaining walls, drainage plans, code compliance, permits, etc.  If you don’t have a whole lot of experience, then I wouldn’t try to this yourself.

As you’re formulating your drainage plan in conjunction with setting the grades, just make sure you know where the water will go once it has shed off the patio.  Just because it drains off the patio doesn’t mean it won’t create a puddle somewhere else in the yard.  And you need to be careful that your project isn’t creating a new headache for your neighbor.  Plan your work and work your plan.

Picture
Surface drains can help redirect water as necessary
If you live in a bowl, or you have poor soil percolation, or just can’t figure out how to deal with the water flow, there are a number of alternative solutions out there depending on the scope of your site – mechanical pumps, retention ponds, and dry wells to name a few.  But like the retaining walls mentioned above, if you’re not sure what you’re doing then this isn’t an area to mess around.  In fact more and more municipalities are beginning to require drainage plans in conjunction with issuing permits for hardscaping projects. And the penalties for irresponsible management of your stormwater are becoming stricter every year.
 
So no, grading and drainage certainly aren’t the most glamorous aspects of your upcoming hardscaping project (unless you have some wacky turn-ons, but hey, who am I to judge?), but it is perhaps the most important in terms of dealing with the overall functionality of your yard, not to mention the costs of fixing these problems.
 
Next week – we’ll take a quick side detour to discuss man-made pavers as our hardscaping series continues.

23 Comments

Hardscaping Series Part 3:  Butts and Joints (This is Still a Family Site, Get your Head Out of the Gutter!!)

10/12/2012

1 Comment

 
As my hardscaping series continues, I promised last week that I would touch on the topic of “butt” joints, or “near-zero” joint widths, so here goes…

As contractors we have to be somewhat well-versed in math, whether we like it or not.  Thankfully I always did reasonably well in my math classes throughout high school and college, particularly geometry.  So I’d like to take the opportunity this week to get my Pythagoras on, so to speak.

Don’t be scared.  The lesson really pertains more to flagstone installation techniques than anything else, and if you follow along you’ll realize it’s really more basic arithmetic than anything else.

Lets start by briefly going over the available dimensions of pre-cut flagstones.  Most suppliers sell their flagstone in intervals of 6”, starting with 12”.  So that would be 12”, 18”, 24”, … etc.  Simple enough so far, eh?

This allows for the stones to be laid out in a linear pattern with the joints matching up – two 12’s equal a 24.  An 18 plus a 12 equals a 30, etc.  Notice in the below illustration how the various dimensions allow for a tight uniform installation.

Now lets take a moment to think about how flagstone it typically laid out.  In most cases, certainly not all though, as the stones are laid they include a ½” mortar joint.  Still with me?

Most suppliers recognize that the installation will want to include a consistent joint width, therefore they sell their flagstones pre-cut to allow for the joint width.  In otherwords, the 18” dimension actually measures 17 ½”, the 30” dimension at 29 ½”, etc.  Add in the ½” mortar joint and we’re right back to where we were with the layout.

But hold on, you may be saying.  “That dryset installation that we were interested in doesn’t include mortar joints. What then?  Do we still need the ½” gaps between the stones?  Are the stones available in true dimensions without the ½” allowances?”

First, yes, I have seen the stones available in the true dimensions.  But not commonly.  You’re going to have to do some searching and it most likely will take some time to find, and possibly some additional special order costs.
Picture
Our Four-Stone "Segment"
But you can still lay the stones without leaving any gaps, even if they are pre-cut a half-inch shy. It just takes a little thought and planning.

The key is to think in segments, or units.  Lets say we’re doing a 324 square foot patio, measuring 18’ x 18’.  For this lesson we’ll keep things simple, so lets focus on one small section – say we have 4 stones – two 18” x 30” (actually 17.5’ x 29.5), and two 18 x 24 (17.5 x 23.5).  Even with the half-inch allowances, we can line these stones up to make a tight rectangle measuring one inch shy of 3’ x 4.5’ (see adjacent diagram), or approximately 13.5 square feet.

Picture
Segments Repeat Themselves to Create a Patio
Now lets take that same 13.5 square foot pattern and repeat it, 6 times across by four times down. Voila!  There’s our 18 x 18 patio (minus a few inches) with no allowances for joint widths utilizing the half-inch shy dimensional stone.

Now any experienced mason or hardscaper will tell you its always a good idea to break up your joints. You don’t want continuous seams running the full width of your patio.  Unfortunately with this method you will need to have some continuous seams running in one direction – it’s just the nature of the math.  But if you orientate the seams in a direction that will draw you to something else, or stretch out the space, you can actually use those seams to your advantage.

So now that you’ve got the basics of “thinking in segments”, start playing around a bit.  Maybe you can come up with a larger 6 or 8-stone pattern that can be repeated without continuous joints.

Experiment, and have some fun.  And if lugging large stones around to play with math dimensions isn’t your idea of a good time, you can always play around on paper first.  Or I know a really good hardscaping contractor you can call.  

1 Comment

Hardscaping Series Part 2: Wet-set vs. Dry-set Installs

10/5/2012

4 Comments

 
Last week I introduced our series on decisions that need to be made in conjunction with planning for a new outdoor living space, and I discussed the differences between a linear flagstone pattern vs. an irregular pattern.

This week I’d like to continue the series by discussing the differences between a wet-set installation and a dry-set installation, and the advantages and disadvantages of each.

First, a quick lesson.  Hardscaping projects generally fall into one of two basic categories; Wet Set or Dry Set.  While there are a lot of options to consider when selecting materials, no matter what material you choose they will be set using one of these two techniques. Wet set refers to setting the materials in a bed of mortar.  (The mortar was mixed and was wet when we set the stones, get it?)  Dry set refers to setting the stones atop a bed of compacted crushed gravel and sand.  No mortar, no concrete, thus the “dry” label.

In either case, the process begins with excavating out the footprint a minimum of 8”.  What happens from there depends on the technique.
Picture
Wet Set Installation in Progress
A wet set application includes a base layer of gravel to separate the native soil from the new install.  Forms are then set at the necessary grade along the perimeter of the new install, be it a path, patio, or combination of the two.  A 4” thick rebar-reinforced concrete pad is then installed to serve as the base.  This pad is typically rough-finished, as the finish will be concealed by the eventual installation of the flagstone.  The grade of the concrete should be approximately 2” below the desired finish grade, to accommodate the flagstone and mortar thickness.

Once the concrete has set, the perimeter forms are removed and flagstones can begin being mortared to the surface.  When all is said and done, you will have a solid, rigid, impermeable surface.  It is long lasting and durable, however it can be more difficult and/or costly to repair or reset if necessary.  The technique is also subject to any impermeable surface requirements that many municipalities are requiring for stormwater management purposes.

On the other hand, a dry set application includes approximately 6” of compacted crushed gravel as the base, in lieu of a concrete foundation.  Once the base gravel has been compacted (typically compacted in a series of three-inch lifts), a thin layer of sand is spread evenly across the gravel base. Flagstones are then set atop the sand bed, allowing for a slightly permeable installation that offers some degree of flexibility.  We typically use thicker heavier stones on dryset installations, as the weight of the stones offers strength and weight to hold the stones in place.

Picture
Dry Set Installation with "Butt" Joints
Because of the flexible nature of the installation, dry set installations are less likely to crack, and can be easily lifted and re-set if necessary.  The flexible nature is slightly more prone to frost heaving and settling however.

As for costs, typically the dry set technique runs about $5 to $6 cheaper a square foot then the wet set technique, assuming the stone selection is comparable.

So again the question becomes which one is right for you, and again the answer is that it depends on your personal taste (I’m not going to make all the decisions for you, you know!).  I can tell you that we don’t do too many irregular shaped dryset installations, mostly due to the wider joint widths and the potential of joint material washing out.  But we have done them, and we can address the joint material issue as well if that’s where your heart truly rests.  Linear designs lend themselves quite nicely to either dry or wet set applications, and you do have the option of “butt” joints (meaning near-zero joint widths) on the dry-set option as well.  More on that option in an upcoming post for the series.

In fact, maybe I’ll touch on that last nugget in next week’s post…

4 Comments
    Picture

    Company

    Clark Kent Creations, LLC is a full-service landscape construction company servicing the Pennsylvania communities of Delaware County, Chester County, The Main Line, and the University City, Art Museum, and Manayunk/Roxborough neighborhoods of Philadelphia.  In addition to this blog page, additional information regarding the company and our services can be found on the subsequent pages of the site.
    Picture

    Author

    Clark Linderman is the president of Clark Kent Creations, LLC, a landscape construction company based in Swarthmore, PA.  He is a proud graduate of the University of Michigan.  In addition to his passion for all things outdoors, he counts Michigan football, Phillies baseball, Superman memorabilia, Memphis R&B music, and good craft brews among his many interests.  He currently resides in Swarthmore with his wife, Sheila, two sons, his dog Krypto, and a really, really messy garage full of work supplies and toys.

    Picture
    Contact Us:
    Clark Kent Creations, LLC
    Swarthmore, PA
    Design and Construction to Maximize Your Outdoor Experience

    707-290-9410
    clark@clarkkentcreations.com
    Serving Delaware County, PA

    View my profile on LinkedIn

    Categories

    All
    Business And The Front Office
    Carpentry
    Environmental Issues
    Fencing
    Guest Posts
    Hardscaping
    Inspiration And Design Ideas
    Places & Local Interest
    Ramblings
    Seasonal
    Snack Break
    Water Features

    Archives

    July 2015
    September 2014
    February 2014
    January 2014
    December 2013
    November 2013
    October 2013
    September 2013
    August 2013
    July 2013
    June 2013
    May 2013
    April 2013
    March 2013
    February 2013
    January 2013
    December 2012
    November 2012
    October 2012
    September 2012
    August 2012
    July 2012
    June 2012
    May 2012
    April 2012
    March 2012
    February 2012
    January 2012
    December 2011

    Like my Blog?

    If you like the content of my blog posts, here are a few other blogs that I check in on regularly:

    Stone Soup:  A Master Stone Mason shares his craft.

    Arcadia Gardens:  Plenty of great tips about horticulture and landscape design.  A great blog (even though she's an MSU Spartan!)

    Revolutionary Gardens:  A Virginia-based landscape designer shares his work and ideas.

    Rockin Walls:  A certified dry stone mason from Maryland shares his projects and tricks of the trade

    If you have or know of a blog that you think I might be interested in, just let me know.  If I like it I just may add it to the list!

    RSS Feed

    All content ©2013
    Clark Kent Creations, LLC
Proudly powered by Weebly