Clark Kent Creations -- Swarthmore, PA. Landscape Design and Construction, Hardscaping, Patios
  • Home
  • Services/Photos
    • Hardscaping >
      • A Flagstone Walkway -- The Process
      • Stone Steps -- The Process
    • Wood Fences
    • Exterior Carpentry
  • About
  • Community

Copper Fence Post Caps.  The New Normal.

9/27/2013

0 Comments

 
I want to use this space this week to make a brief announcement regarding our fencing services – specifically about fence postcaps.

As many of you know, we offer custom wood fence construction services in a wide variety of designs and styles.  Some of these are basic designs, some are custom one-of-a-kind creations.  But in all cases these are solid, well-constructed fences that are built to last.  Not your basic pre-fab big box-store panels.

Every design is different, and in some cases these designs include post caps as ornamental pieces atop each fence post.  Many of our fences don’t have the need for postcaps based on the design, but for the ones that do, we’ve typically offered wood sleeve caps that simply slide over the top of the post, and are fastened using a pair of simple finish nails.
Picture
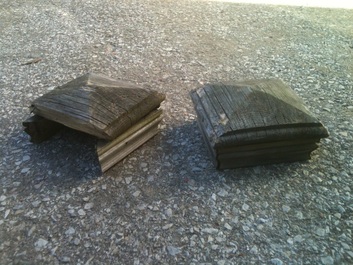
Two-year-old removed postcaps. Already falling apart
I've been offering this service since I first started in the business some 13 years ago.  With nary a problem at all.  Until about two years ago.

I received a call from a very satisfied client who wanted to tell me how thrilled he was with his fence – except for one thing.  Some of the postcaps had buckled and the trim was falling off.

I stopped over to take a look, and sure enough, the trim piece had completely curled out, ripped away from the nail fastener, and was in the process of falling apart.  This was the case on several of the
caps.

I quickly replaced the caps at no charge.  “Hmmm. Bad batch of lumber” I thought to myself.  It happens sometimes.  Wood is a natural product after all.

I thought nothing more of it until a few months later when I got a similar call from another client.  “Love the fence, not liking the caps” was the point of the call.  Wow.  Well, the fences were constructed in roughly the same time period, so I just assumed the caps must have been from the same bad batch.  Again, I replaced the caps at no extra charge.

Until a third call. Same thing.  No longer a coincidence at this point.

So I quickly began looking at the supply of caps, wondering what was going on, and looking for a better option.  I tried a few different suppliers, a few different brands.  The results were all the same.

But why now?  Why not 10 years ago?  Those original caps I installed some 10-plus years ago are, in many cases, still perfectly functional today.

Picture
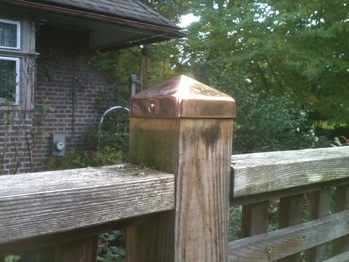
And the new copper replacement caps
It basically boils down to the lumber supply.  As lumber demand heats up, the supply diminishes.  And in a haste to keep the supply available, many manufacturers are using inferior or new-growth wood.  The wood often isn’t aged properly, or its not fully grown and ready to be used.

And the result is often wood that curls or splits or doesn’t hold up.

And I for one am tired of dealing with it.

That’s why effective immediately I will no longer be installing wood postcaps as part of my fences.
 
Fortunately however, I have found a suitable replacement at little to no added cost.  I’ve been able to source solid copper pyramid caps at little to no extra cost than the original wood caps I offered.  These are attractive, will develop a natural patina over time, and should hold up for as long as the fence.  

And if they don’t?  Well as always, I’m here to stand by our work.

Because ultimately, it’s the client satisfaction that will make or break the business.  And your satisfaction is quite important to me, personally.

So that’s why we won’t be installing the wood caps any more.

But I’m quite sure the copper caps will be a quite suitable replacement, if not an upgrade.

If you’d like to see a sample copper cap, give us a call, and I can show you one in action.

0 Comments

Wet-Set Flagstone Walkway, Stone Steps and Stone Border Wall

9/20/2013

4 Comments

 
PictureThe Completed Project
Another quick project update this week, this one involving a rebuild of a stone driveway border wall, a replacement set of stone steps, and a new wet-set flagstone walkway.

I was first contacted by this homeowner to discuss rebuilding an old stone wall that bordered the edge of their driveway.  The old wall was falling apart, a combination of substandard original construction, having been clipped by vehicular traffic more times than is recommended, and some of the old original schist stone splitting and deteriorating due to moisture.

As we spoke about the wall, we also identified that the steps leading to the side door were quite awkward -- two risers each measuring 10"-plus, treads that were narrower than the risers were high, and constructed from uneven field stone.  Not an easy approach. So we were contracted to rebuild the wall and replace the steps.

Picture
Steps Before -- Ugh!
Picture
And After. Still Need to Replace the Path Though ...
Picture
The wall was disassembled carefully, setting aside stone that could be reused in the rebuild, and discarding stone that was deteriorating or unusable.  We dug out the trench for the wall footing, installed a footing of compacted crushed gravel, and began laying the stone.

Additional stone was purchased from a local quarry to replace the stone that was discarded. The wall measured on average less than a foot high, but we still wanted to make sure an adequate foundation was in place.  That includes about 4" of compacted crushed gravel, plus about 6" of buried stone -- much more than was in place on the original build.

For the steps, we wanted to include natural stone to match and complement stonework on the house.  But getting rid of those uneven treads was important.  So we went with a concrete foundation, with mortared natural stone veneer on the sides and risers, with full length bluestone treads.  The rebuild included installing an additional step, now instead of two 10" risers we included three 7" risers.  Much more comfortable, and we widened the depth of the treads to 14".

Picture
The homeowner was thrilled with the results.  Well kind of.  The wall rebuild looked great, the steps were even and comfortable to walk on, even the old wood trim that was rotting out below the door threshold was replaced. 

But there was a problem.  Now that the wall and steps had been replaced, the muddy homeowner DIY pathway connecting the drive and the steps stood out like a sore thumb.

Luckily, we knew just the people to help with the pathway replacement -- us!  We went with a wet-set bluestone linear-shaped walkway to match the treads on the steps. 

The old pathway was lifted and set aside for the homeowner to use as stepping stones through their gardens.  We ID'd the desired footprint for the path, excavated accordingly, poured a concrete foundation, and mortared the flagstones to the surface.

What a transformation!  Now the homeowner was officially thrilled, wall, steps, walkway and all.

Is there a part of your yard that needs a transformation?  Give us a call or shoot us an email, and see what we can do for you! 

4 Comments

Making a Grill Out of a 55-Gallon Drum.  A Hybrid Propane Wood Smoker Project

9/13/2013

11 Comments

 
PictureMe and My New Grill!
This is one of those projects that’s been on my life bucket list for some time – building my own grill out of a reclaimed 55-gallon drum.

The seed for this project was actually planted some time ago.  With a wife from the barbecue capitol of the world, Memphis Tennessee, and a palate that seems to be constantly attracted to some of the world’s best street food, I’ve seen some awesome grills and smokers over the years. Grills on trailers for barbecue cook-offs, grills made from old beer kegs, gas tanks, even some made out of old cars.  Heck, even my own family on my mom’s side made some home-made grills on the banks of the mighty St. Joe’s river in Elkhart, IN.  So it’s kind of in the blood.

PictureThe Unaltered Food-Grade Drum
So the idea had been festering for some time.  And when our old 13-year-old store-bought gas grill finally bit it a few weeks back, instead of trying some spot repairs and part replacements as I’ve done in the past, it was time to pull the trigger on the new grill.

Before I get into the how-to, I should share a bit about my grilling preferences.  With family lineage in Memphis and a taste for good barbecue, part of me is really drawn to the all-day, slow smoked, wood-fired smokers.

But the realist in me also realizes that I work and have about a billion responsibilities, so slow-smoking a rack of ribs on a Tuesday evening just isn’t in the cards. Slapping burgers on a propane grill fits much better into my schedule.  So what to do?  I wanted the ability to slow-smoke some good ‘cue on a football Saturday afternoon, but also to whip up some simple hot dogs before soccer practice on Thursday night.

So the solution?  A hybrid, with enough room on one side to throw in some pieces of wet hickory when the time allows, but with a propane set-up on the other side for those weeknight quick-and-easy’s.

What you need:
One 55-gallon drum (sealed ends, food grade)
A grinder or metal cutting saw
Three door hinges
Approximately (30) ¼” x 1” hex bolts, with nuts and washers
Approximately 6’ of 1” angle-iron
One wood finial fence postcap
One propane burner replacement piece
One propane burner heat shield
Propane ceramic briquets
Replacement grill grates to fit

Picture
Mark Your Lid Locations
Picture
A Properly Safety-Compliant Helper
PictureThe Empty Barrel on the Stand
What to do:

First, get your hands on a 55-gallon drum.  If you have the time and you’re diligent in your search, you can probably find a free one from an automotive service center or food processing plant.  My time and patience were lacking, so I found one on Craigslist for $20.  I could have paid $10, but splurged for the “Food Grade” barrel, as I really wasn’t in the mood to be tasting oil on all my food for the next few years.  Make sure it is metal, not plastic (duh).  Also make sure it is
“sealed” meaning the circular ends aren’t removable.

Next, mark out and cut your door opening.  There’s a few ways I could have done this, but I chose to keep the circular ends intact, partially not to compromise the stability of the barrel, and partially to keep options open if I ever want to install an upper grill rack down the road. I marked out the door with masking tape to ensure good straight lines, and used a grinder to make the cuts.

Once the door panel is cut out, attach the three hinges to door using the ¼” bolts.  Mark your hole locations, pre-drill holes, and tighten the bolts using the nuts and washers.  Once all three hinges are secured on the door, hold in place and mark the hinge locations on the barrel itself.  Pre-drill your holes (need to be precise with the locations so everything lines up), insert bolts and attach the hinges.  

You’ll also want to easily open your door, so it will need some handles.  You don’t want metal handles, as they will conduct the heat. There were some wood cabinet handles at the box store that could have worked, but they weren’t meant for outdoor use, so I was concerned about rot.  So I improvised again, using a pressure-treated finial postcap.  I simply drilled a hole through the door and secured the knob with a small lag screw from the inside.  I used one, centered on the door, depending on preferences you may want two.  You now have a functioning door.

PictureAttach Door with Hinges and Install Knob
The stand.  I have to admit, I cheated on this one bit, as the stand from our old store-bought grill was still perfectly functional, and the barrel fit quite nicely on the frame.  If I had to build my own stand, I probably would have used threaded metal pipes to construct a simple stand.  But I didn’t have to, so there.  My guess is you could probably find something at your house that works – shopping carts, old metal shelving, old trailers – you’ll figure it out.

I now placed the barrel on the stand sideways with the door on top, circular ends on either side, and drilled a few drain holes in the bottom of the barrel.  This will help for airflow, and allow for drainage if you ever leave the grill open in the rain, or spill barbecue sauce into the grill.

PictureCut Hole in Bottom for Propane Access and Drainage
If you’re just going the wood route, you can skip this step, but if you’re retrofitting some propane parts, you’ll need to cut a small opening in the bottom of the barrel (amongst the drain holes) to allow for the burner to be installed, and the feeder pipes to access the main propane supply and control knobs.  Again, I used my grinder to cut out a hole roughly 3”x4” to allow both feeder pipes to fit through comfortably.  
 
The big box stores sell a wide assortment of after-market replacement parts for propane grills. Just a find a burner that fits the barrel, and a heat shield that fits the size of the burner.   (The heat shield prevents the flame from torching the food, redistributing the heat to the ceramic briquettes).

PictureThe Propane Burner, and Angle-Iron Grate Supports
You’re getting close now. All you’re missing is the cooking grate. I ended up purchasing two of the largest size grates I could find at the box store, but if you have access to any sort of metal working shop you can probably find some sturdy steel mesh that would work just fine.  Regardless of what you go with, get the grate first, as you’ll need it to install your bracing.

Place your grate down into the barrel over the propane burner apparatus.  Check for level both front to back and side to side.  Ideally, you should have about 4” between the top of the heat shield and the grate.  Once you position the grate into the location you want, mark the location of the grate on the inside of the barrel with a pencil.  Now remove the grate form the barrel.

PictureFire!! Inaugural Meal? ... Chicken Kabobs.
Take your angle iron, and cut two equal length pieces that will run the length of the barrel (3’ +/-). Now drill three ¼” holes through one side (flange) of the angle iron, one on either end and one in the middle. Hold your drilled angle iron piece up against the line you already drew on the inside of the barrel, and mark the hole locations.  This may require a helper to hold the piece, making sure your hole marks line up exactly with the holes on the angle iron.  Now drill the holes through the barrel itself, and fasten the angle iron to the inside of the barrel using the ¼” bolts.  Repeat for the front and back.  When you’re done, you’ll have two metal “shelves” running the full length of the barrel, both front and back.  Simply place your grate resting on both sides of the angle iron, and you are good to go!

I’m thrilled to cross this project off the bucket list for a number of reasons.  Go look at a box store or home center, and you’ll see a whole assortment of grills ranging from $300 on up.  The big ones that have enough space to do what I want (you know, that whole pig roast every red-blooded male dreams about …) start at $600 at least, and run far, far upwards of that number.  Mine?  About $65 for the barrel conversion, and about $55 for the propane burner equip. Not bad.  Plus, it’s way, way, way cooler in my opinion.

I still may make a tweak or two, and who knows, maybe I’ll even play around making a few more for some friends.  If I can squeeze it in between getting my grill on …

Interested in something like this for your outdoor living space?  Give me a call.  We’ll talk.

11 Comments

What is Hardscaping?  A Basic Primer.  Act Like You Know.

9/6/2013

0 Comments

 
PictureElements of Hardscaping -- Patios, Pergolas, Stone Walls, Boulders ...
I’d like to take a small step backwards this week and talk about what I’ve always viewed as a basic term – “hardscaping”.

Being a veteran of the industry, it’s sometimes easy to forget that not all clients or prospects are tuned in to the trends and knowledge that I’m exposed to on a regular basis. Sometimes I’ll even mention a term that I assume is common knowledge, only to be met with confused looks that tell me I might as well be speaking Russian.

One term that I throw around regularly is hardscaping.  To me this is a basic term that I just assume everybody is familiar with.  But gauging from the responses I’ve seen, not everybody is.

In fact, it’s the one word that I use regularly and even my MS Word program insists on trying to catch it as a spelling
error.

But it is a real word. And it is just what it sounds like – landscaping with hard materials.  Stone, brick, blocks, concrete, etc.

Much the way that The Jeffersons were a spin-off of All in the Family or Laverne and Shirley was a spin-off of Happy Days, hardscaping is a spin-off of landscaping.

Mention landscaping to a handful of people, and you’ll probably conjure up images ranging from lawn mowing to mulching to tree-trimming to patio construction to pond maintenance – quite a wide range of services.  In fact, when I mention our company works in the landscape industry, I’m often confronted with requests to plant shrubs or mow lawns.

So the term hardscaping was developed to specifically refer to the “hard” portion of your landscape. Stone walls?  Check.  Flagstone patios?  Check. Brick walkways?  Check.  Ornamental boulders?  Check.

And if you think about it, this makes perfect sense.  Does the horticulture expert at the local garden nursery have the in-depth skills or knowledge that will help with your stone patio construction?  Perhaps they’ll be knowledgeable with a few of the basics, but just as you wouldn’t necessarily trust a brick mason with picking out the best shrub selections for your shade garden, a plant expert won’t most likely have the skills and knowledge to deliver a successful patio construction.

So hardscaping has evolved into a somewhat separate industry within the industry, if you will.

And on the flip side, the term “softscaping” has evolved to separately describe the portion of your landscape that remains “soft” – the beds and plantings to be specific.

All that’s not to say that many contractors and companies don’t do both.  Many do, but usually the larger companies will have separate divisions that handle the hardscaping and softscaping portions of your landscape.  Much the way that many general contractors have separate crews that handle the basic framing vs the finish and fixture duties for a structure or dwelling.

There’s other “scapings” that have evolved as well.  Aquascaping is the side of the business that centers around ponds and aquatic plantlife. Xeriscaping (from the Greek xeros, or “dry””) centers around landscaping with little use of water.  Roofscaping is landscaping on your roof.  Stonescaping is hardscaping to the next level, dealing only with natural stonework.  The list goes on, you get the idea.

So the next time you’re talking with someone and they mention the word hardscaping, you can carry on and perhaps even respond by telling them about that new patio you just had installed.  You’re now officially in the know.

And if you call the right contractor, you can even brag about what a great job that locally-owned-and-operated, super-responsive, personable, attentive-to-detail, company Clark Kent Creations did installing your new patio.  :)

Give us a call.  A free consultation is just a phone call away.

But just don't ask me to mow your lawn ...  :)

0 Comments
    Picture

    Company

    Clark Kent Creations, LLC is a full-service landscape construction company servicing the Pennsylvania communities of Delaware County, Chester County, The Main Line, and the University City, Art Museum, and Manayunk/Roxborough neighborhoods of Philadelphia.  In addition to this blog page, additional information regarding the company and our services can be found on the subsequent pages of the site.
    Picture

    Author

    Clark Linderman is the president of Clark Kent Creations, LLC, a landscape construction company based in Swarthmore, PA.  He is a proud graduate of the University of Michigan.  In addition to his passion for all things outdoors, he counts Michigan football, Phillies baseball, Superman memorabilia, Memphis R&B music, and good craft brews among his many interests.  He currently resides in Swarthmore with his wife, Sheila, two sons, his dog Krypto, and a really, really messy garage full of work supplies and toys.

    Picture
    Contact Us:
    Clark Kent Creations, LLC
    Swarthmore, PA
    Design and Construction to Maximize Your Outdoor Experience

    707-290-9410
    clark@clarkkentcreations.com
    Serving Delaware County, PA

    View my profile on LinkedIn

    Categories

    All
    Business And The Front Office
    Carpentry
    Environmental Issues
    Fencing
    Guest Posts
    Hardscaping
    Inspiration And Design Ideas
    Places & Local Interest
    Ramblings
    Seasonal
    Snack Break
    Water Features

    Archives

    July 2015
    September 2014
    February 2014
    January 2014
    December 2013
    November 2013
    October 2013
    September 2013
    August 2013
    July 2013
    June 2013
    May 2013
    April 2013
    March 2013
    February 2013
    January 2013
    December 2012
    November 2012
    October 2012
    September 2012
    August 2012
    July 2012
    June 2012
    May 2012
    April 2012
    March 2012
    February 2012
    January 2012
    December 2011

    Like my Blog?

    If you like the content of my blog posts, here are a few other blogs that I check in on regularly:

    Stone Soup:  A Master Stone Mason shares his craft.

    Arcadia Gardens:  Plenty of great tips about horticulture and landscape design.  A great blog (even though she's an MSU Spartan!)

    Revolutionary Gardens:  A Virginia-based landscape designer shares his work and ideas.

    Rockin Walls:  A certified dry stone mason from Maryland shares his projects and tricks of the trade

    If you have or know of a blog that you think I might be interested in, just let me know.  If I like it I just may add it to the list!

    RSS Feed

    All content ©2013
    Clark Kent Creations, LLC
Proudly powered by Weebly