Clark Kent Creations -- Swarthmore, PA. Landscape Design and Construction, Hardscaping, Patios
  • Home
  • Services/Photos
    • Hardscaping >
      • A Flagstone Walkway -- The Process
      • Stone Steps -- The Process
    • Wood Fences
    • Exterior Carpentry
  • About
  • Community

Custom Storage Benches

1/10/2014

7 Comments

 
Picture
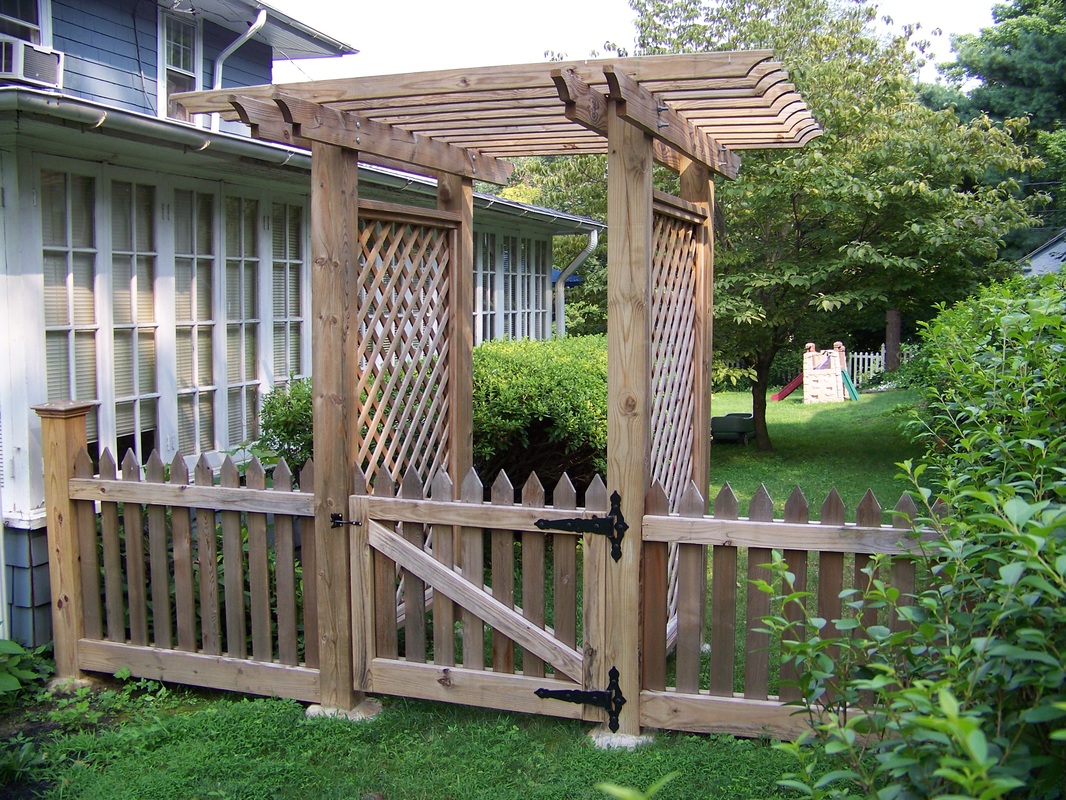
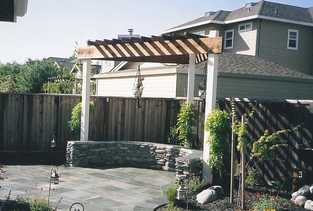
I’ve written on this blog a few times over the past few years regarding a custom wood fence we built for a client, and a number of smaller complimentary projects we’ve constructed using the same design.  Last fall I highlighted a recent series of projects we built for the same client, and included a post about some “outside the box” design ideas they’ve incorporated into their garden.

Shortly after publishing that last piece, they contacted me once again to discuss some storage units they wanted constructed that could double as spillover seating during the outdoor entertainment season.  (You don’t get to incorporate quirky design items in your garden unless you are a collector of stuff – and that stuff needs somewhere to be staged easily).

The requirements were simple – benches that matched the existing fencing, easy access for storage, and the ability to store long pieces of materials.  They also wanted the ability to move them around as necessary, and use them either independently or together as one unit.

Here’s what I came up with.

Picture
Picture
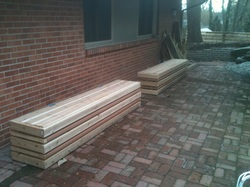
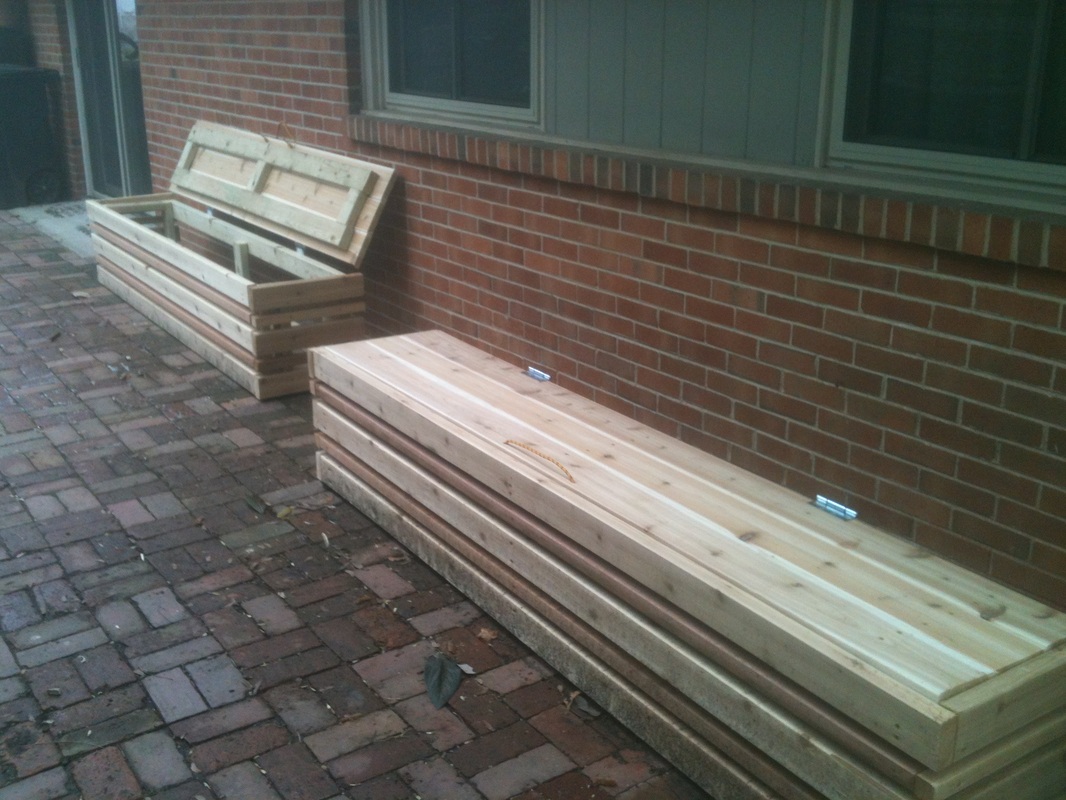
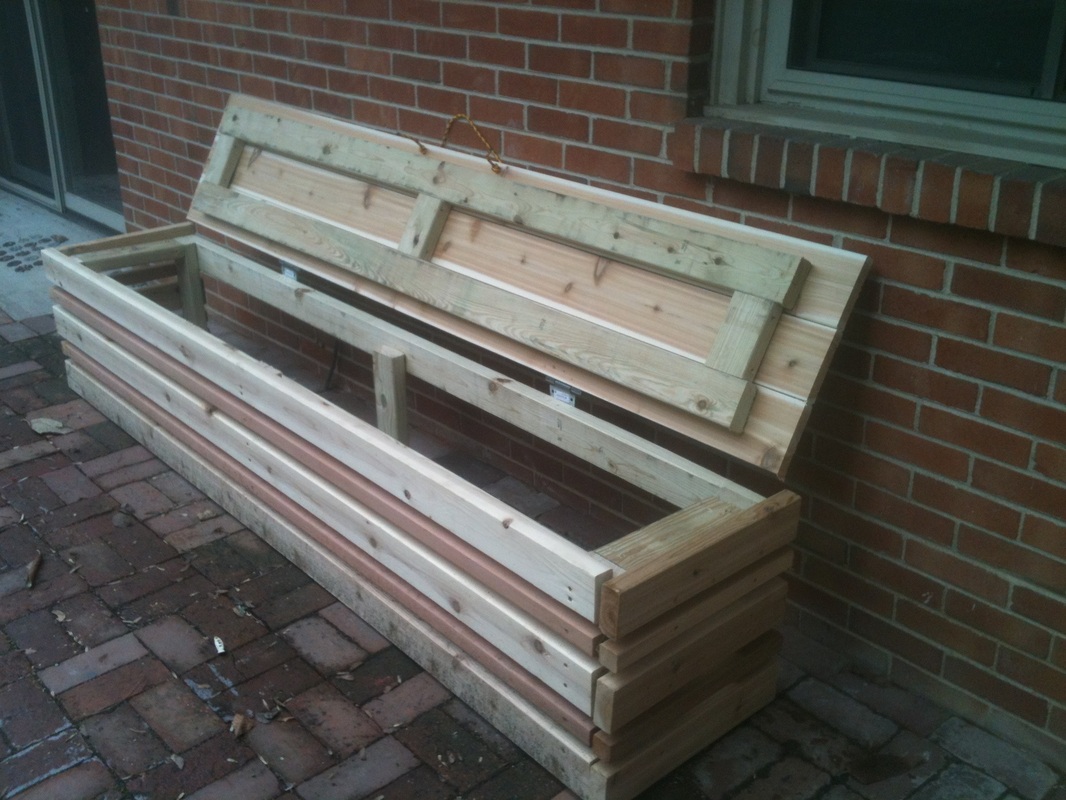
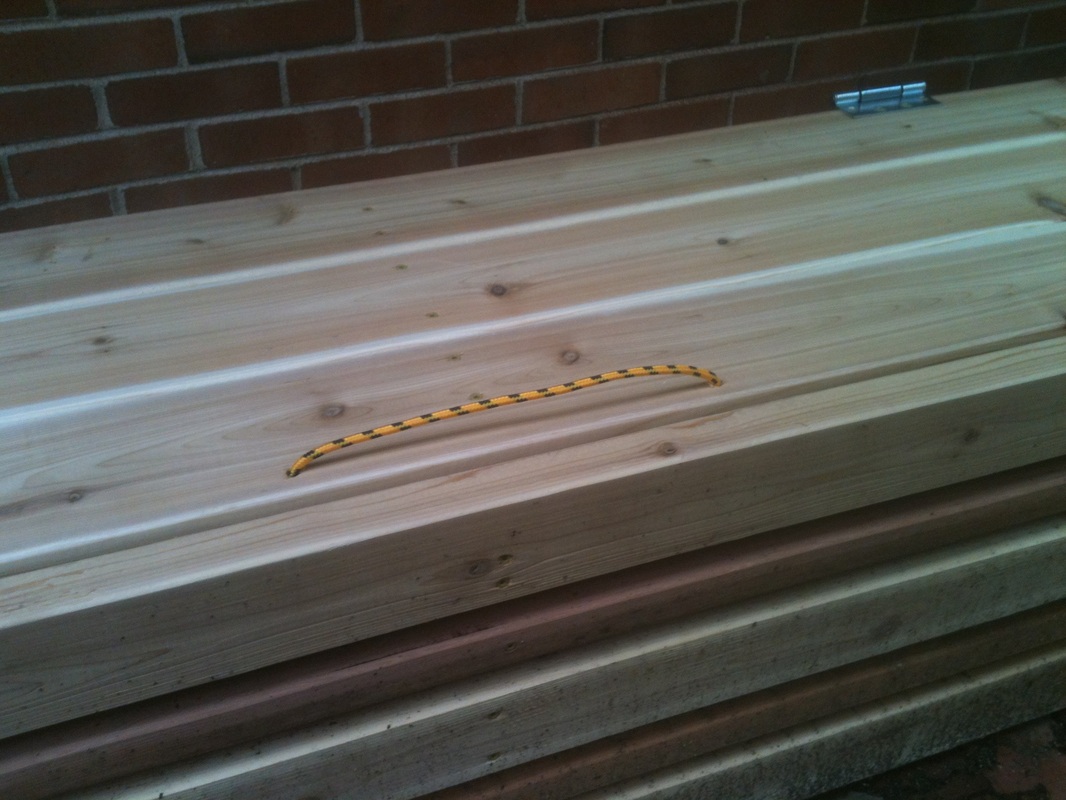
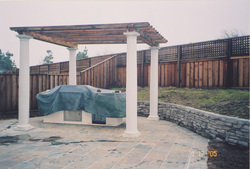
Each bench measures 8’ long, with a hinged lid that can be easily lifted for quick access.  The back side is open, the other three sides are finished with the same design as the fences we’ve done in the past.

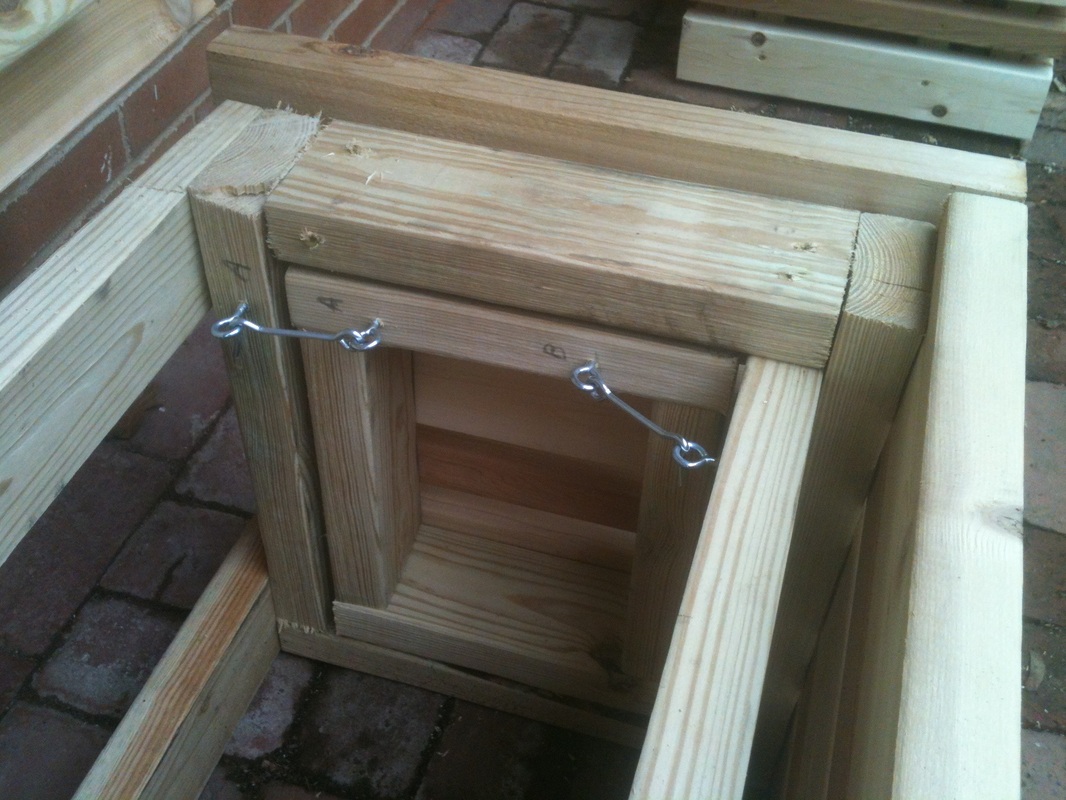
Additionally, I constructed one end of each bench unit with a removable panel that can be taken off when the client wants to position the two benches directly next to each other, with one continuous 16’ l storage space. 

The end panels are attached using a simple hook design, that allows for them to be easily fastened to the benches when the client wants to position them independently.

Picture
Picture
And since they’re benches, we didn’t want obtrusive handles for the hinged lids that might interfere with seating.  So we went with simple rope handles that can sit flush with the lids when being used as seating.  The client plans on using seat cushions atop the lids, which will fit quite easily over the rope handles.

Quick.  Simple.  Effective.  Attractive.  Check, check, check and check.  These are the kind of fun creative projects we love to do.  Looking for some outside-the-box ideas for your yard?  Give us a call – we just might have the perfect idea for you!

7 Comments

Do I Need to Shovel the Snow off my Deck?  Winter Deck Maintenance Tips

12/13/2013

6 Comments

 
PictureA Wintertime Deck: What to Do?
No matter where you live in the United States, this past week provided an early glimpse of the winter weather that lay ahead this year.  Major snowstorms and sub-freezing temperatures have extended all the way across the country, including many areas in the deep south that just aren't used to it.

Here in the Philadelphia area, we got belted with an unexpected 8" of snow this past Sunday (which made for a real fun Eagles game to watch!), another 4" on Tuesday, followed by a blast of bitter Arctic air.  And more snow and "wintry mix" is in the forecast for this coming weekend.

I've posted on this site in the past about how to care for your hardscaping during the winter months, but many of our decking customers may be wondering what the best ways are to deal with ice and snow on your new deck.  Here's a few helpful hints.

First of all, don't worry about the weight of the snow on the deck.  It's not going to fall down.  Remember those building permits we had to file in advance of building the deck?  That was to ensure the structural specifications can handle the weight -- regardless of whether it's a cocktail party in the summer with 40 people, or 2' of snow falling on it in the winter.  In fact, snow is what's called a "dead load", meaning it's stationary and not adding extra force by jumping or moving around.  I know our decks will be just fine.  In fact any deck that went through the proper permitting procedure, regardless of whether we built it or somebody else built it, will be just fine.

Another concern I hear voiced often is whether or not the ice and snow will damage the deck.  Simple answer here: no.  Your deck was built with materials that are meant to hold up to the elements, regardless of whether it's heavy rain, freezing temperatures, or snowdrifts.  Composite materials, pressure-treated lumber, red cedar -- they're all meant to be exposed to the elements.  If they weren't, then we wouldn't be building decks with them. 

That being said, various materials will behave differently in reaction to ice and snow.  Vinyls or composites may shrink slightly in sub-freezing temperatures.  But no worries, as they will just as quickly expand back once the temperatures rebound.  Pressure-treated lumber is about as maintenance free as it gets.  Cedar or other non-treated lumbers should be sealed or treated regularly to help keep out the moisture.  But assuming you're keeping up with the routine maintenance, then a few big blizzards should be nothing to worry about.

As a deck owner, your biggest winter-time concern should be keeping any high traffic areas clear of ice and snow, and maintaining a safe, slip-free traffic path.  And there are a few things to keep in mind when doing this.

First of all, the best thing you can do with your deck is just leave it alone while the snow sits there, slowly melting and clearing itself.  The deck will still be there come March, no need to mess with it in the mean time.

But that's not always realistic.  Oftentimes the rear entrance leads right out to the deck, with a set of steps leading down to the driveway.  It's how you get in to the house when you park in the driveway, it's where you take out the trash, it's how the kids get in the house after a day of sledding in the backyard.  So shutting it down just isn't practical.

In these instances, shoveling the traffic areas is the best thing you can do.  When shoveling, it's best to use a softer, plastic or rubber-bladed shovel that won't scuff up the deck surface.  Metal shovels are great on asphalt driveways, but can really tear up a wood or composite deck in no time.  If it means spending an extra $15 on a designated "deck" shovel, so be it.  It'll eliminate big-time repair costs down the road.  Even a push-broom will work fine in these situations too.

It's also important to shovel "with the grain".  Run your shovel right down the length of the boards, not across the boards.  Running the shovel across the boards is just asking to catch or scuff up a board unnecessarily.  A gentle, long shovel stroke will clear the boards easily without risking getting the shovel caught or stuck on a board.

And even a well-shoveled area can still get slippery, especially when it comes to composites.  I will repeat my wintertime mantra here:  "Rock Salt Bad".  Just like in hardscaping, rock salt will eat away at the deck, drying out wood, staining composites, or even scraping up the surface. 

If slipperyness is a major concern, what you may want to consider, especially in high traffic paths on your deck or steps, is to install some rubber "grip strips" to help with your footing.  Even a single strip on each step tread will add considerable safety to any potentially slippery surface.  And while the strips aren't the most aesthetic add-on in the world, they do come in a few assorted colors to help conceal them, and just a few strips in key strategic locations can add loads of safety to icy surfaces.  It's something at least considering if slip-and-fall is a concern.

And if you don't have a deck, but are considering having one built down the road?  Give us a call for a free consultation.  We'll be happy to take a look -- once all this snow melts that is ...  Happy Winter!

6 Comments

What is a Pergola?  (Let’s all say it together now, PUR-guh-luh)

10/18/2013

1 Comment

 
PictureRecently Completed Pergola in Rose Valley, PA
Lets start with the basics here – what exactly is a pergola, and why do I need one?

Well, nobody NEEDS one, just like nobody needs a patio, or even a garden for that matter.  It’s a design element, meant to enhance a space and add value to your outdoor living space.

So what is a pergola, and what is used for?

The dictionary defines pergola as a structure usually consisting of parallel columns supporting an open roof of girders and cross rafters.

OK.  Fair enough, but I do recall learning in high school and college writing classes that the dictionary definition intro is an easy cop-out, and truth be told that definition doesn’t tell us much.  So how is a pergola used, and how is it going to help my patio or garden?

The purpose of the pergola is really more important.  And the purpose of the pergola is to provide a framework for climbing plants and vines, with the end goal of providing a nice natural-looking shady yet open space.

Traditionally the pergola has been a staple of Italian renaissance gardens, and certainly quite common at vineyards.  But over the past century or so, the pergola has enjoyed a renaissance of its own (you liked that tie-in, didn’t you …), becoming quite common in arts-and-crafts gardens.  

They’re perfectly suited for small garden spaces where shade from a large tree isn’t always an option, and a natural, sun-dappled, filtered shade is desired.  It is a great way to add a vertical dimension to an otherwise limited space.

The name “pergola” is often used interchangeably with “arbor”.  They can be large or small, free-standing or attached to nearby structures, part of a fence or entryway, used to define space, or used to hide nearby unsightly structures.  And with the right plants planted, they can also do a great job of muffling nearby street noise or other urban sounds.

So what are the right plants and vines to plant around a pegola?  Well basically anything that climbs.  Here in the Philadelphia region, my favorites are Clematis, Wisteria, Honeysuckle, and Morning Glory.  Ivy works great too, but it’s a bit too ubiquitous for my taste.  Climbing roses are beautiful , but if you’re in close proximity to people, keep in mind they do have nasty thorns.  There’s plenty of other great choices out there, ask your local garden center what may work for your pergola.

As for the design of the pergola itself, like any construction element in the garden, the sky’s the limit.  Have some fun with it, and don’t be afraid to get creative.

Picture
Entry Gate with Pergola
Picture
3-Posted "Triangular" Pergola with Bench Seat
PicturePergola with Round Fabricated Columns
Here’s a couple more pergolas we built for clients in the past.

Have we piqued your interest?  Might you be interested in seeing how a pergola could add a new design element to your yard?  Give us a call or shoot us an email, and the discussion can begin.


1 Comment

Hardscaping Tools --  Five Basic Hand Tools I Couldn't do Without

8/16/2013

0 Comments

 
I don’t have to tell you that I have a lot of tools.  13-plus years of running my own landscape construction business will do that.  Over the years I’ve accumulated quite the collection.

Some tools are used on a near-daily basis; others sit idly like the 25th man on the bench waiting for his all-important pinch hit appearance.

But regardless of how much the tools get used, there is always a certain job that requires just the right tool for just the right job.  That one shining moment, at least as far as the tool is concerned.

A few months back, a stoneworking colleague of mine (Hi Matt!) wrote on his blog about the various types of trowels he uses on a regular basis, and how they are used.  I commented that if he were stranded on a dessert island and could only have one tool, what would it be?  (You’ll have to check his blog for the answer)  Which got me to thinking, what are my go-to tools?

In otherwords, if the tool police came and confiscated all my tools but a few, what would I really need? 
 
To simplify the list, I’ll break it into a two-part series.  This week I’ll focus on basic handtools, next week we’ll look at my power tools …
Picture
Shovels.  How could I not start the list with THE basic staple of the landscaping
business.  On any given job, no matter what we’re doing, we’ll have at least one round and one flat shovel on site per worker.  The round shovels are better for actual digging, the flat shovels better for scooping gravel or loose soil.  These things get used daily.  And the average lifespan in our industry is about two years.  When picking your shovels, I like the old school wood handles. Spend the extra few bucks for the higher quality.  It’s worth it.


Picture
Margin trowel.  This was my answer for my deserted island trowel.  This handy little 5” x 2” trowel is quite versatile, and works great for nearly any phase of mortar work.  And it fits quite nicely into my side pocket, which makes it all the more handier.  Another one of those tools where we pretty much have one for every worker.


Picture
Chisel hammer.  If you’re doing stonework, you need one of these. Period.  This is your basic regular-sized hammer, but instead of the crowbar claws on the back side of the hammer, there’s a 1” stone chisel.  Great for roughing up a freshly cut piece of stone, or splitting a piece of flagstone that’s been scored.  Save your carpentry hammers for what they’re intended for – carpentry.  If you’re doing masonry, this is your tool.

PictureMy 15-yr-old workhorse of a wheelbarrow
Wheelbarrow.  If you’re moving large quantities of, well, anything pretty much, you need one of these.  Or a few of these.  With a few caveats.  Like the shovels, buy the higher end ones.  The cheap-o’s will fall apart the first time you load them with stone or anything heavy.  I used to be able to get really nice solid metal-framed wheelbarrows when we lived in CA. That was 10+ years ago, and I still have one of my originals that is a key part of my fleet.  A few years ago I bought another one online that I thought was the same as my originals.  The design was the same, but the quality was greatly diminished.  It lasted maybe a year.  Maybe.

Most of the ones I see available today, even the so-called “heavy-duty” ones are wood framed.  Not bad for moving soil around, but if you plan on moving stone, mixing your mortar and/or concrete in the wheelbarrows, or using them to schlep loads of concrete during a pour, you can’t just keep your fingers crossed and hope for the best.  You need to know they’ll hold up.  Get the strongest ones you can find.  And don’t rely on the inflatable tires that come with most wheelbarrows.  Pay the extra $30 for a “flat-free” solid rubber tire. Even then, the bearings may eventually go, but you can’t be worried about flat tires when you're mid-concrete pour.

Picture
Digging bar.  Another really versatile tool that gets used almost daily.  Whether it’s prying up stone or chunks of concrete, loosening up compacted soil when digging a post hole, or chopping roots well below the surface, these solid steel bars are about 6’ long, and come with a point on one end and a chisel on the other.  Beefy tools, no doubt, and not for lightweights.  But effective all the way.

So there’s my Big Five for handtools.  I know some of you may have some feedback to my omissions, or comment on my inclusions. And to be fair, there’s a whole bunch more that I use regularly that didn’t make the list.  But I’m limited to just five, thanks to those pesky tool police, so something was bound to be left off the list.

What are your Big 5 for handtools?
 

0 Comments

Converting a Balcony to a Deck -- And the Importance of Knowing Your Design Goals

8/9/2013

1 Comment

 
I'm typically an advocate for having homeowners spend a year or two in their homes before making any rash decisions on how to change their yards.  Get a sense of how the yard will be used, where the sun shines in winter, where the shade hits in summer, where people tend to walk, and where people tend to congregate.  If you think about it, it makes perfect sense.  As excited as new homeowners are to leave their mark on the yard and make it their own, you want to make sure that any money being spent is being spent wisely.

A good example of this is a relatively new townhouse development that was built here in Swarthmore.  I say "relatively" because many people wouldn't consider a 10-year-old development to be new, but compared with the 100-year-old neighborhoods surrounding the development, it still appears to have that new car shine to it.

The homes were built with all the amenities that new homebuyers have come to expect -- Central air, granite countertops, state-of-the-art kitchens and baths, and shiny new appliances.  And because they're a townhouse community, the homes don't have their own yards per se, but they are surrounded with well-maintained gardens and each has their own private balcony.

And those balconies are the subject of this week's post.

It seems the builders were so focused on giving each unit its own little slice of private outdoor space, that they neglected to think that maybe the homeowners might want to get down off of their balconies, tend to their gardens, intermingle with neighbors, and be a part of the outdoors as opposed to simply observing.
PictureThe "Before" Picture of the Existing Balconies
I was approached by a handful of residents in conjunction with the Townhouse Association to convert these balconies into decks, complete with steps and direct access to the green areas below.

The challenge was that because of the original design of the community and the space it was built on, we didn't have a whole lot of space to build on.  And we certainly didn't want to add steps at the expense of the existing outdoor space on each deck.

The design of each existing balcony allowed us to build a single shared landing that would feed into two of the private outdoor spaces.  Due to the limited space of land, and the desire not to disturb the gardens more than necessary, we wanted to minimize the footprint of the new designs.  As a result, the shared landing would then lead to a set of steps running parallel with the back edge of the balconies. 

PictureAnd the "After" Picture of One Set of Steps
Depending on the exact site of each unit, the balconies ranged in height from about 4 to 6 feet.  We were able to utilize the same design for each set of two balconies, with the only difference being the height and the number of steps necessary to reach grade.

From a construction point-of-view, it was nice being able to build these steps en masse, utilizing an assembly line approach.  All the footings were dug, piers were poured, framing was set, and decking installed in unison, allowing us to knock the whole project out relatively quickly.

And as we neared completion, the homeowners were thrilled with their new sense of freedom.  Several of the units that backed up to one another already christened the steps before we even finished the railings, setting up a firepit in the shared public space, and intermingling over a weekend evening summer barbecue.  Just the sort of activity that makes summer memorable.

The project was a success on many fronts, but it all started because the homeowners had successfully ID'd their needs and desires.  When they called us they had a clear picture of how they wanted their spaces to be used.  It was up to us to design it and make it happen.

Got a few ideas for your own outdoor space?  Give us a call and let us know what we can do for you!

1 Comment

Composite Decks vs. Wood.  Which One is Right For You?  Six Basic Things to Consider.

4/26/2013

0 Comments

 
Picture
A Wood Deck
When planning an outdoor living space there are a lot of options to consider.  One of the first choices that needs to be made is choosing between a patio vs. a deck.  If you go with the patio option you’re then presented with a diverse range of additional choices:  flagstone vs. paver stones; wet-set vs. dryset, linear vs. random shapes, to name a few.

But if you go with the deck option, the biggest choice you’ll be presented with is going with a natural wood vs. composite material.  And that is where I want to focus for this week’s post.

Personally, I tend to lean towards the natural wood for a variety of reasons.  But it would be unfair to force the wood option down my clients’ throats without first at least exploring the pro’s and con’s of each.  And there are some advantages to each.  Here's a break-down comparison:

Cost.  As far as upfront construction costs go, this one is a runaway in favor of wood.  Of course the final cost depends on the type of woods or composites being considered and any unique challenges that the site may hold.  But generally speaking composite materials tend to run about twice as much as pressure-treated wood, 50 percent more than red cedar or redwood, and more comparable compared to tropical woods like teak or ipe.  
 
Additionally, because of the flexible nature of the composite materials, tighter joist spans are required for the framing, which means more materials and labor just to get the framing built.  Thus, the final construction costs always end up costing more for composites, usually somewhere between 1.5 to 2 times as much

Appearance.  Beauty is always in the eye of the beholder, so who am I to judge what looks better to you.  But in my opinion, a deck, or any outdoor living space for that matter, should reflect the natural surroundings.  And real wood is the real deal.  Ask yourself, if composite decking fits the natural surroundings better, than why do they imprint it with a faux wood grain.  And that faux wood grain never looks as good as the real deal.

But composites do offer a wide range of color options and textures, and you certainly won't have to keep up with painting.  And composites can offer a cleaner looking install, especially when they're new.

Maintenance.  This is the big point that composite salesmen like to harp on.  But truth be told, it’s not quite as straight-forward as they want you to believe. Yes, wood decks should be re-sealed or stained at least every few years to prolong their life.  And yes, wood is more susceptible to rotting or splitting. And no, composite decks do not need to be stained or sealed.  
 
But they will fade in terms of color, so in a few years those rich tones from the original install will look aged and dull.  Composites are also quite prone to mossy or algae build-up, which can add a greenish hue to the materials.  And that build-up can also be quite slippery and hazardous to walk on.  Composite decks should be power-washed at least once a year to help prevent this build-up.  And many of the composite materials are quite absorbent, meaning if you accidentally drop that plate of barbecue ribs, you’ll probably be reminded of it every time you look at that greasy stain that just won’t come out. We’ll call this one a push.

Picture
Composite Decking Detail
Design Flexibility. Again, somewhat of a push.  Both wood and composites can be cut or manipulated to achieve curved edges or other unique designs.  In my opinion however, where composites offer limited “customization” is when it comes to the railings.  Today’s composite manufacturers tend to sell their railings as “rail kits” that work fine if you want a standard style railing.  But if you’re looking for something unique or funky, your options are more limited.  A few years back many of the composite manufacturers also sold dimensional pieces of composite materials allowing you to custom build unique features. But for whatever reason, many of the manufacturers have moved away from that approach.

Durability. Composites last longer than wood, there’s no doubt.  But that doesn’t mean your deck will last longer.  The framing is still made of wood, so if its starts to go it really won’t matter what the decking is doing.  And just because the composites last longer, doesn’t mean they’ll look good doing so. The color may fade, the edges may warp, scuff marks or scratches can’t be sanded out.  So maybe a shorter lifespan could allow you to keep a fresher look moving forward.

 Environmental stewardship. A little history lesson is in order to discuss this one.  When composites were first introduced some twenty-plus years ago, they were, just as the name indicates, a composite of recycled wood pulp combined with plastics to help bind the materials together.  The plastic certainly wasn’t beneficial to the environment, however the use of recycled wood was a plus.  For a variety of reasons however, the composite formulas have been tweaked slightly over the years, and as a result most of today’s “composite” materials aren’t really composites at all, but rather 100 percent PVC.  PVC is not bio-degradable, not easily recycled, and can be harmful to our waterways and wildlife.  And even the few true composite materials that are still available are so heavily lopsided in favor of the PVC, that means that old deck will be one day be sitting in a landfill – for a long, long, long, long, long time.

Conversely, many of the tropical woods in particular – ipe for example – have not been able to achieve sustainable harvesting and regrowth.  So even though it’s a natural material, it still adds to rain forest de-forestization, and may not be eligible for environmental credits.

There are a few other items that need to be taken into consideration before making a choice.  As mentioned earlier, many of the composite manufacturers are constantly tweaking their recipes in search for better performance. And progress is certainly good, no doubt.  But many of these new formulas haven’t had the advantage of being field-tested over time to see how they’ll hold up.  
 
Additionally, as the manufacturers constantly upgrade their offerings, that means that many of the products that were offered just five or ten years ago are no longer available. And that means if you’re ever looking for individual replacement pieces or boards, you may run into difficulty.

 All of this, no doubt, is a lot to consider.  If you’re thinking about a new deck, you’ll need to prioritize what’s important to you, including cost, appearance, durability, longevity and performance to name a few. There are a huge variety of composite manufacturers out there, each with slightly different formulas and product offerings.  And likewise, there’s a wide range of lumber types to choose from, each also with a variety of pro’s and con’s.  But hopefully this list will at least provide a starting point to compare lumber vs. composites.

0 Comments

Resurfacing a Deck with Composite Decking

4/19/2013

2 Comments

 
Picture
The Newly Refurbished Deck
The arrival of April means our spring schedule has hit full stride, as we've already knocked out a number of projects, both large and small.

A few weeks ago I highlighted our first big project of the season with some pictures from a dryset flagstone walkway and stone stepper project.  I now want to share a composite deck project we just completed.

This project was actually a deck renovation.  We were able to maintain most of the original framing and structure while replacing the old 2x4 decking that had definitely seen better days.  Fortunately we were able to determine before we started that the original framing and joist structure was still in fine condition. 

We began by carefully removing the original decking, making sure we didn't damage the joists or any of the framing.  Old nails were carefully pulled, the old steps were removed in their entirety, and the railings were gently removed with prybars, making sure no additional damage to the structure was incurred.

Once the decking was removed in its entirety, we re-inspected the framing to make sure that there was no damage to the joists or anything we missed  during our initial inspection.  Everything checked out AOK, and we were good to go with the new decking.

We did have to make some amendments to the framing, due to the fact that the composite decking we were installing requires a tighter joist spacing than what was originally present.  The original joists were set at about 24" on center, a bit wider than I typically would set my joists for any material, but far too wide to accommodate composite materials.  The wide spacing did allow us the opportunity to install additional joists at the midpoint of every section to reduce the spacing to less than 12", more than close enough to accommodate the composite decking.

Picture
The Old Decking and Railings are Carefully Removed
Picture
The New Composite Decking and Railing
Picture
A Cozy Outdoor Retreat
Once the framing amendments were complete, we began installing the decking.  For this project the client chose the Trex Accents line in Winchester Grey.  We used the Cortex Hidden Fastener system to adhere the decking to the framing structure, allowing for a smooth continuous deck surface with no visible fastener heads.

Once the decking was installed, it was on to the railings.  For this project we used TimberTech Radiance Rails with round balusters.

We also amended the deck's stairs, eliminating the two narrow sets of steps that originally connected the deck to the lower yard, and replaced them with a single continuous set of steps that wraps around the entire back edge of the deck. 

And since we never like to stray too far from our hardscaping roots, we also added on to the dryset brick patio, extending a brick landing along the full back edge of the newly built steps.

Resurfacing a deck can be a cost effective way to upgrade your deck without the complete cost of building a deck from scratch.  But not every deck is a worthy candidate for resurfacing.  In this case we were able to determine in advance that the existing framing was in viable condition, and that we would be able to amend the joist spacing as described above.

Depending on the condition of your deck, it may or may not be cost effective to resurface the deck or tear it down and start over.  But in this case, it was certainly an effective solution.

If you're thinking about an upgrade to your existing deck, let us know and we'll be happy to offer a free analysis.

2 Comments
    Picture

    Company

    Clark Kent Creations, LLC is a full-service landscape construction company servicing the Pennsylvania communities of Delaware County, Chester County, The Main Line, and the University City, Art Museum, and Manayunk/Roxborough neighborhoods of Philadelphia.  In addition to this blog page, additional information regarding the company and our services can be found on the subsequent pages of the site.
    Picture

    Author

    Clark Linderman is the president of Clark Kent Creations, LLC, a landscape construction company based in Swarthmore, PA.  He is a proud graduate of the University of Michigan.  In addition to his passion for all things outdoors, he counts Michigan football, Phillies baseball, Superman memorabilia, Memphis R&B music, and good craft brews among his many interests.  He currently resides in Swarthmore with his wife, Sheila, two sons, his dog Krypto, and a really, really messy garage full of work supplies and toys.

    Picture
    Contact Us:
    Clark Kent Creations, LLC
    Swarthmore, PA
    Design and Construction to Maximize Your Outdoor Experience

    707-290-9410
    clark@clarkkentcreations.com
    Serving Delaware County, PA

    View my profile on LinkedIn

    Categories

    All
    Business And The Front Office
    Carpentry
    Environmental Issues
    Fencing
    Guest Posts
    Hardscaping
    Inspiration And Design Ideas
    Places & Local Interest
    Ramblings
    Seasonal
    Snack Break
    Water Features

    Archives

    July 2015
    September 2014
    February 2014
    January 2014
    December 2013
    November 2013
    October 2013
    September 2013
    August 2013
    July 2013
    June 2013
    May 2013
    April 2013
    March 2013
    February 2013
    January 2013
    December 2012
    November 2012
    October 2012
    September 2012
    August 2012
    July 2012
    June 2012
    May 2012
    April 2012
    March 2012
    February 2012
    January 2012
    December 2011

    Like my Blog?

    If you like the content of my blog posts, here are a few other blogs that I check in on regularly:

    Stone Soup:  A Master Stone Mason shares his craft.

    Arcadia Gardens:  Plenty of great tips about horticulture and landscape design.  A great blog (even though she's an MSU Spartan!)

    Revolutionary Gardens:  A Virginia-based landscape designer shares his work and ideas.

    Rockin Walls:  A certified dry stone mason from Maryland shares his projects and tricks of the trade

    If you have or know of a blog that you think I might be interested in, just let me know.  If I like it I just may add it to the list!

    RSS Feed

    All content ©2013
    Clark Kent Creations, LLC
Proudly powered by Weebly