As contractors we have to be somewhat well-versed in math, whether we like it or not. Thankfully I always did reasonably well in my math classes throughout high school and college, particularly geometry. So I’d like to take the opportunity this week to get my Pythagoras on, so to speak.
Don’t be scared. The lesson really pertains more to flagstone installation techniques than anything else, and if you follow along you’ll realize it’s really more basic arithmetic than anything else.
Lets start by briefly going over the available dimensions of pre-cut flagstones. Most suppliers sell their flagstone in intervals of 6”, starting with 12”. So that would be 12”, 18”, 24”, … etc. Simple enough so far, eh?
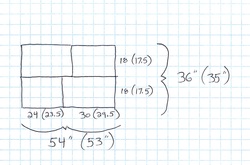
This allows for the stones to be laid out in a linear pattern with the joints matching up – two 12’s equal a 24. An 18 plus a 12 equals a 30, etc. Notice in the below illustration how the various dimensions allow for a tight uniform installation.
Now lets take a moment to think about how flagstone it typically laid out. In most cases, certainly not all though, as the stones are laid they include a ½” mortar joint. Still with me?
Most suppliers recognize that the installation will want to include a consistent joint width, therefore they sell their flagstones pre-cut to allow for the joint width. In otherwords, the 18” dimension actually measures 17 ½”, the 30” dimension at 29 ½”, etc. Add in the ½” mortar joint and we’re right back to where we were with the layout.
But hold on, you may be saying. “That dryset installation that we were interested in doesn’t include mortar joints. What then? Do we still need the ½” gaps between the stones? Are the stones available in true dimensions without the ½” allowances?”
First, yes, I have seen the stones available in the true dimensions. But not commonly. You’re going to have to do some searching and it most likely will take some time to find, and possibly some additional special order costs.

The key is to think in segments, or units. Lets say we’re doing a 324 square foot patio, measuring 18’ x 18’. For this lesson we’ll keep things simple, so lets focus on one small section – say we have 4 stones – two 18” x 30” (actually 17.5’ x 29.5), and two 18 x 24 (17.5 x 23.5). Even with the half-inch allowances, we can line these stones up to make a tight rectangle measuring one inch shy of 3’ x 4.5’ (see adjacent diagram), or approximately 13.5 square feet.

Now any experienced mason or hardscaper will tell you its always a good idea to break up your joints. You don’t want continuous seams running the full width of your patio. Unfortunately with this method you will need to have some continuous seams running in one direction – it’s just the nature of the math. But if you orientate the seams in a direction that will draw you to something else, or stretch out the space, you can actually use those seams to your advantage.
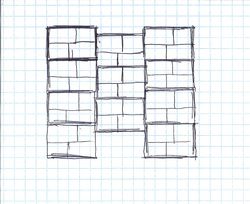
So now that you’ve got the basics of “thinking in segments”, start playing around a bit. Maybe you can come up with a larger 6 or 8-stone pattern that can be repeated without continuous joints.
Experiment, and have some fun. And if lugging large stones around to play with math dimensions isn’t your idea of a good time, you can always play around on paper first. Or I know a really good hardscaping contractor you can call.


 RSS Feed