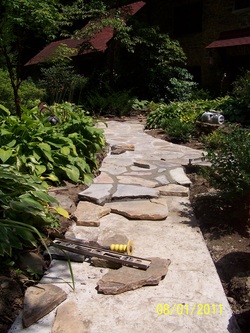
 Wet-Set Installation in Progress
 As I've stated in the past, there are a lot of decisions that need to be made in conjunction with planning for a new outdoor living space. This week I’d like to discuss the differences between a wet-set installation and a dry-set installation, and the advantages and disadvantages of each.
First, a quick lesson. Hardscaping projects generally fall into one of two basic categories; Wet Set or Dry Set. While there are a lot of options to consider when selecting materials, no matter what material you choose they will be set using one of these two techniques. Wet set refers to setting the materials in a bed of mortar. (The mortar was mixed and was wet when we set the stones, get it?) Dry set refers to setting the stones atop a bed of compacted crushed gravel and sand. No mortar, no concrete, thus the “dry” label.
In either case, the process begins with excavating out the footprint a minimum of 8”. What happens from there depends on the technique.
A wet set application includes a base layer of gravel to separate the native soil from the new install. Forms are then set at the necessary grade along the perimeter of the new install, be it a path, patio, or combination of the two. A 4” thick rebar-reinforced concrete pad is then installed to serve as the base. This pad is typically rough-finished, as the finish will be concealed by the eventual installation of the flagstone. The grade of the concrete should be approximately 2” below the desired finish grade, to accommodate the flagstone and mortar thickness.
Once the concrete has set, the perimeter forms are removed and flagstones can begin being mortared to the surface. When all is said and done, you will have a solid, rigid, impermeable surface. It is long lasting and durable, however it can be more difficult and/or costly to repair or reset if necessary. The technique is also subject to any impermeable surface requirements that many municipalities are requiring for stormwater management purposes.
On the other hand, a dry set application includes approximately 6” of compacted crushed gravel as the base, in lieu of a concrete foundation. Once the base gravel has been compacted (typically compacted in a series of three-inch lifts), a thin layer of sand is spread evenly across the gravel base. Flagstones are then set atop the sand bed, allowing for a slightly permeable installation that offers some degree of flexibility. We typically use thicker heavier stones on dryset installations, as the weight of the stones offers strength and weight to hold the stones in place.
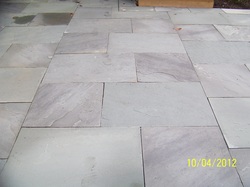
 Dry-Set Installation with "Butt" Joints
 As for costs, typically the dry set technique runs about $5 to $6 cheaper a square foot then the wet set technique, assuming the stone selection is comparable.
So again the question becomes which one is right for you, and again the answer is that it depends on your personal taste (I’m not going to make all the decisions for you, you know!). I can tell you that we don’t do too many irregular shaped dryset installations, mostly due to the wider joint widths and the potential of joint material washing out. But we have done them, and we can address the joint material issue as well if that’s where your heart truly rests. Linear designs lend themselves quite nicely to either dry or wet set applications, and you do have the option of “butt” joints (meaning near-zero joint widths) on the dry-set option as well.
If you'd like to discuss which application is right for your project, just give us a call. Consultations are always free, and I'm always open to discussing ideas and how to make sure your project best fits your needs.


 RSS Feed