Clark Kent Creations -- Swarthmore, PA. Landscape Design and Construction, Hardscaping, Patios
  • Home
  • Services/Photos
    • Hardscaping >
      • A Flagstone Walkway -- The Process
      • Stone Steps -- The Process
    • Wood Fences
    • Exterior Carpentry
  • About
  • Community

Jack-o-Lantern-o-Rama.  Fun with Pumpkins in the Landscape.  Happy Halloween!

10/25/2013

0 Comments

 
Picture
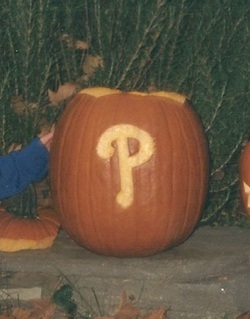
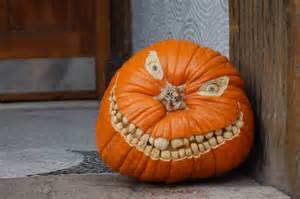
My 2008 World Series Champion Phillies pumpkin
I just love what they're doing with pumpkins these days.  When I was a kid, the standard Jack-o-Lantern design consisted of two triangles for eyes, an inverted triangle for the nose, and, depending on the level of creativity, either a buck-tooth-grin or Jaws-like fangs for the mouth.

Pretty much all the lines were linear -- usually cut with that old steak knife from the kitchen. 

At some point during the last 20 years or so, somebody realized that the geometric designs, as classic Peanuts as they may be, just weren't pushing the envelope of creativity.  Since that time, the levels of creativity have exploded.

I remember watching the old TV show Roseanne -- generally speaking I wasn't a big fan of the show, but their Halloween specials were rather fun.  That was the first time I remember seeing the intricately carved artistic masterpieces that are still showstoppers at pumpkin festivals.

Around that same time, the "etched" pumpkins were also becoming popular.  These aren't carved pumpkins per se, but rather lightly etched on the surface just enough to allow light through but not cut completely through the pumpkin walls.

Picture
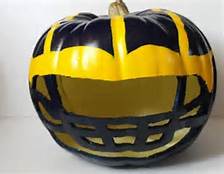
Go Blue! Painted UM pumpkin
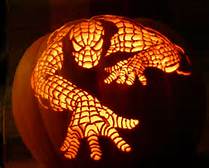
Picture
Spiderman pumpkin
Picture
Awesome!!
Picture
Kind of looks like the Grinch
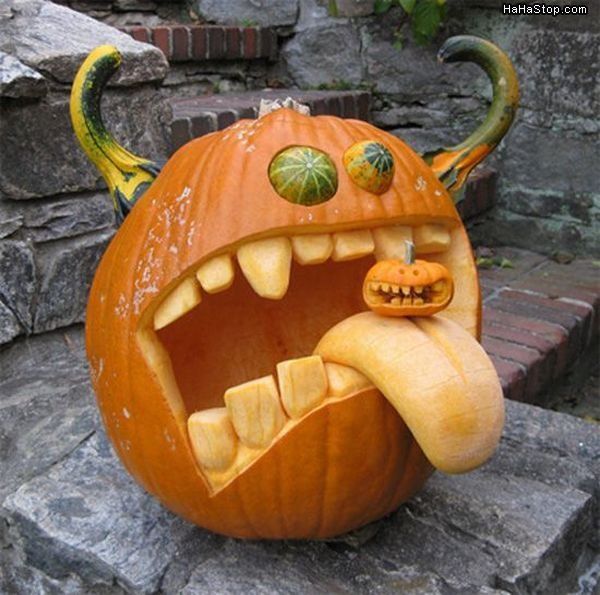
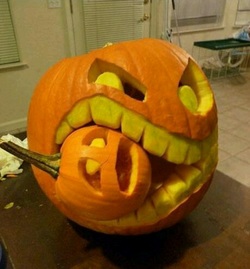
PicturePumpkin Canabalism
From that point on, the levels of creativity just exploded.  Pumpkin stencils became available.  Painted pumpkins.  Pumpkins with props.  Pumpkins with costumes.  Upside down pumpkins.  Pumpkins eating other pumpkins.  Pumpkins with squash accessories.  Pumpkins with mum wigs and other plant accessories.

You get the idea.

Soooooo.  All of this pumpkin talk begs the question -- How are you decorating your pumpkins this year?

Happy Halloween from the whole scary Clark Kent Creations team!

0 Comments

What is a Pergola?  (Let’s all say it together now, PUR-guh-luh)

10/18/2013

1 Comment

 
PictureRecently Completed Pergola in Rose Valley, PA
Lets start with the basics here – what exactly is a pergola, and why do I need one?

Well, nobody NEEDS one, just like nobody needs a patio, or even a garden for that matter.  It’s a design element, meant to enhance a space and add value to your outdoor living space.

So what is a pergola, and what is used for?

The dictionary defines pergola as a structure usually consisting of parallel columns supporting an open roof of girders and cross rafters.

OK.  Fair enough, but I do recall learning in high school and college writing classes that the dictionary definition intro is an easy cop-out, and truth be told that definition doesn’t tell us much.  So how is a pergola used, and how is it going to help my patio or garden?

The purpose of the pergola is really more important.  And the purpose of the pergola is to provide a framework for climbing plants and vines, with the end goal of providing a nice natural-looking shady yet open space.

Traditionally the pergola has been a staple of Italian renaissance gardens, and certainly quite common at vineyards.  But over the past century or so, the pergola has enjoyed a renaissance of its own (you liked that tie-in, didn’t you …), becoming quite common in arts-and-crafts gardens.  

They’re perfectly suited for small garden spaces where shade from a large tree isn’t always an option, and a natural, sun-dappled, filtered shade is desired.  It is a great way to add a vertical dimension to an otherwise limited space.

The name “pergola” is often used interchangeably with “arbor”.  They can be large or small, free-standing or attached to nearby structures, part of a fence or entryway, used to define space, or used to hide nearby unsightly structures.  And with the right plants planted, they can also do a great job of muffling nearby street noise or other urban sounds.

So what are the right plants and vines to plant around a pegola?  Well basically anything that climbs.  Here in the Philadelphia region, my favorites are Clematis, Wisteria, Honeysuckle, and Morning Glory.  Ivy works great too, but it’s a bit too ubiquitous for my taste.  Climbing roses are beautiful , but if you’re in close proximity to people, keep in mind they do have nasty thorns.  There’s plenty of other great choices out there, ask your local garden center what may work for your pergola.

As for the design of the pergola itself, like any construction element in the garden, the sky’s the limit.  Have some fun with it, and don’t be afraid to get creative.

Picture
Entry Gate with Pergola
Picture
3-Posted "Triangular" Pergola with Bench Seat
PicturePergola with Round Fabricated Columns
Here’s a couple more pergolas we built for clients in the past.

Have we piqued your interest?  Might you be interested in seeing how a pergola could add a new design element to your yard?  Give us a call or shoot us an email, and the discussion can begin.


1 Comment

Custom Fences, Repeat Customers, and Fun Garden Design Ideas in Media, PA

10/4/2013

7 Comments

 
PictureThe original fence as constructed several years ago.
For those of you familiar with my website and my blogs, you may recognize the fence pictured to the left.  It was a fence we built a few years back at the request of a local couple who was looking for a unique fence to complement their artfully renovated home.

They first approached me looking for some contemporary fence design ideas.  After a bit of collaboration I showed them some pictures of a deck railing I built a few years earlier when we still lived in California.  We tweaked the design a bit, and they gave me the green light on a custom design that to this day remains one of my favorite projects.

Earlier this summer they contacted me again asking me to come over and take a look at some changes they were considering on the property. I was happy to swing by.

The house itself doesn't appear overly unique from the street.  It's a 1950's rancher, that admittedly sits on a nice piece of property atop a small rocky ridge.  It's well built no doubt, but aside from some really fun garden décor the house doesn't stick out amidst the neighborhood.

But their artistic taste has led to some great changes.  A large portion of the interior of the home was ripped out when they first moved in to give it a real urban loft feel as you enter -- not what you'd expect from a 1950s rancher.

And the outside is accented with numerous items that definitely give the yard a unique flavor and personalizes the space.

PictureAnd the new fence extension and shed.
Last spring they worked with an architect to design a custom shed that is like no other shed I've ever seen.  The architect did a great job of working with the clean lines and modern feel of the design, while fitting a useful structure onto an admittedly tight space.

My clients were looking to extend the original fence back behind the newly constructed shed, as well as looking to continue the same fence design as a screen to conceal their air conditioning units and conceal their newly constructed compost bins.

Easy enough.  And plenty of fun.

It's always great to work with clients who are fun, creative, and think outside the box.  My personal garden design taste always seems to lean toward the whimsical -- after all isn't the whole point of a garden to have fun and enjoy outdoor space?  All while putting your own personal stamp on nature's beauty?

And this yard pulls that off like no other.

A few of the more unique design items include an old carousel horse perched atop a rock ledge, and standing against an old stump.  Their mailbox?  Well look at the two photos below and see if you can figure out where the structure that houses the mailbox came from.

Picture
A unique mailbox housing
Picture
See where it may have come from?
An old spigot collection embedded in concrete?  Check.  Old drums used as vegetable and herb planters?  Check. Carved stumps and totem polls.  Check.  With some great custom stonework to match the natural stone ledge that the house is built upon.  It's a great site in its raw form, but the garden design highlights everything I believe garden design is all about.  Fun and creativity.
Picture
Old carousel horse
Picture
Repurposed drums
Picture
Embedded spigot collections
Picture
Our new AC screen
Picture
And our new compost screen
Admittedly not everybody has the artistic vision to come up with ideas like this.  In this case the clients are both artistic professionals.  But if you're looking to come up with something fun, something that will get people talking, and something that will be built first and foremost with quality and workmanship in mind, give us a call.

I'd love to talk up some fun ideas and see where can take your yard.
7 Comments

Making a Grill Out of a 55-Gallon Drum.  A Hybrid Propane Wood Smoker Project

9/13/2013

11 Comments

 
PictureMe and My New Grill!
This is one of those projects that’s been on my life bucket list for some time – building my own grill out of a reclaimed 55-gallon drum.

The seed for this project was actually planted some time ago.  With a wife from the barbecue capitol of the world, Memphis Tennessee, and a palate that seems to be constantly attracted to some of the world’s best street food, I’ve seen some awesome grills and smokers over the years. Grills on trailers for barbecue cook-offs, grills made from old beer kegs, gas tanks, even some made out of old cars.  Heck, even my own family on my mom’s side made some home-made grills on the banks of the mighty St. Joe’s river in Elkhart, IN.  So it’s kind of in the blood.

PictureThe Unaltered Food-Grade Drum
So the idea had been festering for some time.  And when our old 13-year-old store-bought gas grill finally bit it a few weeks back, instead of trying some spot repairs and part replacements as I’ve done in the past, it was time to pull the trigger on the new grill.

Before I get into the how-to, I should share a bit about my grilling preferences.  With family lineage in Memphis and a taste for good barbecue, part of me is really drawn to the all-day, slow smoked, wood-fired smokers.

But the realist in me also realizes that I work and have about a billion responsibilities, so slow-smoking a rack of ribs on a Tuesday evening just isn’t in the cards. Slapping burgers on a propane grill fits much better into my schedule.  So what to do?  I wanted the ability to slow-smoke some good ‘cue on a football Saturday afternoon, but also to whip up some simple hot dogs before soccer practice on Thursday night.

So the solution?  A hybrid, with enough room on one side to throw in some pieces of wet hickory when the time allows, but with a propane set-up on the other side for those weeknight quick-and-easy’s.

What you need:
One 55-gallon drum (sealed ends, food grade)
A grinder or metal cutting saw
Three door hinges
Approximately (30) ¼” x 1” hex bolts, with nuts and washers
Approximately 6’ of 1” angle-iron
One wood finial fence postcap
One propane burner replacement piece
One propane burner heat shield
Propane ceramic briquets
Replacement grill grates to fit

Picture
Mark Your Lid Locations
Picture
A Properly Safety-Compliant Helper
PictureThe Empty Barrel on the Stand
What to do:

First, get your hands on a 55-gallon drum.  If you have the time and you’re diligent in your search, you can probably find a free one from an automotive service center or food processing plant.  My time and patience were lacking, so I found one on Craigslist for $20.  I could have paid $10, but splurged for the “Food Grade” barrel, as I really wasn’t in the mood to be tasting oil on all my food for the next few years.  Make sure it is metal, not plastic (duh).  Also make sure it is
“sealed” meaning the circular ends aren’t removable.

Next, mark out and cut your door opening.  There’s a few ways I could have done this, but I chose to keep the circular ends intact, partially not to compromise the stability of the barrel, and partially to keep options open if I ever want to install an upper grill rack down the road. I marked out the door with masking tape to ensure good straight lines, and used a grinder to make the cuts.

Once the door panel is cut out, attach the three hinges to door using the ¼” bolts.  Mark your hole locations, pre-drill holes, and tighten the bolts using the nuts and washers.  Once all three hinges are secured on the door, hold in place and mark the hinge locations on the barrel itself.  Pre-drill your holes (need to be precise with the locations so everything lines up), insert bolts and attach the hinges.  

You’ll also want to easily open your door, so it will need some handles.  You don’t want metal handles, as they will conduct the heat. There were some wood cabinet handles at the box store that could have worked, but they weren’t meant for outdoor use, so I was concerned about rot.  So I improvised again, using a pressure-treated finial postcap.  I simply drilled a hole through the door and secured the knob with a small lag screw from the inside.  I used one, centered on the door, depending on preferences you may want two.  You now have a functioning door.

PictureAttach Door with Hinges and Install Knob
The stand.  I have to admit, I cheated on this one bit, as the stand from our old store-bought grill was still perfectly functional, and the barrel fit quite nicely on the frame.  If I had to build my own stand, I probably would have used threaded metal pipes to construct a simple stand.  But I didn’t have to, so there.  My guess is you could probably find something at your house that works – shopping carts, old metal shelving, old trailers – you’ll figure it out.

I now placed the barrel on the stand sideways with the door on top, circular ends on either side, and drilled a few drain holes in the bottom of the barrel.  This will help for airflow, and allow for drainage if you ever leave the grill open in the rain, or spill barbecue sauce into the grill.

PictureCut Hole in Bottom for Propane Access and Drainage
If you’re just going the wood route, you can skip this step, but if you’re retrofitting some propane parts, you’ll need to cut a small opening in the bottom of the barrel (amongst the drain holes) to allow for the burner to be installed, and the feeder pipes to access the main propane supply and control knobs.  Again, I used my grinder to cut out a hole roughly 3”x4” to allow both feeder pipes to fit through comfortably.  
 
The big box stores sell a wide assortment of after-market replacement parts for propane grills. Just a find a burner that fits the barrel, and a heat shield that fits the size of the burner.   (The heat shield prevents the flame from torching the food, redistributing the heat to the ceramic briquettes).

PictureThe Propane Burner, and Angle-Iron Grate Supports
You’re getting close now. All you’re missing is the cooking grate. I ended up purchasing two of the largest size grates I could find at the box store, but if you have access to any sort of metal working shop you can probably find some sturdy steel mesh that would work just fine.  Regardless of what you go with, get the grate first, as you’ll need it to install your bracing.

Place your grate down into the barrel over the propane burner apparatus.  Check for level both front to back and side to side.  Ideally, you should have about 4” between the top of the heat shield and the grate.  Once you position the grate into the location you want, mark the location of the grate on the inside of the barrel with a pencil.  Now remove the grate form the barrel.

PictureFire!! Inaugural Meal? ... Chicken Kabobs.
Take your angle iron, and cut two equal length pieces that will run the length of the barrel (3’ +/-). Now drill three ¼” holes through one side (flange) of the angle iron, one on either end and one in the middle. Hold your drilled angle iron piece up against the line you already drew on the inside of the barrel, and mark the hole locations.  This may require a helper to hold the piece, making sure your hole marks line up exactly with the holes on the angle iron.  Now drill the holes through the barrel itself, and fasten the angle iron to the inside of the barrel using the ¼” bolts.  Repeat for the front and back.  When you’re done, you’ll have two metal “shelves” running the full length of the barrel, both front and back.  Simply place your grate resting on both sides of the angle iron, and you are good to go!

I’m thrilled to cross this project off the bucket list for a number of reasons.  Go look at a box store or home center, and you’ll see a whole assortment of grills ranging from $300 on up.  The big ones that have enough space to do what I want (you know, that whole pig roast every red-blooded male dreams about …) start at $600 at least, and run far, far upwards of that number.  Mine?  About $65 for the barrel conversion, and about $55 for the propane burner equip. Not bad.  Plus, it’s way, way, way cooler in my opinion.

I still may make a tweak or two, and who knows, maybe I’ll even play around making a few more for some friends.  If I can squeeze it in between getting my grill on …

Interested in something like this for your outdoor living space?  Give me a call.  We’ll talk.

11 Comments

Converting a Balcony to a Deck -- And the Importance of Knowing Your Design Goals

8/9/2013

1 Comment

 
I'm typically an advocate for having homeowners spend a year or two in their homes before making any rash decisions on how to change their yards.  Get a sense of how the yard will be used, where the sun shines in winter, where the shade hits in summer, where people tend to walk, and where people tend to congregate.  If you think about it, it makes perfect sense.  As excited as new homeowners are to leave their mark on the yard and make it their own, you want to make sure that any money being spent is being spent wisely.

A good example of this is a relatively new townhouse development that was built here in Swarthmore.  I say "relatively" because many people wouldn't consider a 10-year-old development to be new, but compared with the 100-year-old neighborhoods surrounding the development, it still appears to have that new car shine to it.

The homes were built with all the amenities that new homebuyers have come to expect -- Central air, granite countertops, state-of-the-art kitchens and baths, and shiny new appliances.  And because they're a townhouse community, the homes don't have their own yards per se, but they are surrounded with well-maintained gardens and each has their own private balcony.

And those balconies are the subject of this week's post.

It seems the builders were so focused on giving each unit its own little slice of private outdoor space, that they neglected to think that maybe the homeowners might want to get down off of their balconies, tend to their gardens, intermingle with neighbors, and be a part of the outdoors as opposed to simply observing.
PictureThe "Before" Picture of the Existing Balconies
I was approached by a handful of residents in conjunction with the Townhouse Association to convert these balconies into decks, complete with steps and direct access to the green areas below.

The challenge was that because of the original design of the community and the space it was built on, we didn't have a whole lot of space to build on.  And we certainly didn't want to add steps at the expense of the existing outdoor space on each deck.

The design of each existing balcony allowed us to build a single shared landing that would feed into two of the private outdoor spaces.  Due to the limited space of land, and the desire not to disturb the gardens more than necessary, we wanted to minimize the footprint of the new designs.  As a result, the shared landing would then lead to a set of steps running parallel with the back edge of the balconies. 

PictureAnd the "After" Picture of One Set of Steps
Depending on the exact site of each unit, the balconies ranged in height from about 4 to 6 feet.  We were able to utilize the same design for each set of two balconies, with the only difference being the height and the number of steps necessary to reach grade.

From a construction point-of-view, it was nice being able to build these steps en masse, utilizing an assembly line approach.  All the footings were dug, piers were poured, framing was set, and decking installed in unison, allowing us to knock the whole project out relatively quickly.

And as we neared completion, the homeowners were thrilled with their new sense of freedom.  Several of the units that backed up to one another already christened the steps before we even finished the railings, setting up a firepit in the shared public space, and intermingling over a weekend evening summer barbecue.  Just the sort of activity that makes summer memorable.

The project was a success on many fronts, but it all started because the homeowners had successfully ID'd their needs and desires.  When they called us they had a clear picture of how they wanted their spaces to be used.  It was up to us to design it and make it happen.

Got a few ideas for your own outdoor space?  Give us a call and let us know what we can do for you!

1 Comment

Vegetable Garden Ideas & a Few Misconceptions

5/10/2013

0 Comments

 
PictureMy peppers and 'maters, ready for planting
One of my biggest personal enjoyments I get from my garden is my summer vegetable crop.

But when I mention the possibility of including a vegetable garden in with my clients’ yards, I’m often met with a fair amount of hesitation.  I can see their eyes rolling as they envision countless hours turning soil, pulling weeds, managing pests, and harvesting the crops.

But it really doesn’t have to be that complicated.  In fact, its one of the more simpler tasks I undertake.  And trust me, if I can find the time to work the garden, it certainly can’t be that time-consuming.  The rest of my ornamental gardens?  Well not so much, (they’re kind of a mess, to be honest), but the veggie garden is so simple to maintain, and the payoff is so great it’s really a no-brainer.

And yes, like anything you can make it as complicated as you’d like, but for those of you who don’t have the time (I’m guessing most of you?), it can really be quite simple.

Here’s what you need to get started; a small corner of the yard with moderate to ample sunlight, a few cages or support screens to support the plants as they grow, and a little bit of loose pocket change (OK, maybe some loose pocket cash).

If you’re just starting out as a hobby vegetable gardener, I’d like to suggest limiting your growing season to just the summer crops.  Tomatoes and peppers alone will give you a great crop, and are about the easiest of the veggies to
grow.  Depending on how you enjoy the experience, or how much time and space you have, you can always add to
your  crops down the road.

PictureAnd the space they'll be overtaking this summer
Here’s a few misconceptions about vegetable gardens I’d like to put to rest:

You don’t need a dedicated space.  Sure, if you’re starting a small suburban farmstead you might want a dedicated space, but if your intention is just providing some fresh vegetables for the summer dinner table, its actually quite easy to incorporate a few vegetables in with your existing beds. 

Interplanting vegetables amidst the ornamentals is a great way to make sure you don’t have large barren swaths of dirt during the non-growing season.  And I think you’ll be amazed how many visitors to your garden will comment on how fun it is to see an edible tomato plant tucked in between the ornamentals.  It invites you to interact with the garden, and after all that’s half the fun, right?

The vegetables don’t have to overtake your yard.  Tomatoes in particular do have a reputation for being rather “leggy” plants.  But there are plenty of varieties out there that are meant for small spaces without crowding out the surrounding gardens. Some are even meant exclusively for small or medium sized containers.  A few tomato varieties worth looking into include Better Bush, Husky Cherry Red, Bush Goliaths, and Sweet ‘N Neat Cherries. 

There’s plenty more out there, just look for varieties labeled for container gardening.

It doesn’t have to entail a large-scale construction project.  We’ve built plenty of raised beds with extensive pathways allowing access to the gardens, but that doesn’t mean it has to be that way.  The time involved in getting your garden started can be as straight-forward as a few minutes just to plant the 4” containers

It’s not a costly endeavor. Most big box stores and gardening centers sell 4” starter plants that run about $2 to $3 per plant.  Selling vegetable plants is also a popular fundraiser for garden clubs and schools, so you can support your local community while getting your garden started at the same time.  Pre-fab tomato cages also run just a few bucks per, and can be re-used every year down the road.  If you want to forgo the cage costs, you can even get a bit artsy by using old garden tools, sporting equipment, window frames – you name it – and tying some twine as
support cables to hold the plants as they grow. 

Pests and disease aren’t that big an issue.  Most tomato varieties that are sold in retail outlets are engineered to be disease-and-pest-resistant.  The biggest issue I have with pests is the native deer population and even that isn’t that big of an issue.  Rabbits are another fun little creature to deal with, especially when the plants are young, but even their damage is typically minimal to the plants.  And the burgeoning fox population in my neighborhood has worked wonders to solve this problem.

There’s really no excuse not to give it a go.  Put the plants in the ground in May, and by mid-July you’ll be enjoying
the fruits of your labor.  Literally.

And trust me, if your only experience with summer vegetables is eating what they sell in the stores, you’ll be amazed at how much more flavorful the homegrown ones are. 

Get started with the tomatoes and peppers, maybe a few herbs like basil, and once you get this down you can experiment and add new crops as you see fit.  Depending on the space you have available, beans, peas, lettuce, eggplant, and squash varieties are also quite easy to grow with tremendous payoff.  

0 Comments

Cool Product Alert -- Fire Boulders!

3/8/2013

4 Comments

 
Picture
Fire Boulders Ready for Purchase
A few weeks ago as the offseason was winding down and I was making my final preparations for the 2013 season, I went in to visit my friends at Galantino Supply Company, my primary hardscaping material supplier.

It's always fun to catch up with acquaintances after a few months off, but my primary reason for stopping in was to see what was new for the coming season.

Vince, Anthony, and Carl quickly loaded me up with an ample supply of updated product catalogues, new pricing sheets, and walked me through some of the new product offerings for the year.

As they listed some of the new products they are carrying, one thing in particular caught my ear -- "fire boulders".  Admittedly I wasn't familiar with this term, but the combination of the words "fire" and "boulder" were enough to pique my interest.  "What's a fire boulder?" I quickly asked.

Fire boulders are natural, rustic fieldstone boulders, in which a firepit has been carved out in the top surface, and a hole has been drilled through to the base of the boulder to allow a gas line to extend to the carved-out bowl.  The boulders are sold complete with a flex-pipe gas line, stainless steel burner plate, and child-resistant gas shut-off valve.

Picture
And the Installed Fire Boulder in Action
The boulders and accompanying hardware are designed to run off a gas line connected to your home's gas supply lines, or if your home doesn't have an easy-to-access gas supply, the boulders can also be fueled via a connection to a stand-alone propane tank.

There is something about fire and the outdoors that cuts to the very core of our DNA.  What camping trip or outdoor gathering isn't complete with a warm mesmerizing fire.  It fosters warmth, good company, engaging conversation, and unforgettable times.

And to be able to enjoy a beautiful fire in a natural boulder in the sactuary of your own backyard on your own patio is now easily available, at a cost well within reason.

Installation costs vary based on the size of the fire boulder and the location and access to where the boulder will be installed.  But it is reasonable to ballpark the labor and material cost somewhere in the $2000 to $3500 range, based on a variety of factors.  Clark Kent Creations will handle the boulder installation and setting in place.  The gas line extension and/or propane installation will need to be handled separately by a licensed plumber or gas contractor.

There's always a few products out there every year that I have to put on my personal wish list, and I gotta admit, this one qualifies.  I'd love a chance to install this as part of a hardscaping project, whether its in my yard or yours.  To see more samples of fire boulders or to inquire about more specific pricing, or to ask about other firepit options, drop us a line and we'll see what we can do for you.

4 Comments

Garden Inspiration

3/1/2013

2 Comments

 
Last week I posted about some unique patio design ideas with the idea of fueling the imagination as homeowners start thinking about possible outdoor projects for their little slice of Planet Earth.

I’m going to continue that theme this week, but instead of patio designs I thought I’d expand it a bit, looking at some of my all-time favorite gardens I’ve visited.

There are tons of great gardens across the country, across the world for that matter.  Whether it’s your neighbors’ bedding areas, your local community park, or a larger horticultural showcase, you really don’t have to go far.

I’m keeping this list to five, but I could probably go on with dozens and dozens more.  But these five each struck me in various compelling ways.
Picture
The Longwood Waterlillies
Longwood Gardens, Kennett Square, PA. 
Nearly every major metropolitan area has at least one great world-class public garden, and Philly’s certainly no exception.  There are a number of great gardens throughout Philadelphia and the Delaware Valley, and Longwood Gardens has to be one of the finest.  Dating back to the original land grant of William Penn, the land was eventually acquired by Pierre DuPont of the famous family (Yes, that Dupont) who used his fortune to create the gardens.

The gardens are situated on more than 1000 acres of land about 25 miles southwest of Philadelphia. There are a number of great display gardens throughout the park, but one of the more popular (and perhaps my favorite) is the amazing water lilly collection on display every summer.  Some of these platters reach a diameter of 6’! The insect-catching plant display and bonsai gardens are some other cool ones to check out.  Whatever your taste, it’s a great place to get inspired.


Picture
The Japanese Tea Garden at GG Park
Japanese Tea Garden, Golden Gate Park, San Francisco, CA. 
When we lived in San Francisco, Golden Gate Park was just a quick 5-minute walk from our apartment.  And while the entire park has all sorts of fun stuff to do and explore, the Japanese Tea Garden is one of the more popular.  And understandably so.  If you ever want to see what careful cultivation of plants can achieve, you needn’t look any further than the Mt. Fuji-shaped or Dragon hedges near the garden entrance. And they also have one of the largest most established Wisterias I’ve ever seen, checking in at more than 100 years old!  Be sure to check out the waterfall display and koi ponds as well.  As far as peaceful tranquil gardens go, this one has to be near the top of any list.

Picture
Balboa Park's Native Plant Garden
Native Plant Garden, Balboa Park, San Diego, CA. 
While we’re out on the West Coast we might as well as swing down south and check out the native plant garden in Balboa Park in San Diego.  This is an awesome urban park, with many gardens (and other attractions) throughout.  I’m picking the native plant garden just because it reminds me of my California days and the unique plants that grow on the west coast.  But you really can’t go wrong anywhere in the park.  Plus you’ll be in beautiful and nearly always perfect weather San Diego. Can’t really complain about anything out there.


Picture
Interest for All Ages
Ithaca Childrens Garden, Ithaca, NY. 
There are many childrens’ gardens located throughout the country, but I have a soft spot for this one in the Finger Lakes Region of upsate New York.  Maybe because it’s just a few miles from 215’ high Taughannock Falls.  Maybe because its nearly impossible not to be inspired by all the amazing gorges and rock formations throughout the area.  Or maybe its because of their awesomely stated goal of inspiring the next generation of environmental stewards.  Whatever the reason, in my opinion this is exactly what a garden should be.  Inviting. Interactive.  Fun.  None of that “stay on the path, don’t touch” mentality.  Nope.  Just kids playing in the dirt, exploring, getting involved, and most importantly having fun.  Grown-ups too.  And oh yeah, they’re host to International Mud Day events, where kids (of all ages) are actually ENCOURAGED to play in the mud.  Imagine that.  Cool indeed.

Picture
The Scott Amphitheater at Swarthmore College
Scott Amphitheater/Arboretum, Swarthmore PA. 
Just to show you that you don’t need to be a world-class traveler to
enjoy world-class gardens, I’m including this one located less than a mile from my house.  I wrote about Scott Arboretum in more detail in an earlier post last year, but its worth mentioning again, if for no other reason than just to illustrate that great gardens can be located anywhere and everywhere.  But there are plenty of other reasons to include it on this list as well, like the world-class holly, magnolia and oak collections, idyllic Crum Creek, and the absolutely amazing amphitheater, with its masterfully created stone bench walls and majestic tulip tree canopy.

Admittedly this is just a sampling, but hopefully it’ll provide a bit more inspiration to anybody thinking about an outdoor project this year.  And even if you’re not, these are still great places to visit.  Go out and get inspired!

2 Comments

Patio Design Inspiration

2/22/2013

2 Comments

 
Every year there’s always one weekend when my phone starts ringing off the hook.  It’s usually sometime around mid-to-late March, that first really nice weekend when everybody gets out in their yards, starts in earnest their spring clean-up, and says something along the lines of “Oh yeah, we wanted to get a new patio installed this year…”

And who knows, maybe that’ll be you this year.  And maybe you’ve already started kicking around few thoughts.  Or
maybe you’re struggling to come up with some ideas.

Many homeowners like to visit local supply yards to get a sense of styles and what products are available, and look over some design ideas.  Most suppliers have a display courtyard with many of their more “popular” products.  Paver manufacturers offer catalogues upon catalogues of their product lines, all designed to help sell as many products as possible.  And many suppliers will also display some “basic” flagstone designs, all laid out to appeal to the masses.

And many homeowners are able to find something that works for them.  I always encourage clients and prospects to look at “live” samples, and a supplier is a great place to get started.

The problem with this technique however, is that because these display areas are set up to appeal to nearly everybody and offend no one, the result is a somewhat chocolate and vanilla selection.  Do I like vanilla ice cream?  Yes, of course, but what really gets me excited is Peanut Butter Swirl or Pralines and Pecans.  And getting back to hardscaping, you’re probably not going to see those designs in a catalogue or display area.

So I wanted to show a couple of patio design samples, designed to be slightly off the beaten path perhaps, but to show you what can be possible with a little bit of thinking outside the box.

Picture
Reclaimed Bricks
Full disclosure here, this is the front path at my house.  This was a project that was a few years in the making as I wrestled with some design ideas (happens to the best of us) and worked on accumulating as many bricks as possible.  The bricks are a hodge-podge of leftover bricks from other projects, some were part of the original path we took out, and some were scavenged from driving around looking for demo-work and asking for bricks.  Not a single brick was purchased with the intention of being used for this project. 

We set them in a modified running bond style pattern because the various size bricks just wouldn’t line up cleanly any other way.  I love the interplay of the various shades of red, and the mortar stains from the bricks’ previous lives really add some character.  Nothing that could have been achieved by buying new bricks right off the pallet.


Picture
Irregular Flagstones with Plantings
This was a walkway we did a few years’ ago back in my California days.  The problem we were presented with was an incredibly narrow passageway between the newly built house and the side fence. We had about 3.5’ of clearance, barely enough to fit a wheelbarrow (Thanks builders!).  And certainly not enough space to do any traditional size beds flanking the path. And the homeowners and I were on the same page in that we wanted some softscaping to avoid the appearance of a barren concrete dead zone.

The solution was to incorporate the plantings into the path.  We left just enough space between the large irregular pieces of flagstone to soften the area without sacrificing space, and planted some jasmine to (eventually) cover up the fence.


Picture
Making the Most of a Small Space
These next few pictures aren’t our projects, and the photos are courtesy of Sunset Magazine (Awesome mag! Check it out if you’re not familiar). I love this picture because it really shows what can be done with a ridiculously small space.  The yard was divided in half, not just with a straight horizontal or vertical line, but rather a diagonal line from corner to corner, stretching the line as far as possible to create the illusion of more space. And the use of the irregular shaped natural flagstones adds a rustic wilderness feel, even though you’re just a few feet from the urban jungle.


Picture
Pipe Planters
Another Sunset picture here. And OK, so it’s not a patio, and no, I’m not suggesting that we can grow cactus outside here in Philly.  But I LOVE what they did for these planters. Those are old chunks of terracotta drain pipe, broken off into random length segments and stuck into the hillside as planters.  How cool is that!  A perfect example of using non-traditional materials in an everyday use.  You could also use old watering cans, wheelbarrows, bathtubs – pretty much anything that will hold soil and allow for a bit of drainage.


Picture
Assorted Variety of Materials
Follow the yellow brick road … I love this patio because it really shows how a design doesn’t have to be linear, and the material choices don’t have to be just one thing.  The combination of big stones and little stones, square stones and round stones, and stones and bricks of different types are all used together to create something truly unique and special.  I can just see my 5-year-old playing “roads” with his toy trucks following the spiral path of large stones.  Can’t do that on a square space with just one material being used.

The moral of this post? Don’t be afraid to be a little different.  Nearly everybody wants their patio, their living space, and their yard to be interesting in addition to be functional.  But in order to be interesting you need to be a little different.  And copying the manufacturer catalogues isn’t going to get you there.

I had a client a few years ago who had a collection of hose spigot handles that he set in the surface of the patio for quite an interesting and unique border around the patio.  The sky really is the limit.  Those horizontal ledge stones  for your garden walls?  Try setting them vertical instead.  Nearly every garage I’ve ever been in has some old “junk” – bricks, windowframes, garden tools – that can be incorporated into your yard or patio somehow.  Give it a shot.  Don’t be afraid.  We’re certainly not, so if you need a little help, just let us know.

2 Comments

How a Few Simple Landscaping Tips Can Keep Your Home Safe

2/8/2013

6 Comments

 
Picture
What Does A Burglar See When he Looks at Your Home?
Editor’s Note:  I’d like to try something just a bit different this week with the introduction of my first guest author, Isaac Carver.  Isaac is an accomplished home security expert who has spent over a decade in the field helping people to protect their homes.  Whether it’s talking about the latest tech or offering some creative yard or home improvement tips, he’s there to help keep you and your loved ones safe.

When it comes to the idea of home security, lots of people think you need to opt into fancy systems and high-grade surveillance equipment. While these things certainly couldn’t hurt, it’s not the only thing you can do to improve the safety of your home.

It might surprise some homeowners out there to know that there is a proactive approach you can take to home security without relying on a system. Things like yard work and home improvement – little things that can improve the overall quality of life – can make a huge difference. 

Trimming Back Hedges and Branches
Lots of people like to keep rows of hedges close to their front doors and windows. The problem here, however, is that these are unwittingly providing cover to burglars as they attempt to force their way in. If you have bushes or hedges flanking any major entry points, you might consider trimming them back. As a general rule of thumb, you should be able to see over any bushes that are in close proximity to your windows or doors. If maintenance is an issue, then you might want to consider shopping for a particular type of hedge or bush that can only grow a certain height.

Plants with thorns or spiky leaves such as roses or hollies can also be an effective deterrent when it comes to keeping unwanted visitors from entering your yard though border plantings around the perimeter of the yard. 

Tree branches provide their own unique set of trouble. While not always the case, some burglars in the past have made use of overgrown tree branches to access second floor windows and patios. Keeping up with the pruning not only makes your trees look nicer, it helps minimize the ways a burglar can get in.

Outside Lights
Some people put them in their yard, some people put them along the path leading in – wherever you decide to put them, just make sure it’s in a spot where you’ll benefit the most. For a lot of homeowners in this country, that just so happens to be near the front and back doors and the driveway area. Outside or exterior lights can be purchased in most major hardware stores and many of them are easy enough to install. These lights also come in a variety of forms. Some are solar powered, some have sensors that detect when it’s dark enough to automatically turn on, and some have motion sensors.

The kind with motion sensors built in are especially helpful in securing your home because of how they work. If even a small amount of movement is detected within range of the lights – be it from a four-legged or two-legged intruder – the lights flash on conveying the illusion that someone is home, and illuminating any misdeeds the intruder is trying to hide.
 
Gravel Paths
Loose stone or gravel paths serve a number of different purposes. Primarily, they provide people with an obvious path into the home at a relatively affordable cost. Depending on what you’re going for, from a landscaping perspective, gravel paths can also provide a visually pleasing contrast against all the surrounding softscaping. Gravel paths can also open the door to more creative opportunities regarding your yard, like native rock gardens or water features. 

Reading this, though, you might be asking yourself: How can a gravel path actually help secure the home?  By giving you enough warning to act if someone is approaching your front door. How many people do you know that can actually tread quietly on such a surface? You’ll hear their approach and so will any canine companions you have in the home.

Fences and Gates
Putting in a fence serves a number of different purposes from marking your property to confining the area of play for your little children and pets. While not necessarily a guaranteed crime stopper, the inherent structure and boundary presented by a fence can impede the progress of a would-be intruder.

Also remember that when you put a gate in, unless it is properly secured, you might as well be carving a hole in your fence. You need a sturdy lock to secure that gate and it’s wise to make sure the gate is the same height as the rest of the fence.

If All Else Fails
You can always put out a search for home security systems if, after all these tips, you still aren’t quite sure about the safety and security of yourself and your home. Some brands and sites like http://www.homessecurity.com/, for example, offer some of the best systems on the market.

However you decide to protect your home, just remember that with a little work and maintenance, you can not only improve the look of your home, but the overall quality of life within. It’s about time your home looked safe in addition to looking good.

6 Comments
<<Previous
    Picture

    Company

    Clark Kent Creations, LLC is a full-service landscape construction company servicing the Pennsylvania communities of Delaware County, Chester County, The Main Line, and the University City, Art Museum, and Manayunk/Roxborough neighborhoods of Philadelphia.  In addition to this blog page, additional information regarding the company and our services can be found on the subsequent pages of the site.
    Picture

    Author

    Clark Linderman is the president of Clark Kent Creations, LLC, a landscape construction company based in Swarthmore, PA.  He is a proud graduate of the University of Michigan.  In addition to his passion for all things outdoors, he counts Michigan football, Phillies baseball, Superman memorabilia, Memphis R&B music, and good craft brews among his many interests.  He currently resides in Swarthmore with his wife, Sheila, two sons, his dog Krypto, and a really, really messy garage full of work supplies and toys.

    Picture
    Contact Us:
    Clark Kent Creations, LLC
    Swarthmore, PA
    Design and Construction to Maximize Your Outdoor Experience

    707-290-9410
    clark@clarkkentcreations.com
    Serving Delaware County, PA

    View my profile on LinkedIn

    Categories

    All
    Business And The Front Office
    Carpentry
    Environmental Issues
    Fencing
    Guest Posts
    Hardscaping
    Inspiration And Design Ideas
    Places & Local Interest
    Ramblings
    Seasonal
    Snack Break
    Water Features

    Archives

    July 2015
    September 2014
    February 2014
    January 2014
    December 2013
    November 2013
    October 2013
    September 2013
    August 2013
    July 2013
    June 2013
    May 2013
    April 2013
    March 2013
    February 2013
    January 2013
    December 2012
    November 2012
    October 2012
    September 2012
    August 2012
    July 2012
    June 2012
    May 2012
    April 2012
    March 2012
    February 2012
    January 2012
    December 2011

    Like my Blog?

    If you like the content of my blog posts, here are a few other blogs that I check in on regularly:

    Stone Soup:  A Master Stone Mason shares his craft.

    Arcadia Gardens:  Plenty of great tips about horticulture and landscape design.  A great blog (even though she's an MSU Spartan!)

    Revolutionary Gardens:  A Virginia-based landscape designer shares his work and ideas.

    Rockin Walls:  A certified dry stone mason from Maryland shares his projects and tricks of the trade

    If you have or know of a blog that you think I might be interested in, just let me know.  If I like it I just may add it to the list!

    RSS Feed

    All content ©2013
    Clark Kent Creations, LLC
Proudly powered by Weebly