Clark Kent Creations -- Swarthmore, PA. Landscape Design and Construction, Hardscaping, Patios
  • Home
  • Services/Photos
    • Hardscaping >
      • A Flagstone Walkway -- The Process
      • Stone Steps -- The Process
    • Wood Fences
    • Exterior Carpentry
  • About
  • Community

Converting a Balcony to a Deck -- And the Importance of Knowing Your Design Goals

8/9/2013

1 Comment

 
I'm typically an advocate for having homeowners spend a year or two in their homes before making any rash decisions on how to change their yards.  Get a sense of how the yard will be used, where the sun shines in winter, where the shade hits in summer, where people tend to walk, and where people tend to congregate.  If you think about it, it makes perfect sense.  As excited as new homeowners are to leave their mark on the yard and make it their own, you want to make sure that any money being spent is being spent wisely.

A good example of this is a relatively new townhouse development that was built here in Swarthmore.  I say "relatively" because many people wouldn't consider a 10-year-old development to be new, but compared with the 100-year-old neighborhoods surrounding the development, it still appears to have that new car shine to it.

The homes were built with all the amenities that new homebuyers have come to expect -- Central air, granite countertops, state-of-the-art kitchens and baths, and shiny new appliances.  And because they're a townhouse community, the homes don't have their own yards per se, but they are surrounded with well-maintained gardens and each has their own private balcony.

And those balconies are the subject of this week's post.

It seems the builders were so focused on giving each unit its own little slice of private outdoor space, that they neglected to think that maybe the homeowners might want to get down off of their balconies, tend to their gardens, intermingle with neighbors, and be a part of the outdoors as opposed to simply observing.
Picture
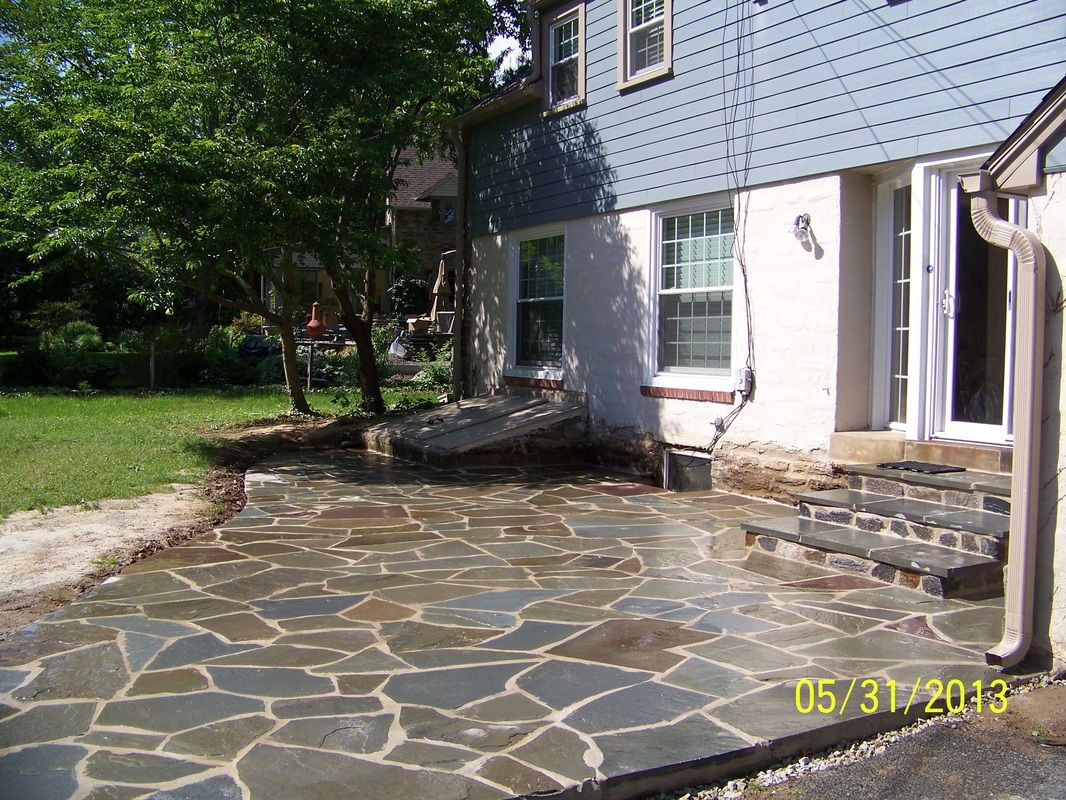
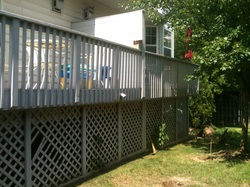
The "Before" Picture of the Existing Balconies
I was approached by a handful of residents in conjunction with the Townhouse Association to convert these balconies into decks, complete with steps and direct access to the green areas below.

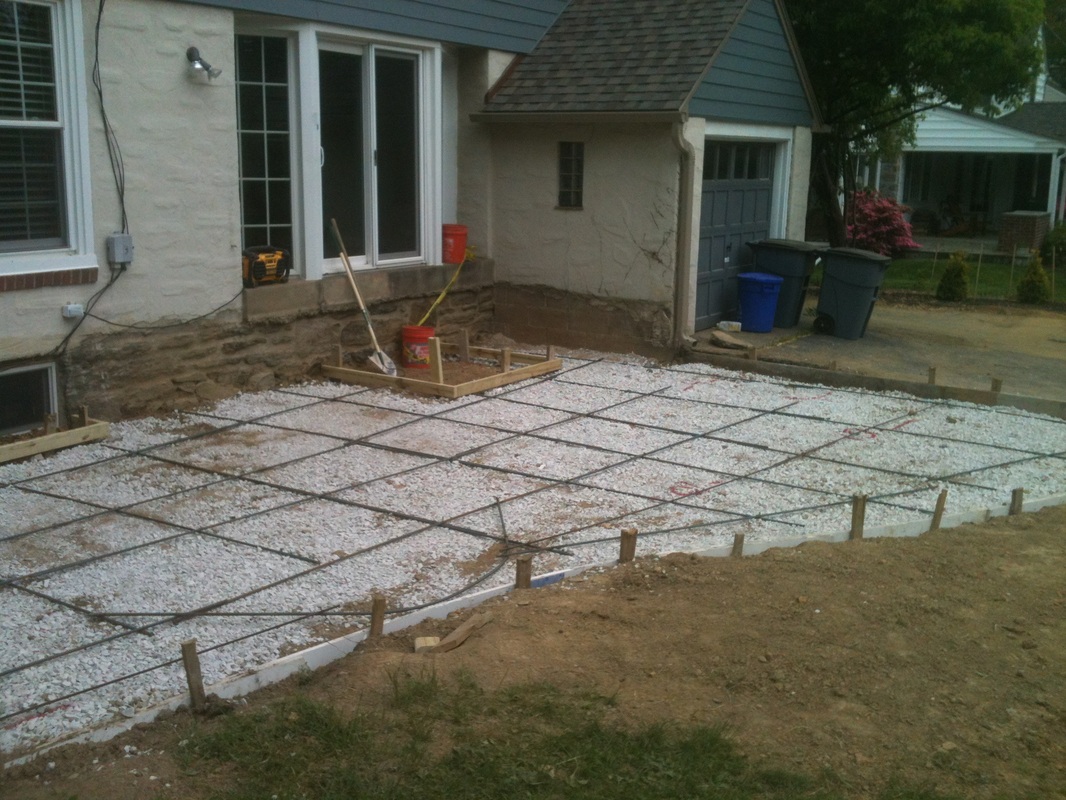
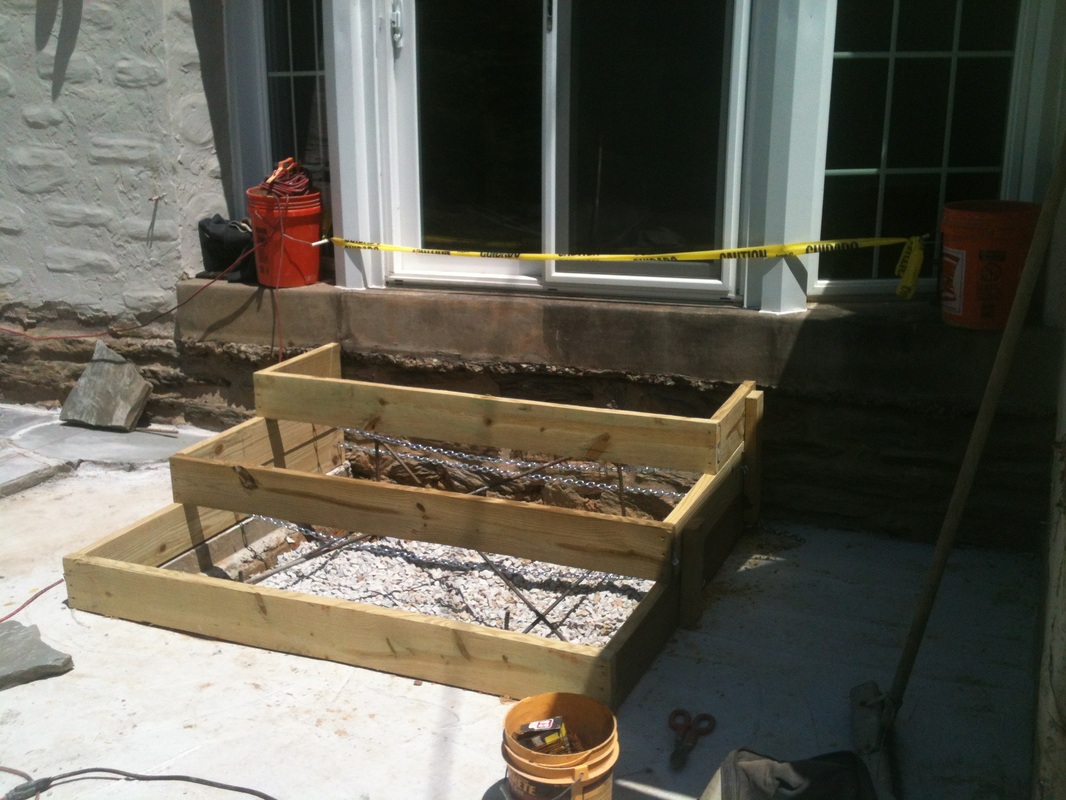
The challenge was that because of the original design of the community and the space it was built on, we didn't have a whole lot of space to build on.  And we certainly didn't want to add steps at the expense of the existing outdoor space on each deck.

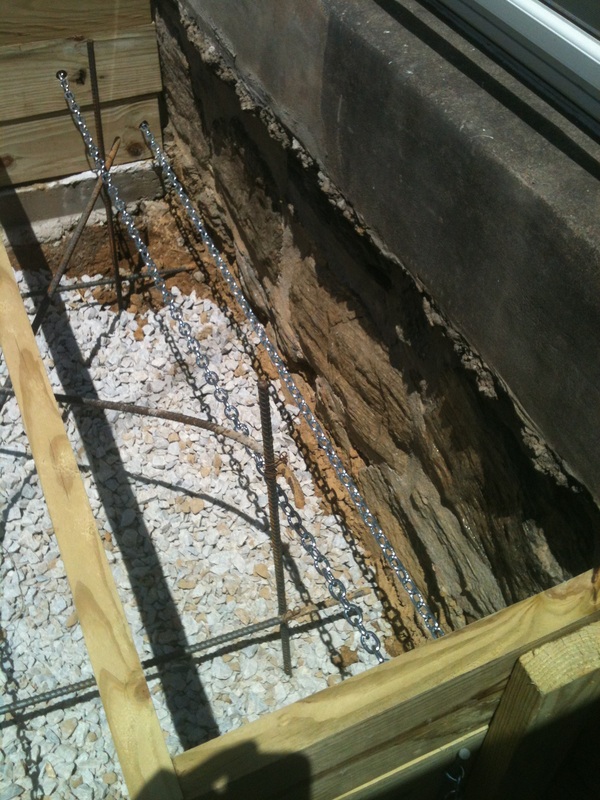
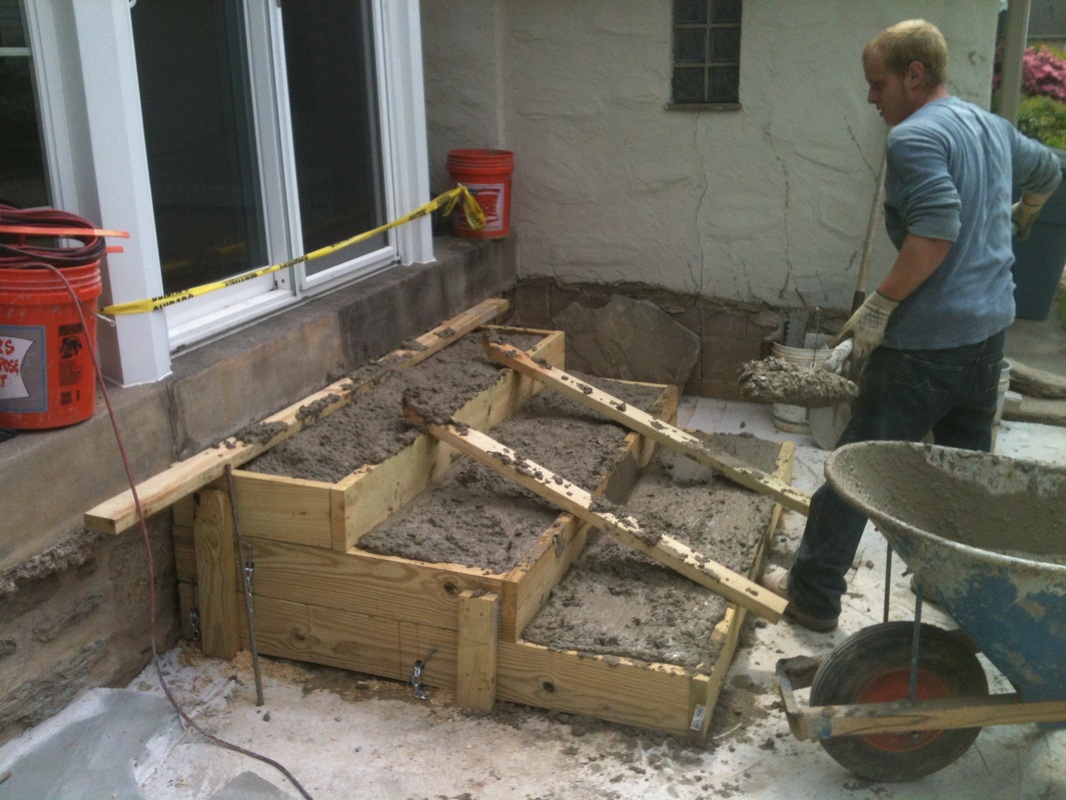
The design of each existing balcony allowed us to build a single shared landing that would feed into two of the private outdoor spaces.  Due to the limited space of land, and the desire not to disturb the gardens more than necessary, we wanted to minimize the footprint of the new designs.  As a result, the shared landing would then lead to a set of steps running parallel with the back edge of the balconies. 

Picture
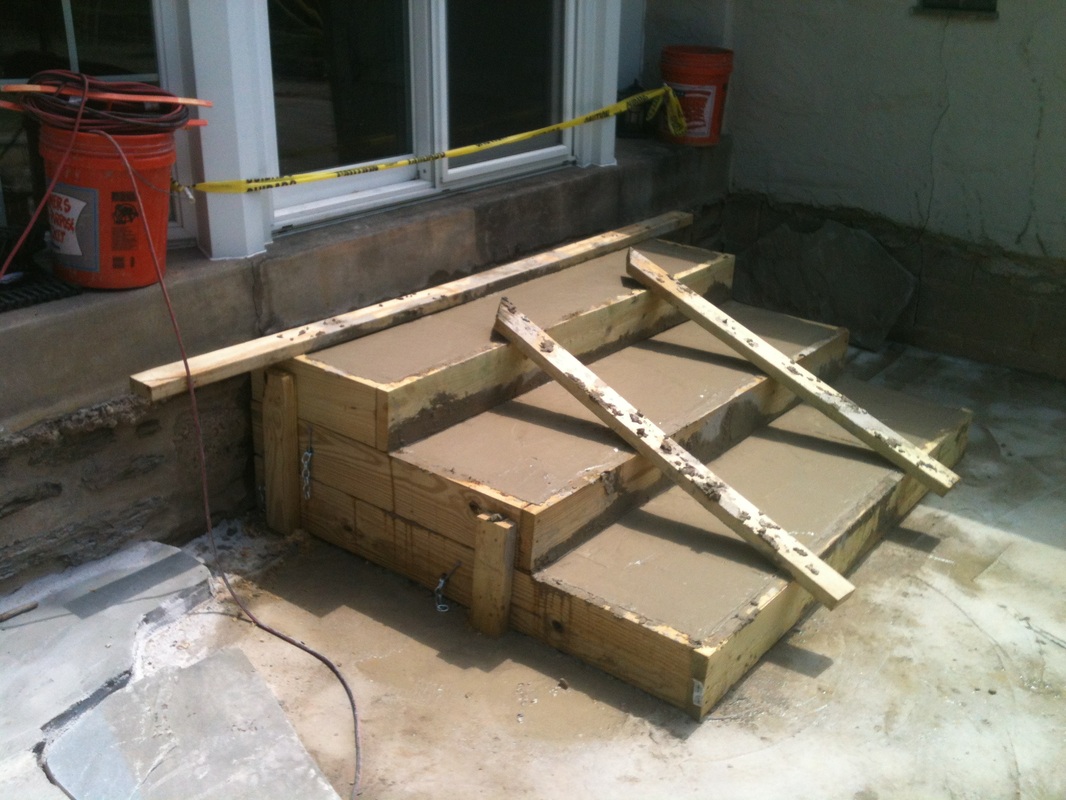
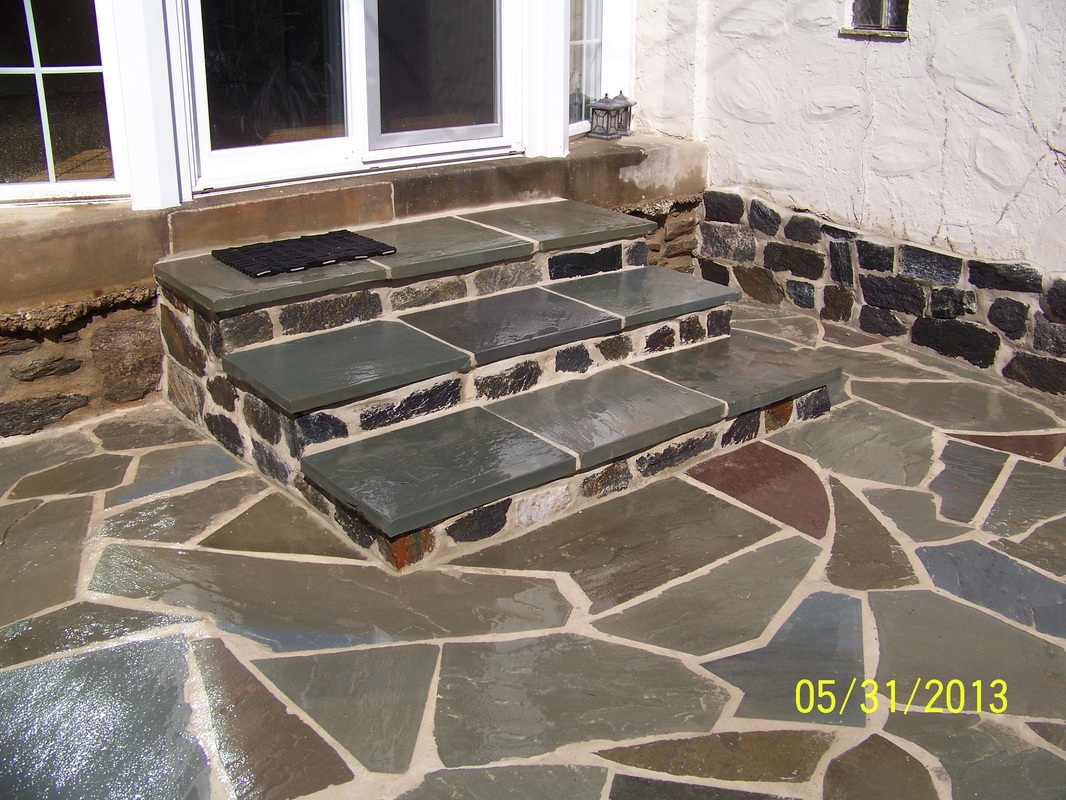
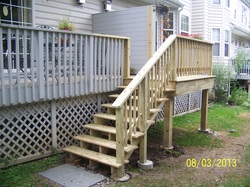
And the "After" Picture of One Set of Steps
Depending on the exact site of each unit, the balconies ranged in height from about 4 to 6 feet.  We were able to utilize the same design for each set of two balconies, with the only difference being the height and the number of steps necessary to reach grade.

From a construction point-of-view, it was nice being able to build these steps en masse, utilizing an assembly line approach.  All the footings were dug, piers were poured, framing was set, and decking installed in unison, allowing us to knock the whole project out relatively quickly.

And as we neared completion, the homeowners were thrilled with their new sense of freedom.  Several of the units that backed up to one another already christened the steps before we even finished the railings, setting up a firepit in the shared public space, and intermingling over a weekend evening summer barbecue.  Just the sort of activity that makes summer memorable.

The project was a success on many fronts, but it all started because the homeowners had successfully ID'd their needs and desires.  When they called us they had a clear picture of how they wanted their spaces to be used.  It was up to us to design it and make it happen.

Got a few ideas for your own outdoor space?  Give us a call and let us know what we can do for you!

1 Comment

Hardscaping Careers and the State of the Labor Force

8/2/2013

1 Comment

 
PictureMy Workers ... Hard at Work
I’ve been thinking a lot lately about careers.  Not my career necessarily, but just the state of the labor force and the difference between a job and a career.

As a business owner I rely heavily on the labor force.  I need strong and healthy workers who are willing and able to work.  And when I say “willing to work”, I mean actually working, not just being employed.  It sounds straight-forward enough, no doubt.  Show up on time, be reliable, provide a little muscle, break a sweat, learn a few things, and grow your career.

I think for most people of my generation, that’s the way we started our careers.  The stories and details may all be a little different, but the theme is the same – work hard, learn, grow.

But over the past few years, I’ve noticed that it has gotten harder and harder to sift through the pool of applicants and find workers who are willing to work hard and learn.

Don’t get me wrong – my current workers are great.  I get compliments all the time from clients who tell me how pleased they are with my crew, how respectful and courteous the guys are, what a pleasure it is not to be bombarded with loud music or disrespectful behavior.

Truth be told, I pride myself on that.  And I work hard at finding the right guys.  But it does seem to be getting harder and harder to weed out the wannabes, the “entitled”, the lazy, the “know-it-alls”, or just the dim bulbs.

I guess my thought process began a few weeks ago when I saw an interview with Mike Rowe of Dirty Jobs.  For those of you who aren’t familiar with the show, he basically travels the country looking for the sewer rats, the hog farmers, the trash sorters, etc – all the jobs most people wouldn’t want to touch.

The workers are all hard-working Americans who clock in an honest day’s labor doing often unpleasant tasks, all while taking pride in their work and supporting their families.

His travels and encounters have given him a frontline look at the state of the American workforce, and the jobs that are needed, and oftentimes available.

His take was interesting, as he argued that even though we currently hear a lot about the high level of unemployment, we don’t hear a lot about the thousands and thousands of jobs available for those who are willing to take them.  And he didn’t blame the workforce necessarily.  The blame, he argued, is on the disconnect between the education system that is training young people for jobs that aren’t needed, while simultaneously creating a stigma against jobs where you may get a bit greasy, sweaty, dirty, etc.

So while thousands of decent-paying, reliable jobs are available, our education system is perpetuating an atmosphere where students borrow money that they won’t be able to pay back, to train for jobs that aren’t available.  

An interesting perspective, no doubt.

PictureQuitting Time for Fred Flintstone
So what does this mean for me and you?  Well I can’t speak for you, but for me it’s an opportunity to provide a bit of insight as to what I look for in an employee, and perhaps how to break in to the hardscaping or landscaping trades, if you’re just getting started.

So here’s my tips for you young’uns out there looking for a job.

Be dependable.  Show up on time.  If your day starts at 8am, show up at 7:55 so you’re ready to work at 8am. If you’ve spent the past few years being a lazy college student sitting on your couch watching gameshows, then you’ll know that the Price is Right rules mean you can’t go over.  That means 8:02 is no good for an 8am start.  Fix your alarm clock.  Fill up with gas.  No excuses. It’s about the easiest thing that makes the biggest impression on your boss.  If I can count on you to be on time, then I can probably count on you for lots of other things too.

Listen.  When I’m telling you what to do, pay attention.  Boss talking is not check your weather app time.  If I’m not making sense (which happens), then let me know. I’ll say it another way so I do make sense.  Don’t sit there and nod and then not do things the right way because you didn’t listen. I don’t like wasting my breath. Most bosses don’t.  Listen to what I say, and then do it.  Another pretty easy one.

Learn.  The first two items are huge, but admittedly easy. This is where things start ratcheting up a bit.  When you listen to what I tell you and what I teach, hopefully you’re retaining a bit for the next time.  If you’re a worker looking
to impress your boss, there is no quicker way than to demonstrate that you remember and are applying what you were told the last time. The less I have to tell you as a worker, the more value you are to me.

Treat it like a career, not a job.  I get it.  A 22-year-old kid is looking for beer money and wants to spend his time with his friends.  Been there.  I know.  Remember the old intro to The Flintstones when the 5pm horn sounded and Fred threw down what he was doing mid-task to go home.  That doesn’t fly these days.  If you want to advance, you want a raise, you want more responsibilities, you want to be recognized, then a little extra effort is required.  My day doesn’t end at 5pm, far from it.  If a worker can demonstrate to me that they are more interested in getting a job done well, taking the extra time to stay organized, or getting a few extra tasks done than they are to leave at 5pm sharp, that goes along way. Plus you’ll earn a few extra bucks in the process.

Think.  I’ve read a number of articles on this lately, today’s youth is losing the ability to logically solve problems.  Blame it on cell phones, or video games, or today’s education – whatever.  But the ability to look at a situation, recognize or assess a problem, and come up with a solution is sadly becoming a lost skill.  Even though you may be able to follow instructions (ie paint-by-numbers) doesn’t mean you can create your own instructions, or adapt if something isn’t quite as planned (ie paint your own masterpiece) .  It’s important, and if you can demonstrate some problem-solving ability, you’ll go far, not just in one job, but in your career as a whole.

Are you looking for a job in the hardscaping industry with hands-on training?  Think you have what it takes?  We always keep interesting respectable resumes on file.  Make yourself known to us.  Always the first step.

1 Comment

A Small Dry-Set Flagstone Walkway Project

7/26/2013

0 Comments

 
PictureFlagstones Set in Sand Atop a Compacted Gravel Base
As a landscape contractor who blogs, I have tendency to focus my writings on either industry trends, seasonal information, or some of the many large projects we undertake.

Lost in the shuffle of my writings and ramblings however, are some of the many small projects we undertake on a regular basis.

A few weeks ago we had a short week as we prepared for the long Fourth of July weekend.  We had just finished a large patio project, the Thursday and Friday extended Holiday weekend was looming, and our next project wasn’t due to start until the following week because the homeowners were out of town.  
 
Thankfully this provided us with the opportunity to fill the schedule with a small dryset flagstone walkway project.

The existing layout of the yard included a driveway that ended about 20’ short of an existing flagstone patio.  The homeowners had placed a series of stepping stones connecting the driveway to the patio, but the stones would inevitably get buried beneath the encroaching grass or get covered in mud due to some suspect grading.

So they enlisted our services to fix the problem.

The existing patio was a wet-set PA graystone patio, set in a linear pattern of squares and rectangles. The homeowners really liked the look of the natural stone, however their personal tastes ranged more on the rustic irregular side of things.  And they didn’t want to spend a lot of money on a small walkway.

So we decided upon a dryset walkway using irregular-shaped PA graystones.

The project began by excavating out the footprint for the new walkway, digging approximately 6” down where the new walkway was to be installed.  The footprint was then filled with crushed modified gravel and compacted to give a firm foundation to the new walkway.  

We then covered the compacted gravel with a thin (approximately 1” +/-) layer of sand. The sand helps to give a softer bed in which to place the flagstones, and also helps to accommodate for the slight difference in stone thickness without affecting the finish grade.

PictureThe Completed Project
Random-shaped irregular flagstones were purchased, averaging approximately 1.5” in thickness.  Each stone is carefully placed in the
bed of sand, making sure we have a firm placement with no rocking or wobbling of the stones.  For a dryset application such as this, we like to use thicker stones to help keep them in place and avoid them “floating” on top of the sand.

For a professional look, it is important to keep the joint widths between each stone to a minimum.  As a result there is certainly some “puzzle-building” that needs to occur.

I like to lay out all the stones in advance so I can get a true sense of the sizes and shapes we’ll be working with.  Maybe it’s just the geography geek in me, but I tend to envision each stone as a shape of a state.  As the pieces start to fit together, it’s not uncommon for me to think to myself “we need a South Carolina to fit over here”, or “if only we had an Ohio to fit against the curve of that last one”.  (Editor’s note:  some states just don’t work – stay away from the skinny panhandles of Florida and Oklahoma, West Virginia just doesn’t look natural, and Michigan, well forget about that whole Upper Peninsula thing …)

Sometimes we will have to do some minor cutting of the stones to help get a clean fit, but we try to avoid it as much as possible.  The less cutting you do, the more natural it will look.

Once all the stones are placed and fit together nicely, the last step is to sweep the walkway to fill in the joints.  We usually sweep the joints with “screenings” – a by-product of the quarrying process consisting of small crumbs of stone that lock together nicely and avoid washing out.

And that’s it.  Start-to-finish in this case the project took about 2 and a half days.  The perfect filler between some of our larger projects.  The homeowner is happy with their new walkway, and we get to keep working despite an awkward calendar and a short week.

Do you have a small hardscaping project that you’ve been putting off, or just assume a contractor won’t want to handle?  If so, give us a call.  I’ll be happy to come take a look.

0 Comments

A Midsummer Day's Paver Project

7/19/2013

0 Comments

 
Picture"Whatever I touch, starts to melt in my clutch. I'm too much."
I’ve made it no secret in the past that summer is my favorite season.  But despite ALL the things tipping the scales in summer’s favor (and there are a lot!), it can be, quite frankly, somewhat trying to work in when that midsummer heatwave hits.

It seems like every summer, usually around mid-July, we’re hit with one or two real doozies of a heat wave.  And the projects we’re working on during those heatwaves are etched in my brain for eternity – the concrete job where we were constantly battling the streams of sweat dripping off our faces messing up our finish, the excavation job where we were covered in caked-on dirt that refused to let go of our sweat-covered arms and faces, the patio job where the surface temperature of the stones must have been well into the 130’s or 140’s.  Yup, name the year, and I’ll tell you where we were during the big heat wave.

Well this year’s heat wave has arrived, and we have embraced it once again.  High temperatures have averaged well into the upper 90’s, with humidity to match and nighttime lows only in the mid 80’s.  No doubt, it’s hot.

And it’s not just the air temperature that gets hot.  Ever try picking up a black steel pry bar after sitting in the hot sun for an hour or two?  Let’s just say I don’t recommend it.  I wear heavy rubber gloves when I’m using the bricksaw, and I swear they were just as wet on the inside from sweat the other day as on the outside.  And I made the mistake of leaving them on the hood of my black truck for a few minutes while I took a phone call.  Somehow or other the gloves didn’t melt, but I put them back on and nearly scalded my hands as the moisture on the inside of the gloves must have been approaching boiling.  Ouch.

But that doesn’t stop us from carrying on.  I’ve had a few clients comment to me that they can’t believe we’re working in this heat. My reply is that if we waited for the perfect day to work, we’d probably only be working 5 to 6 months a year. And that ain’t gonna swing it as far as maintaining a sustainable business.  So we carry on.

Truth be told, I really don’t mind the extreme heat.  Is it ideal? – Well of course not, but it sure beats those late fall jobs or early spring jobs when we have to thaw out the hose in the morning and we can’t move or feel our fingers throughout the day.  I’ll take the heat over the cold any day.

PictureThis Year's "Hot" Project
The trick is just to accept and embrace it.  When your shirt is saturated with sweat by 10 am you really don’t have much choice.  As long as you’re drinking your water and listening to your body, you’ll be fine.  Sweaty, but fine.

I went to the bank at lunch the other day, drenched in sweat from head to toe, with a nice layer of dirt and sand and mortar sticking to me like I was some sort of magnet.  A cute young girl went to get in line behind me, and it was quite apparent that she didn’t want to get anywhere near my sweaty self. That’s right I work, got a problem?

Thankfully my wife is much more understanding.

So where were we during this year’s big heat?  Not that it’s ended yet, or that it won’t return in a few weeks, but so far we’ve endured this year’s heat while doing a paver stone patio project.  The project turned out great, and a big thanks to our clients Bill and Rose who continuously offered us ice water and cold juice throughout the day.  Good clients and nice people are just the best.  Period.  Thanks guys!

So according to the forecast, the heat is supposed to break on Saturday when a line of storms passes through.  I can’t say I’ll be sad to see the heatwave go, but a part of me really kind of embraces and, dare I say it, enjoys the extremes.  Enjoy it while its here.  Or at least make the best of it.  It never lasts too long, and it certainly gives us something to talk about (or blog about) in the mean time.

To quote Ferb from one of my kids’ favorite shows Phineas and Ferb, “Summer – it’s noticeably warmer”.  Indeed it is Ferb, indeed it is.

0 Comments

A Great Business Coach 5 Reasons Why Yoda Would Make ...

7/12/2013

2 Comments

 
PictureAnd I'm Pretty Sure he has a Green Thumb too!
My Star Wars geekiness maxes out at about a 6 out of ten.  I certainly know my way around the double trilogies, but I have yet to attend Comicon in full stormtrooper regalia.  Maybe someday, but doubtful.

But regardless of your sci-fi affections, I think there is one universal truth that we can agree on – Yoda is one cool dude, and one who can teach us all a thing or two.

I remember seeing “The Empire Strikes Back” in the theater when I was 10.  The anticipation mounted as our hero Luke Skywalker escaped the clutches of the evil Darth Vader and sought out the Jedi wisdom of the Jedi Master Yoda.  “Wow,” I remember thinking to myself, “this Yoda guy is going to be one all-American space hero!” 

The moment came when Yoda finally revealed himself to us and – wait a minute, Yoda is a little green muppet!!??  (With some serious subject/predicate sentence structure issues, I might add).

But as we got to know Yoda better through the remainder of the movie, and remaining sequels as well, we came to learn that indeed Yoda has a lot we all could learn from.  If he’s not the original zen-master, he certainly at least ranks near the top.

And that’s kind of the point.  Erase all preconceptions, erase what you think you know, observe and learn.

And when you think about it, isn’t that kind of what running a business is all about?  Lets take a look at some of Yoda’s more famous quotes, and see how they relate to running a business.

"Try not.  Do or do not.  There is no try."  This quote is perhaps my favorite.  In current language it probably translates in to something along the lines of “Get’er done.” When my five-year-old gets frustrated at something he can’t do he always reverts to “Well I tried.”  In business “tried” isn’t good enough.  It’s the results that matter.  Just because achieving sales goals may be difficult, or excavating into a stone hillside may seem a bit overwhelming doesn’t mean it can’t be done.  It just means the methods need to be re-evaluated.  Either it gets done, or it doesn’t.  In the end, the effort doesn’t matter.

"Size matters not, ... Look at me. Judge me by size, do you?"  As a small business owner I think we all can relate to this one.  In today’s world of big box store chains and large corporations we are constantly bombarded with advertising and marketing telling us why we need the services of these chains (even if we often don’t).  And as business owners I think sometimes we feel the need to grow to compete with the big boys.  Personally, I like to think smaller is better.  More responsive, more attention to detail, more levels of personal service.  As long as we’re doing what we set out to do, does it really matter what the size is?
 
"Fear is the path to the dark side. Fear leads to anger, anger leads to hate, hate leads to suffering."  Working backwards on this quote, as business owners we certainly don’t want to suffer.  We certainly don’t want to hate what we do.  And we certainly don’t want to get angry when things don’t go our way.  We can’t be afraid to offer new services or new products, and we can’t be afraid that things won’t turn out the way we want them to.  Be confident in what you do.  If you’re not, then prepare or train more until the confidence is there.

"Always in motion is the future."  I’m a big proponent of choices, in life and contracting.  And I always say that the choices we make today will affect what happens to you tomorrow.  The point of this quote is that we control the future through our actions, and what choices we make today.  You shouldn’t choose one material or product over another strictly based on price, you need to be prepared to enjoy those materials well into the future.  You shouldn’t increase your advertising budget if you’re not prepared for the additional business.  You shouldn’t increase staffing if you’re not prepared for the additional payroll burden.  Always in motion is the future, indeed.  The good news is we have a say in that motion.

“[Luke:] I can’t believe it. [Yoda:] That is why you fail.”  You never heard Steve Jobs say he couldn’t believe Apple was successful.  You never hear Steven Spielberg act surprised when one of his movies cleans up at the Oscars.  And you never hear Roy Halliday act surprised when he pitches a great game. Successful people and businesses expect to be successful.  They’ve trained for it, they’ve worked at it, and they’ve prepared for it.  Believe it.

For more Jedi wisdom, or simply to inquire about landscape construction services, please feel free to give us a call. 
And if you’re looking for a quality landscape contractor, I might add one final Yoda pearl of wisdom:  “Looking? Found someone you have…”

2 Comments

It's Hot Out There!  -- 5 Basic Precautions to Take.

7/5/2013

0 Comments

 
Picture
**  Editors Note:  The following is an archive post, but with summer here and heat gripping much of the country, it never hurts to take a second to remind us how to be safe in the summer heat.

For those of us who work outdoors, summer is typically a welcome time of year.  Longer daylight hours, plenty of work, and usually nice weather in which to work.  But with summer often comes a few heat waves, and right now much of the country is in for a doozy.  Plenty of records being set, excessive heat waves, massive thunderstorms and power outages.

Even my trusty i-phone is feeling the effects.  I went to make a call earlier today at work, and a big yellow exclamation mark appeared on the screen with a brief message -- "Excessive Heat.  Please allow iphone to cool off before using."

Here in the Philadelphia area, we've had consistent temperatures in the mid to upper 90s, and the forecast calls for
continued heat through the next few days. Triple digits are even in the forecast for the weekend.

And as much as us outdoorsy types usually welcome the warmer weather, if we fail to take a few basic precautions, that heat can cause some serious health problems.  Even the fittest and most strongest can feel the effects if we're not careful.  Here are five basic precautions to take to avoid falling prey to the heat.

1.  Hydrate, hydrate, hydrate!  Make sure to keep up with with water intake.  This doesn't mean waiting until you're thirsty to grab a drink, by that point the body is playing catch-up.  And it most certainly doesn't mean drinking lots of coffee in the morning or drinking too much alcohol the night before.  Avoid drinks with caffeine, sugar, or alcohol, this includes most energy drinks.  The best thing to do is "prime the pump" with plenty of water consumption in the morning, consistently throughout the day, and in the evening before bed.  It sounds cliche, but stay hydrated!

2.  Adjust the hours of strenuous activity, if possible.  Sure, it's our job to work hard during the day, but if we can get a little earlier start, or get the bulk of the heavy work done earlier in the day before the heat peaks, it will help.

3.  Take your time.  My best workers are animals.  Seriously.  They're big strong guys who are athletes and are used to pushing their bodies.  But even the biggest and strongest guys can fall victim to the heat if they're not smart about it.  Take a little breather between wheelbarrow loads or at regular intervals during digging.  If you wait until you're feeling weak or tired, it may be too late.

4.  Dress smart.  The best clothes to wear are loose fitting lightweight clothes that breathe and will keep the direct sunlight off your body.  The tendency is for guys to think that the less clothes they wear the better.  This is false.  Have you ever noticed that workers in the middle east tend to wear loose-fitting robes that cover most of the body, or that Central American workers often wear long sleeves or even long pants?  These guys know what they're doing.  There's a reason workers in the desert regions of the world don't go shirtless.  Keep the body shaded and out of the direct sun.  That doesn't mean wear a sweater or a jacket, but don't let the sun affect your body any more than need be.

5.  Listen to your body. If at any point during the day you're feeling excessively tired, light-headed, nauseous, or experiencing muscle cramps or headaches, take a breather.  Find a cool spot in the shade, drink a cool glass of water, and try to cool off and regain your strength.  For people who are used to pushing themselves, this may seem like a wimpy thing to do and you may think this shows signs of weakness or a poor work ethic.  To the contrary.  As a boss I'd rather have a worker who is taking care of themselves to remain productive, instead of pushing themselves to the point of being completely useless.

A few other quick heat-related notes.  If you are on any special medications, be sure to check with your doctor to make sure that you aren't prone to any additional heat-related side effects.  Diuretics and antihistamines in particular can cause additional problems if you're out in the sun or heat for a prolonged period of time.  And even if you're not working outdoors, make sure you check on the elderly, your pets, or young children to make sure they're doing OK.

We can't change the weather, but we certainly can control how it affects us.  Be careful out there!

0 Comments

How Much Will My Flagstone Patio Cost?  Basic Hardscaping Pricing for Delaware County PA

6/21/2013

0 Comments

 
PictureWet-set Brick Walkway
Every single meeting I’ve ever had with a client or prospect to discuss a new hardscaping project always ends up with one question.

“So how much is it going to cost?”

Well that’s kind of the million dollar question, isn’t it?  And hopefully, it’s not a million dollar answer.

Rest assured, unless you have the biggest, grandest dreams for a patio I’ve ever seen, your patio is not going to cost a million dollars.

But the question is certainly a legitimate one, and one which we’re asked all the time.

And of course, the answer varies based on a number of factors.  Size and materials are probably the two biggest factors, but other site-specific factors can also come into play, which is why most contractors are always a bit hesitant to mention even a ballpark price without seeing the site first.

But I’m going to buck the trend.  Right here. Right now.

No wait, I will tease you a bit more.  It’s important to note that the costs I’m about to share are BALLPARK COSTS.  Every site is different.  Conditions.  Access.  Soil.  Trees.  Roots.  Can we fit a dumpster in the driveway?  Can we stage the pallets next to where we’re working?  Is there easy-to-access power?  Easy-to-access water?  Will the yard drain properly?  Do we need a pump truck for concrete?  Do we need to build up the grade with a wall?  Etc.  You get the idea.  
 
So no, those “We install Flagstone Patios for $12/square foot” signs I’ve seen around probably aren’t telling you everything.  And to be honest, I’d be a little scared to trust their work.

Here’s more of what prices should look like here in Delaware County, PA, suburban Philadelphia.

Finished Concrete:  $10-$13 / square foot
Dryset Bricks:  $18-$21 / square foot
Dryset Paver Stones:  $19-$22/ square foot
Dryset Flagstone (PA Gray Full Color Natural Cleft):  $23-$24 / square foot
Wetset Bricks:  $24-$27 square foot
Wetset Flagstone (PA Gray Full color Natural Cleft):  $27-$29 / square foot

Again, these are BALLPARK costs.  And in addition to the site conditions listed above, economy of scale plays into it too. So a 4x4 sidewalk square replacement certainly isn’t going to be priced at the same rate as a 700 sf patio project.

It’s also important to note that costs can vary based on who is doing the work.  
 
If you hire a weekend warrior who found you driving around the neighborhood, you may be paying a bit less than a reputable, referred, licensed contractor.  But what is his experience?  Is he licensed?  Insured? Are his workers on payroll?  These sort of things can certainly offer peace of mind.  But guess what – they also cost money for us contractors.  So if you’re willing to take a risk – sure, maybe you can save a few bucks.  But if you want to be sure of what your money is being spent on, going the licensed route is the way to go.

A properly built patio or walkway will last at least as long as you stay in your house, and most likely well beyond the time when you decide to move on.  It will provide years of enjoyment and most likely add value to your home.  But the key phrase to that sentence is “properly built.”

When I provide estimates to prospects, they are usually well prepared for the numbers that accompany the estimate.  They know they’re hiring us because of our level of expertise, our ability to not only do the heavy lifting and digging, but to construct something that is beautiful and will last, and that we have the experience to offer suggestions and make sure the job not only gets done right, but meets their goals in terms of how it will get used.  All while taking the necessary site conditions into account.

Not to say that the occasional client doesn’t suffer a bit of sticker shock on occasion when they see the price, but once they swallow that lump in their throat they are usually on board with the project.  You get what you pay for.

So there you go. Ballpark pricing.  Hopefully this will help define your budget.  And once that’s defined, the next step is to nail down the specifics.  If you’d like a free site consultation and cost estimate give us a call.  We’d love to see what we can do for you!

**  Editors Note:  The CKC blog will not appear next week, as the author takes a little mid-season R&R.  We'll be back in July with more weekly posts.  Have a great 4th of July everybody!

0 Comments

Building Forms for Concrete Steps -- And Some More Follow-up to my Swarthmore Flagstone Patio Project

6/14/2013

8 Comments

 
PictureA Rough Build-up of the Forms in Progress. More Bracing to Come
Last week I posted some follow-up pictures to a recent flagstone patio we completed.  Part of that project included a simple set of steps leading from the back door down to the patio grade.

I've talked about building steps before -- in fact there's a stand-alone page here on the site dedicated to starting a step project from scratch.

But I did want to spend a bit of time this week talking about building forms for concrete steps.

For flatwork such as patios and walkways, setting concrete forms really isn't that difficult.  As long as you pay attention to the grades and ID your footprint, it's actually kind of simple.  But steps get a bit trickier, mostly because of the amount of weight that the forms are expected to hold while the concrete is being poured.

The step project that I'm highlighting here included three steps, each measuring about 18" d x 6' w.  Including the necessary footer, the whole pour took about two yards of concrete.  That's about 8,000 lbs!!  And if you think a few simple nails will hold that kind of weight, well think again.  And if you don't believe me, feel free to try it yourself on your own dime.

The key to building forms for steps is to think like the concrete.  Where will the pressure build?  Where is the weak link that the concrete will try to escape?  What is likely to pop or bow?  All while keeping in mind that the forms need to be easily removed once the concrete sets.

For flatwork forms, we typically use Duplex nails to connect the stakes to the forms -- easy to install, easy to remove.  But for steps?  I'm not a big fan of nails for step forms.  If they're not in solidly they can pop pretty easily.  If you've ever been involved with a concrete pour when a form blows, you know it's not a fun experience.

So to avoid the forms blowing mid-pour, I usually use screws for the step forms -- a much stronger connection.  But there are a few precautions that need to be taken.  First, make sure you don't over sink the screws into the wood.  I usually leave about an 1/8" sticking out so I can easily find the screws when it comes time to remove the forms.  Secondly, it's not a bad idea to cover the screw heads to avoid concrete clogging up the screw heads.  A simple extra 10 seconds with some duct tape over the screws can save hours of banging your head against the newly formed concrete when all is said and done.

Additionally, if you think all that is required is just forming out the treads and risers, think again.  The picture on the right below shows a good illustration of the front bracing.  This helps keep the tread widths uniform, as the tendency is for the risers to bow out as the concrete is being poured.

I also tend to avoid pouring directly from the concrete truck right into the hole.  Sometimes it is tempting as it can save some labor having to wheel and/or shovel the concrete in, but as mentioned above we're talking about 8,000 lbs of concrete, and that's just for three simple steps.  Imagine that 8,000 pounds being dumped forcefully from the truck into the hole.  If you want to put added pressure on your forms, that's a good way to do it.

Picture
Chain and Rebar Detail
Picture
Chain Connections to Forms
Picture
The Completed Pour
PictureAnd the Completed Project
This pour was somewhat interesting, because as documented in last week's post, we poured the steps about a week after the surrounding patio was poured.  As a result, we didn't have a whole lot of soft ground in which to stake in our forms.

To address that, I needed to come up with a good way of securing the side walls so they wouldn't blow out or pull apart.  The answer -- chain.

Yup, there's a series of imbedded chains inside those completed steps, running the full width of the steps.  Since nobody is going to see the inside of the concrete, and since the exterior was slated to get veneered, I wasn't really concerned about leaving the chains in.

If you look at the two pictures on the left in the above sequence of three, you'll see the chain running across the width of the steps.  I drilled holes just wide enough for the chain in the forms, and secured the chain on the outside using a simple nail through one of the links.  As the pressure from the concrete intensified during the pour, the outside walls wanted to push out, but were prevented in doing so by the nail holding the chain and forms in place.  The end result was two perfectly plumb sidewalls, with no bowing or blowouts.

When the pour was done we simply pulled the nails (which had imbedded themselves slightly into the wood thanks to the force of the concrete), unscrewed our forms, removed the wood, and BAM -- concrete step foundation ready to go!

As mentioned above, the most important thing is to make sure every board is braced and secured in every direction, with attention to making sure the access is on the outside of the concrete so the forms can be removed easily.

A few days later we began veneering the sides and risers, mortared the treads, and we were done!

Steps are key in any landscaping project, and knowing how to build the forms for a concrete pour is an important (brace yourself for this one folks) step! 

Think you may need a set of steps for your next project?  Give us a call and we'll see what we can do for you!

8 Comments

Flagstone Patio Project

6/7/2013

0 Comments

 
PictureThe Finished Product
A few weeks back I wrote about a patio project we were just beginning, specifically about the excavation in which we discovered the old patio was built upon 18" of sand.  And I promised a future post in which I would share the finished patio pictures.

Well, as promised, here are the finished pictures.  And a few pictures of the project in progress.

Overall, the project was a complete success.  We began with the demolition of the old patio, as documented in my post from a few weeks back.  Once the demo was complete, we set the forms for the new patio foundation.  The layout was approved by the homeowner, forms were set, grades were established, and we prepared for the concrete pour.

A base layer of gravel was applied and the rebar reinforcement was set.  We were ready for the pour. 

The overall design included a set of steps leading from the back doors to the main patio surface.  Because of the amount of concrete involved and the logistics of getting the concrete installed, we decided to pour the steps separately from the main patio surface. The main patio took about 8 yards of concrete to pour the foundation.  Once the patio was poured and had time to set, we built the forms for the steps.  A few days later we poured an additional 2 yards to build the step foundation.  (I'll get into the details of forming the steps in a future post sometime soon).

Picture
Picture
Picture
PictureMission Accomplished! On to the Next One!!
The finished patio specifications called for irregular shaped PA graystone flagstones set in mortar atop the concrete footing.  Irregular shaped flagstone can be intricate to install.  It's basically a giant puzzle which we have to piece together, keeping an eye to keep joint dimensions to a minimum.  It involves laying out a large quantity of flagstone pieces in the lawn, figuring out which pieces fit together best, and more often than not cutting the stones so they end up fitting together cleanly.  It's a time-consuming process, no doubt, and in this case it took us about 9 days to set approximately 500 square feet of flagstone.

Additionally we set flagstones on the steps,,measuring about 6' w, with three treads each measuring about 18" d.  The step risers and sides were covered with a mica schist stone veneer to match the existing stone on the home foundation.

From start to finish the project took just under four weeks, including a few rain delays and time to allow the concrete to set after the pours.

It was a great project, for great clients -- the type of project that I love to get involved with, love to create, and take great pride in delivering an awesome product for great people.

What's next?  Well we already knocked out a fence project about a block away from Merion Country Club -- just in time before the chaos of golf's US Open begins next week.  A paver patio, a flagstone walkway, another fence project, a stone wall project, and a deck rebuild await.

Sound like something that you might be interested in?  I'd love a chance to meet with you and discuss.  Call us for a free consultation.  Maybe I'll be blogging about your project sometime soon!

0 Comments

Mortar Types, and other Random Cementitious Info

5/31/2013

2 Comments

 
PictureMortar at Work
I’m putting on my technical hat this week to discuss mortar.  Admittedly this may not be the most exciting topic for many of my readers out there, but before you click away, I think its worth noting that it is important to understand the different types of mortar and what they’re used for, whether you’re tackling a DIY project yourself, or hiring a contractor to undertake some improvements.
 
But before we begin, I need to offer a real quick lesson in terminology.  
 
I hear clients and prospects throw around a lot of incorrect terminology when it comes to masonry. Just as I would most likely butcher terminology if talking about insurance or quilt-making, its understandable. But important nonetheless.  So lets get a few terms straight.

Cement is, at its most basic level, simply a binder which sets and hardens independently.  There are a number of different types of cement mixes out there, but the most commonly used ones are Portland cement blends which are derived primarily from limestone and sulfate (gypsum).  Cement by itself is quite brittle and not used as a building material, but rather as an ingredient for concrete and mortar. To say a sidewalk or patio is made of “cement” is technically incorrect (and quite frankly, a nails-on-the-blackboard pet peeve of mine).

Concrete is a construction material made from mixing cement with aggregate (small stones or gravel) along with sand.  There are a number of “recipes” for concrete depending on the desired strength and application.  The aggregates and sand add additional strength to the mix and help to eliminate some of the “brittle” and “shrinkage” qualities of cement.  Fibers and manmade materials can also be added to the mix to help increase strength.  When you see a sidewalk or patio being poured, this is concrete.

Mortar is a separate construction material used to adhere stone, brick, or blocks.  Historically there have been a number of different recipes for mortar, but the most commonly used mortars used for our purposes today consist of
various ratios of Portland cement, lime, and sand.  Portland cement offers compression strength, lime offers flexibility and bonding qualities, and sand works to minimize shrinkage during curing. And that is where I want to get into a bit more detail.

There are five generally accepted classifications of mortar types used in the trades;  M, S, N, O and K.

Type M mortar consists of 3 parts Portland cement, 1 part lime, and 12 parts sand.  This is the strongest mortar in terms of compression strength, but may not offer the flexibility of forgiveness that some “softer” mortars offer.  It is commonly used for applications where some load-bearing capabilities are required, such as stone foundations.  In many cases the high compression strength results in the mortar being stronger than the materials they are binding, resulting in cracked bricks or blocks.

Type S mortar is the mortar that we typically use for our wet-set flatwork applications.  The generally accepted recipe is two parts Portland cement, one part lime, and nine parts sand.  It offers high compression strength with increased bonding qualities and flexibility.  For this reason it is recommended for exterior applications at or below grade, or when high compression strength is needed in conjunction with softer stones or bricks.

Type N mortar is perhaps the most commonly sold “all-purpose” mortar, consisting of one part Portland, one part lime, and six parts sand.  It offers medium compression strength, and is commonly used for non-load-bearing applications above grade, such as walls or chimneys (not exposed to direct heat).

The remaining two classifications of mortar, O and K, are the softest of the mortars, and are generally used for tuckpointing or repair work above grade, when compression strength is not necessary and flexibility/forgiveness are more important. Type O mortar generally is made up of one part Portland, two parts lime, and nine parts sand.  Type K is the weakest of the mortar types, with a one-three-ten ratio, and is most commonly used in historical preservation repair work.
 
And just as a good creative cook may tweak a few recipes to achieve desired results in the kitchen, these recipes can be tweaked a bit too depending on the application.  Additional factors such as the coarseness of the sand being used and amount of water used to mix the mortar can also have an effect on how the mortar will behave.
 
It’s also important to note that when it comes to mortar, stronger does not necessarily mean better. The strength of the mortar itself would be of little value if it doesn’t effectively bond to the materials that are meant to be held in place.  And as mentioned earlier, some degree of flexibility may be desired to work with temperature contractions or lateral load.

Additionally there are also a number of “specialty” mortar mixes available such as refractory mortar for use in ovens or chimney interiors where heat is a concern, and specialty additives are also available for enhanced bonding or durability qualities in certain applications.

So there you go. Mortar 101.  Even if you’re not going to use this information on a regular basis, it never hurts to have a basic understanding of materials and how they’re used.  Keep it handy if you never need it as a reference.

2 Comments
<<Previous
Forward>>
    Picture

    Company

    Clark Kent Creations, LLC is a full-service landscape construction company servicing the Pennsylvania communities of Delaware County, Chester County, The Main Line, and the University City, Art Museum, and Manayunk/Roxborough neighborhoods of Philadelphia.  In addition to this blog page, additional information regarding the company and our services can be found on the subsequent pages of the site.
    Picture

    Author

    Clark Linderman is the president of Clark Kent Creations, LLC, a landscape construction company based in Swarthmore, PA.  He is a proud graduate of the University of Michigan.  In addition to his passion for all things outdoors, he counts Michigan football, Phillies baseball, Superman memorabilia, Memphis R&B music, and good craft brews among his many interests.  He currently resides in Swarthmore with his wife, Sheila, two sons, his dog Krypto, and a really, really messy garage full of work supplies and toys.

    Picture
    Contact Us:
    Clark Kent Creations, LLC
    Swarthmore, PA
    Design and Construction to Maximize Your Outdoor Experience

    707-290-9410
    clark@clarkkentcreations.com
    Serving Delaware County, PA

    View my profile on LinkedIn

    Categories

    All
    Business And The Front Office
    Carpentry
    Environmental Issues
    Fencing
    Guest Posts
    Hardscaping
    Inspiration And Design Ideas
    Places & Local Interest
    Ramblings
    Seasonal
    Snack Break
    Water Features

    Archives

    July 2015
    September 2014
    February 2014
    January 2014
    December 2013
    November 2013
    October 2013
    September 2013
    August 2013
    July 2013
    June 2013
    May 2013
    April 2013
    March 2013
    February 2013
    January 2013
    December 2012
    November 2012
    October 2012
    September 2012
    August 2012
    July 2012
    June 2012
    May 2012
    April 2012
    March 2012
    February 2012
    January 2012
    December 2011

    Like my Blog?

    If you like the content of my blog posts, here are a few other blogs that I check in on regularly:

    Stone Soup:  A Master Stone Mason shares his craft.

    Arcadia Gardens:  Plenty of great tips about horticulture and landscape design.  A great blog (even though she's an MSU Spartan!)

    Revolutionary Gardens:  A Virginia-based landscape designer shares his work and ideas.

    Rockin Walls:  A certified dry stone mason from Maryland shares his projects and tricks of the trade

    If you have or know of a blog that you think I might be interested in, just let me know.  If I like it I just may add it to the list!

    RSS Feed

    All content ©2013
    Clark Kent Creations, LLC
Proudly powered by Weebly