Clark Kent Creations -- Swarthmore, PA. Landscape Design and Construction, Hardscaping, Patios
  • Home
  • Services/Photos
    • Hardscaping >
      • A Flagstone Walkway -- The Process
      • Stone Steps -- The Process
    • Wood Fences
    • Exterior Carpentry
  • About
  • Community

What is a Pergola?  (Let’s all say it together now, PUR-guh-luh)

10/18/2013

1 Comment

 
Picture
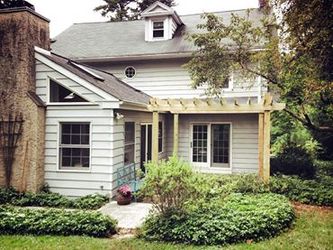
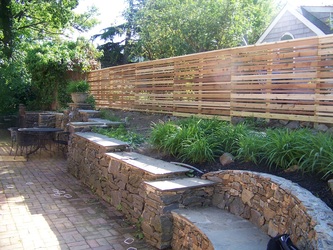
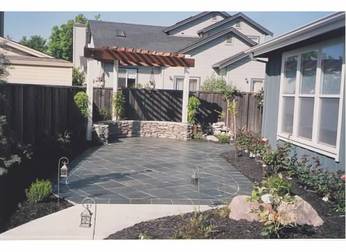
Recently Completed Pergola in Rose Valley, PA
Lets start with the basics here – what exactly is a pergola, and why do I need one?

Well, nobody NEEDS one, just like nobody needs a patio, or even a garden for that matter.  It’s a design element, meant to enhance a space and add value to your outdoor living space.

So what is a pergola, and what is used for?

The dictionary defines pergola as a structure usually consisting of parallel columns supporting an open roof of girders and cross rafters.

OK.  Fair enough, but I do recall learning in high school and college writing classes that the dictionary definition intro is an easy cop-out, and truth be told that definition doesn’t tell us much.  So how is a pergola used, and how is it going to help my patio or garden?

The purpose of the pergola is really more important.  And the purpose of the pergola is to provide a framework for climbing plants and vines, with the end goal of providing a nice natural-looking shady yet open space.

Traditionally the pergola has been a staple of Italian renaissance gardens, and certainly quite common at vineyards.  But over the past century or so, the pergola has enjoyed a renaissance of its own (you liked that tie-in, didn’t you …), becoming quite common in arts-and-crafts gardens.  

They’re perfectly suited for small garden spaces where shade from a large tree isn’t always an option, and a natural, sun-dappled, filtered shade is desired.  It is a great way to add a vertical dimension to an otherwise limited space.

The name “pergola” is often used interchangeably with “arbor”.  They can be large or small, free-standing or attached to nearby structures, part of a fence or entryway, used to define space, or used to hide nearby unsightly structures.  And with the right plants planted, they can also do a great job of muffling nearby street noise or other urban sounds.

So what are the right plants and vines to plant around a pegola?  Well basically anything that climbs.  Here in the Philadelphia region, my favorites are Clematis, Wisteria, Honeysuckle, and Morning Glory.  Ivy works great too, but it’s a bit too ubiquitous for my taste.  Climbing roses are beautiful , but if you’re in close proximity to people, keep in mind they do have nasty thorns.  There’s plenty of other great choices out there, ask your local garden center what may work for your pergola.

As for the design of the pergola itself, like any construction element in the garden, the sky’s the limit.  Have some fun with it, and don’t be afraid to get creative.

Picture
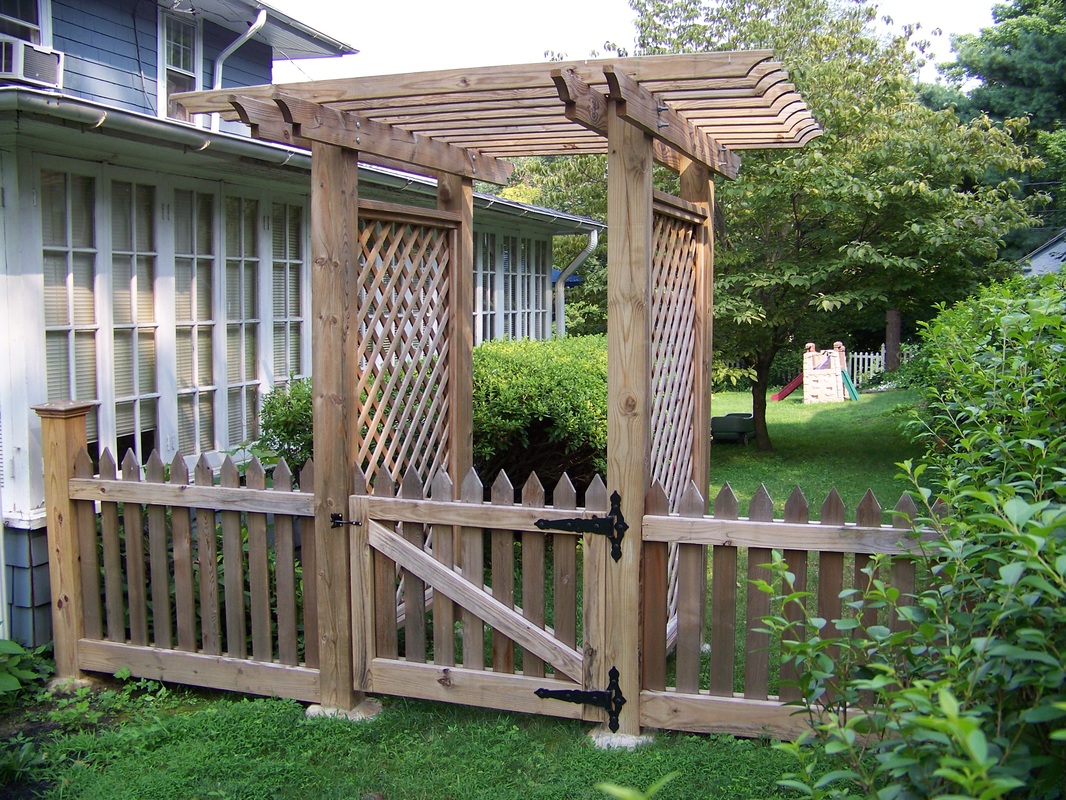
Entry Gate with Pergola
Picture
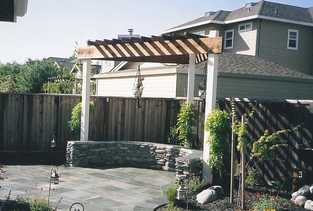
3-Posted "Triangular" Pergola with Bench Seat
Picture
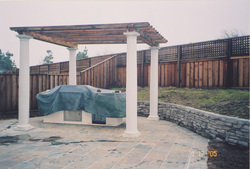
Pergola with Round Fabricated Columns
Here’s a couple more pergolas we built for clients in the past.

Have we piqued your interest?  Might you be interested in seeing how a pergola could add a new design element to your yard?  Give us a call or shoot us an email, and the discussion can begin.


1 Comment

When is the Best Time of Year to Start My Hardscaping or Fencing Project?  (And How Long Will it Take?)

10/11/2013

2 Comments

 
Picture
If you’re thinking about a new patio, fencing project, or any other landscape construction project, there’s a lot of information to absorb and a lot of decisions that need to be made.  No doubt, it can all be a bit overwhelming as you begin the planning process.

One question that I get asked quite regularly during prospect phone calls and sales meetings is when the best time of year is to undertake a landscape construction project.

Are there advantages to doing it during certain times of year?  Are there times of year to avoid?  Does it matter at all?

Let’s start with the third part of those questions;  Yes, it does matter.  But how it matters really depends on your priorities, what’s important to you during the construction process, and when you want the project completed.

First, let’s take a quick look at the calendar.  Generally speaking, we’re working outside completing landscape construction projects beginning usually around the first of March, and typically ending about mid-December.  Those dates can be tweaked a bit depending on how the year’s weather is behaving, but those are pretty accurate average dates. 
 
No matter what, we won’t be out doing masonry or fence work during January or the first half of February.  Even the mildest of winters can turn nasty in a heartbeat, and the last thing anybody wants is a half-completed construction project sitting idly while a foot of snow melts, or the ground heaves, or it turns into a muddy mess.  Better off to wait until the winter threat has at least subsided.

So take away  the winter, and you’re left with nine, maybe ten months at the most to get your project completed.  Still a pretty broad range.

Rest assured, if we’re out doing a project it’s only because we’re confident enough in the weather, and are taking any seasonal precautions that need to be made.  So at this point the “when” of the project is entirely up to you.

But there are some things to consider:
 
  • When do you want the project completed by?  If you want that new patio installed for your child’s graduation party, don’t call us on Memorial Day.  If there’s an end-goal in play, allow enough time for all the i’s to be dotted and t’s to be crossed, and the project to be completed in a thorough, detailed manner.
     
  • Are there seasonal discounts?  We don’t offer seasonal discounts, but I have heard of some companies offering discounted prices to fill schedules during slower times of year.  It’s certainly worth asking anybody you’re soliciting bids from.
     
  • Are there times of year when we’ll have to wait longer for availability?  Absolutely.  Once the really nice spring weather hits, a backlog queue of up to four months isn’t uncommon, although we certainly try to keep that time to a minimum.  Mid-to-late summer availability can often be pretty quick.  There’s  usually a bump in business around Labor Day, so fall availability can often be delayed but not as significantly as the spring.
     
  • Can customers pick their construction dates?  To some extent, yes.  If you call us early enough and leave plenty of lead time, it certainly allows you some flexibility.  Keep in mind we are busy doing other projects while your project is in the queue, and there is always some  uncertainty in project length due to weather, unforeseen site conditions, etc.  Scheduling for “mid-August” is realistic.  Scheduling for “Aug 12th” is not.
     
  • Do clients need to be home  during the construction process?  No, but it is advisable.  I’ve  had clients in the past want to schedule their projects for weeks when they’re away at the Shore or on vacation.  First, as mentioned above, picking the exact day we begin isn’t  always an option.  Secondly, there  are often day-to-day decisions that need to be made or approved during the construction process.  Sure, it’s  tempting to want to be “out of Dodge” while the yard is torn up and the driveway is full of equipment.  But as I always say, the most successful projects are the ones where there is open and frequent communication.  If  you’re available by phone, or are simply an hour’s drive away at the Shore we can probably make it work.  But if you’re going off the grid to some exotic locale, it’s probably best to wait until you return.
     
  • Can I schedule a project for next spring?  Absolutely.  From a scheduling perspective, I always like to have one or two projects in the can ready to go once the winter weather breaks.  And a March start  date means you’ll be ready to enjoy and use the final product by the nice April weather.
     
  • Entire process – sales cycle to final sweep.  How long will it take?  Wow, that’s a tough question, with a lot of factors to consider.  A lot depends on your level of responsiveness.  Are there multiple revisions and design changes? Are you first calling us in April or August?  Are we talking about a 600 square foot patio, or a simple front entry path?  There’s just too many factors to answer that question effectively, but hopefully the above points will help give you a sense of turn-around.

So, in summary, the best advice I can offer is to call us early, well in advance of the desired completion dates.  It will allow you to make sure you’re fully on board with any design layouts or material selections, allow you a bit of flexibility in scheduling projects, and allow us the necessary time to complete your project meticulously to the highest standards.

For additional questions or to begin the process for your upcoming project, give us a call.  We look forward to speaking with you!

2 Comments

Custom Fences, Repeat Customers, and Fun Garden Design Ideas in Media, PA

10/4/2013

7 Comments

 
PictureThe original fence as constructed several years ago.
For those of you familiar with my website and my blogs, you may recognize the fence pictured to the left.  It was a fence we built a few years back at the request of a local couple who was looking for a unique fence to complement their artfully renovated home.

They first approached me looking for some contemporary fence design ideas.  After a bit of collaboration I showed them some pictures of a deck railing I built a few years earlier when we still lived in California.  We tweaked the design a bit, and they gave me the green light on a custom design that to this day remains one of my favorite projects.

Earlier this summer they contacted me again asking me to come over and take a look at some changes they were considering on the property. I was happy to swing by.

The house itself doesn't appear overly unique from the street.  It's a 1950's rancher, that admittedly sits on a nice piece of property atop a small rocky ridge.  It's well built no doubt, but aside from some really fun garden décor the house doesn't stick out amidst the neighborhood.

But their artistic taste has led to some great changes.  A large portion of the interior of the home was ripped out when they first moved in to give it a real urban loft feel as you enter -- not what you'd expect from a 1950s rancher.

And the outside is accented with numerous items that definitely give the yard a unique flavor and personalizes the space.

PictureAnd the new fence extension and shed.
Last spring they worked with an architect to design a custom shed that is like no other shed I've ever seen.  The architect did a great job of working with the clean lines and modern feel of the design, while fitting a useful structure onto an admittedly tight space.

My clients were looking to extend the original fence back behind the newly constructed shed, as well as looking to continue the same fence design as a screen to conceal their air conditioning units and conceal their newly constructed compost bins.

Easy enough.  And plenty of fun.

It's always great to work with clients who are fun, creative, and think outside the box.  My personal garden design taste always seems to lean toward the whimsical -- after all isn't the whole point of a garden to have fun and enjoy outdoor space?  All while putting your own personal stamp on nature's beauty?

And this yard pulls that off like no other.

A few of the more unique design items include an old carousel horse perched atop a rock ledge, and standing against an old stump.  Their mailbox?  Well look at the two photos below and see if you can figure out where the structure that houses the mailbox came from.

Picture
A unique mailbox housing
Picture
See where it may have come from?
An old spigot collection embedded in concrete?  Check.  Old drums used as vegetable and herb planters?  Check. Carved stumps and totem polls.  Check.  With some great custom stonework to match the natural stone ledge that the house is built upon.  It's a great site in its raw form, but the garden design highlights everything I believe garden design is all about.  Fun and creativity.
Picture
Old carousel horse
Picture
Repurposed drums
Picture
Embedded spigot collections
Picture
Our new AC screen
Picture
And our new compost screen
Admittedly not everybody has the artistic vision to come up with ideas like this.  In this case the clients are both artistic professionals.  But if you're looking to come up with something fun, something that will get people talking, and something that will be built first and foremost with quality and workmanship in mind, give us a call.

I'd love to talk up some fun ideas and see where can take your yard.
7 Comments

Copper Fence Post Caps.  The New Normal.

9/27/2013

0 Comments

 
I want to use this space this week to make a brief announcement regarding our fencing services – specifically about fence postcaps.

As many of you know, we offer custom wood fence construction services in a wide variety of designs and styles.  Some of these are basic designs, some are custom one-of-a-kind creations.  But in all cases these are solid, well-constructed fences that are built to last.  Not your basic pre-fab big box-store panels.

Every design is different, and in some cases these designs include post caps as ornamental pieces atop each fence post.  Many of our fences don’t have the need for postcaps based on the design, but for the ones that do, we’ve typically offered wood sleeve caps that simply slide over the top of the post, and are fastened using a pair of simple finish nails.
PictureTwo-year-old removed postcaps. Already falling apart
I've been offering this service since I first started in the business some 13 years ago.  With nary a problem at all.  Until about two years ago.

I received a call from a very satisfied client who wanted to tell me how thrilled he was with his fence – except for one thing.  Some of the postcaps had buckled and the trim was falling off.

I stopped over to take a look, and sure enough, the trim piece had completely curled out, ripped away from the nail fastener, and was in the process of falling apart.  This was the case on several of the
caps.

I quickly replaced the caps at no charge.  “Hmmm. Bad batch of lumber” I thought to myself.  It happens sometimes.  Wood is a natural product after all.

I thought nothing more of it until a few months later when I got a similar call from another client.  “Love the fence, not liking the caps” was the point of the call.  Wow.  Well, the fences were constructed in roughly the same time period, so I just assumed the caps must have been from the same bad batch.  Again, I replaced the caps at no extra charge.

Until a third call. Same thing.  No longer a coincidence at this point.

So I quickly began looking at the supply of caps, wondering what was going on, and looking for a better option.  I tried a few different suppliers, a few different brands.  The results were all the same.

But why now?  Why not 10 years ago?  Those original caps I installed some 10-plus years ago are, in many cases, still perfectly functional today.

PictureAnd the new copper replacement caps
It basically boils down to the lumber supply.  As lumber demand heats up, the supply diminishes.  And in a haste to keep the supply available, many manufacturers are using inferior or new-growth wood.  The wood often isn’t aged properly, or its not fully grown and ready to be used.

And the result is often wood that curls or splits or doesn’t hold up.

And I for one am tired of dealing with it.

That’s why effective immediately I will no longer be installing wood postcaps as part of my fences.
 
Fortunately however, I have found a suitable replacement at little to no added cost.  I’ve been able to source solid copper pyramid caps at little to no extra cost than the original wood caps I offered.  These are attractive, will develop a natural patina over time, and should hold up for as long as the fence.  

And if they don’t?  Well as always, I’m here to stand by our work.

Because ultimately, it’s the client satisfaction that will make or break the business.  And your satisfaction is quite important to me, personally.

So that’s why we won’t be installing the wood caps any more.

But I’m quite sure the copper caps will be a quite suitable replacement, if not an upgrade.

If you’d like to see a sample copper cap, give us a call, and I can show you one in action.

0 Comments

Wet-Set Flagstone Walkway, Stone Steps and Stone Border Wall

9/20/2013

4 Comments

 
PictureThe Completed Project
Another quick project update this week, this one involving a rebuild of a stone driveway border wall, a replacement set of stone steps, and a new wet-set flagstone walkway.

I was first contacted by this homeowner to discuss rebuilding an old stone wall that bordered the edge of their driveway.  The old wall was falling apart, a combination of substandard original construction, having been clipped by vehicular traffic more times than is recommended, and some of the old original schist stone splitting and deteriorating due to moisture.

As we spoke about the wall, we also identified that the steps leading to the side door were quite awkward -- two risers each measuring 10"-plus, treads that were narrower than the risers were high, and constructed from uneven field stone.  Not an easy approach. So we were contracted to rebuild the wall and replace the steps.

Picture
Steps Before -- Ugh!
Picture
And After. Still Need to Replace the Path Though ...
Picture
The wall was disassembled carefully, setting aside stone that could be reused in the rebuild, and discarding stone that was deteriorating or unusable.  We dug out the trench for the wall footing, installed a footing of compacted crushed gravel, and began laying the stone.

Additional stone was purchased from a local quarry to replace the stone that was discarded. The wall measured on average less than a foot high, but we still wanted to make sure an adequate foundation was in place.  That includes about 4" of compacted crushed gravel, plus about 6" of buried stone -- much more than was in place on the original build.

For the steps, we wanted to include natural stone to match and complement stonework on the house.  But getting rid of those uneven treads was important.  So we went with a concrete foundation, with mortared natural stone veneer on the sides and risers, with full length bluestone treads.  The rebuild included installing an additional step, now instead of two 10" risers we included three 7" risers.  Much more comfortable, and we widened the depth of the treads to 14".

Picture
The homeowner was thrilled with the results.  Well kind of.  The wall rebuild looked great, the steps were even and comfortable to walk on, even the old wood trim that was rotting out below the door threshold was replaced. 

But there was a problem.  Now that the wall and steps had been replaced, the muddy homeowner DIY pathway connecting the drive and the steps stood out like a sore thumb.

Luckily, we knew just the people to help with the pathway replacement -- us!  We went with a wet-set bluestone linear-shaped walkway to match the treads on the steps. 

The old pathway was lifted and set aside for the homeowner to use as stepping stones through their gardens.  We ID'd the desired footprint for the path, excavated accordingly, poured a concrete foundation, and mortared the flagstones to the surface.

What a transformation!  Now the homeowner was officially thrilled, wall, steps, walkway and all.

Is there a part of your yard that needs a transformation?  Give us a call or shoot us an email, and see what we can do for you! 

4 Comments

Making a Grill Out of a 55-Gallon Drum.  A Hybrid Propane Wood Smoker Project

9/13/2013

11 Comments

 
PictureMe and My New Grill!
This is one of those projects that’s been on my life bucket list for some time – building my own grill out of a reclaimed 55-gallon drum.

The seed for this project was actually planted some time ago.  With a wife from the barbecue capitol of the world, Memphis Tennessee, and a palate that seems to be constantly attracted to some of the world’s best street food, I’ve seen some awesome grills and smokers over the years. Grills on trailers for barbecue cook-offs, grills made from old beer kegs, gas tanks, even some made out of old cars.  Heck, even my own family on my mom’s side made some home-made grills on the banks of the mighty St. Joe’s river in Elkhart, IN.  So it’s kind of in the blood.

PictureThe Unaltered Food-Grade Drum
So the idea had been festering for some time.  And when our old 13-year-old store-bought gas grill finally bit it a few weeks back, instead of trying some spot repairs and part replacements as I’ve done in the past, it was time to pull the trigger on the new grill.

Before I get into the how-to, I should share a bit about my grilling preferences.  With family lineage in Memphis and a taste for good barbecue, part of me is really drawn to the all-day, slow smoked, wood-fired smokers.

But the realist in me also realizes that I work and have about a billion responsibilities, so slow-smoking a rack of ribs on a Tuesday evening just isn’t in the cards. Slapping burgers on a propane grill fits much better into my schedule.  So what to do?  I wanted the ability to slow-smoke some good ‘cue on a football Saturday afternoon, but also to whip up some simple hot dogs before soccer practice on Thursday night.

So the solution?  A hybrid, with enough room on one side to throw in some pieces of wet hickory when the time allows, but with a propane set-up on the other side for those weeknight quick-and-easy’s.

What you need:
One 55-gallon drum (sealed ends, food grade)
A grinder or metal cutting saw
Three door hinges
Approximately (30) ¼” x 1” hex bolts, with nuts and washers
Approximately 6’ of 1” angle-iron
One wood finial fence postcap
One propane burner replacement piece
One propane burner heat shield
Propane ceramic briquets
Replacement grill grates to fit

Picture
Mark Your Lid Locations
Picture
A Properly Safety-Compliant Helper
PictureThe Empty Barrel on the Stand
What to do:

First, get your hands on a 55-gallon drum.  If you have the time and you’re diligent in your search, you can probably find a free one from an automotive service center or food processing plant.  My time and patience were lacking, so I found one on Craigslist for $20.  I could have paid $10, but splurged for the “Food Grade” barrel, as I really wasn’t in the mood to be tasting oil on all my food for the next few years.  Make sure it is metal, not plastic (duh).  Also make sure it is
“sealed” meaning the circular ends aren’t removable.

Next, mark out and cut your door opening.  There’s a few ways I could have done this, but I chose to keep the circular ends intact, partially not to compromise the stability of the barrel, and partially to keep options open if I ever want to install an upper grill rack down the road. I marked out the door with masking tape to ensure good straight lines, and used a grinder to make the cuts.

Once the door panel is cut out, attach the three hinges to door using the ¼” bolts.  Mark your hole locations, pre-drill holes, and tighten the bolts using the nuts and washers.  Once all three hinges are secured on the door, hold in place and mark the hinge locations on the barrel itself.  Pre-drill your holes (need to be precise with the locations so everything lines up), insert bolts and attach the hinges.  

You’ll also want to easily open your door, so it will need some handles.  You don’t want metal handles, as they will conduct the heat. There were some wood cabinet handles at the box store that could have worked, but they weren’t meant for outdoor use, so I was concerned about rot.  So I improvised again, using a pressure-treated finial postcap.  I simply drilled a hole through the door and secured the knob with a small lag screw from the inside.  I used one, centered on the door, depending on preferences you may want two.  You now have a functioning door.

PictureAttach Door with Hinges and Install Knob
The stand.  I have to admit, I cheated on this one bit, as the stand from our old store-bought grill was still perfectly functional, and the barrel fit quite nicely on the frame.  If I had to build my own stand, I probably would have used threaded metal pipes to construct a simple stand.  But I didn’t have to, so there.  My guess is you could probably find something at your house that works – shopping carts, old metal shelving, old trailers – you’ll figure it out.

I now placed the barrel on the stand sideways with the door on top, circular ends on either side, and drilled a few drain holes in the bottom of the barrel.  This will help for airflow, and allow for drainage if you ever leave the grill open in the rain, or spill barbecue sauce into the grill.

PictureCut Hole in Bottom for Propane Access and Drainage
If you’re just going the wood route, you can skip this step, but if you’re retrofitting some propane parts, you’ll need to cut a small opening in the bottom of the barrel (amongst the drain holes) to allow for the burner to be installed, and the feeder pipes to access the main propane supply and control knobs.  Again, I used my grinder to cut out a hole roughly 3”x4” to allow both feeder pipes to fit through comfortably.  
 
The big box stores sell a wide assortment of after-market replacement parts for propane grills. Just a find a burner that fits the barrel, and a heat shield that fits the size of the burner.   (The heat shield prevents the flame from torching the food, redistributing the heat to the ceramic briquettes).

PictureThe Propane Burner, and Angle-Iron Grate Supports
You’re getting close now. All you’re missing is the cooking grate. I ended up purchasing two of the largest size grates I could find at the box store, but if you have access to any sort of metal working shop you can probably find some sturdy steel mesh that would work just fine.  Regardless of what you go with, get the grate first, as you’ll need it to install your bracing.

Place your grate down into the barrel over the propane burner apparatus.  Check for level both front to back and side to side.  Ideally, you should have about 4” between the top of the heat shield and the grate.  Once you position the grate into the location you want, mark the location of the grate on the inside of the barrel with a pencil.  Now remove the grate form the barrel.

PictureFire!! Inaugural Meal? ... Chicken Kabobs.
Take your angle iron, and cut two equal length pieces that will run the length of the barrel (3’ +/-). Now drill three ¼” holes through one side (flange) of the angle iron, one on either end and one in the middle. Hold your drilled angle iron piece up against the line you already drew on the inside of the barrel, and mark the hole locations.  This may require a helper to hold the piece, making sure your hole marks line up exactly with the holes on the angle iron.  Now drill the holes through the barrel itself, and fasten the angle iron to the inside of the barrel using the ¼” bolts.  Repeat for the front and back.  When you’re done, you’ll have two metal “shelves” running the full length of the barrel, both front and back.  Simply place your grate resting on both sides of the angle iron, and you are good to go!

I’m thrilled to cross this project off the bucket list for a number of reasons.  Go look at a box store or home center, and you’ll see a whole assortment of grills ranging from $300 on up.  The big ones that have enough space to do what I want (you know, that whole pig roast every red-blooded male dreams about …) start at $600 at least, and run far, far upwards of that number.  Mine?  About $65 for the barrel conversion, and about $55 for the propane burner equip. Not bad.  Plus, it’s way, way, way cooler in my opinion.

I still may make a tweak or two, and who knows, maybe I’ll even play around making a few more for some friends.  If I can squeeze it in between getting my grill on …

Interested in something like this for your outdoor living space?  Give me a call.  We’ll talk.

11 Comments

What is Hardscaping?  A Basic Primer.  Act Like You Know.

9/6/2013

0 Comments

 
PictureElements of Hardscaping -- Patios, Pergolas, Stone Walls, Boulders ...
I’d like to take a small step backwards this week and talk about what I’ve always viewed as a basic term – “hardscaping”.

Being a veteran of the industry, it’s sometimes easy to forget that not all clients or prospects are tuned in to the trends and knowledge that I’m exposed to on a regular basis. Sometimes I’ll even mention a term that I assume is common knowledge, only to be met with confused looks that tell me I might as well be speaking Russian.

One term that I throw around regularly is hardscaping.  To me this is a basic term that I just assume everybody is familiar with.  But gauging from the responses I’ve seen, not everybody is.

In fact, it’s the one word that I use regularly and even my MS Word program insists on trying to catch it as a spelling
error.

But it is a real word. And it is just what it sounds like – landscaping with hard materials.  Stone, brick, blocks, concrete, etc.

Much the way that The Jeffersons were a spin-off of All in the Family or Laverne and Shirley was a spin-off of Happy Days, hardscaping is a spin-off of landscaping.

Mention landscaping to a handful of people, and you’ll probably conjure up images ranging from lawn mowing to mulching to tree-trimming to patio construction to pond maintenance – quite a wide range of services.  In fact, when I mention our company works in the landscape industry, I’m often confronted with requests to plant shrubs or mow lawns.

So the term hardscaping was developed to specifically refer to the “hard” portion of your landscape. Stone walls?  Check.  Flagstone patios?  Check. Brick walkways?  Check.  Ornamental boulders?  Check.

And if you think about it, this makes perfect sense.  Does the horticulture expert at the local garden nursery have the in-depth skills or knowledge that will help with your stone patio construction?  Perhaps they’ll be knowledgeable with a few of the basics, but just as you wouldn’t necessarily trust a brick mason with picking out the best shrub selections for your shade garden, a plant expert won’t most likely have the skills and knowledge to deliver a successful patio construction.

So hardscaping has evolved into a somewhat separate industry within the industry, if you will.

And on the flip side, the term “softscaping” has evolved to separately describe the portion of your landscape that remains “soft” – the beds and plantings to be specific.

All that’s not to say that many contractors and companies don’t do both.  Many do, but usually the larger companies will have separate divisions that handle the hardscaping and softscaping portions of your landscape.  Much the way that many general contractors have separate crews that handle the basic framing vs the finish and fixture duties for a structure or dwelling.

There’s other “scapings” that have evolved as well.  Aquascaping is the side of the business that centers around ponds and aquatic plantlife. Xeriscaping (from the Greek xeros, or “dry””) centers around landscaping with little use of water.  Roofscaping is landscaping on your roof.  Stonescaping is hardscaping to the next level, dealing only with natural stonework.  The list goes on, you get the idea.

So the next time you’re talking with someone and they mention the word hardscaping, you can carry on and perhaps even respond by telling them about that new patio you just had installed.  You’re now officially in the know.

And if you call the right contractor, you can even brag about what a great job that locally-owned-and-operated, super-responsive, personable, attentive-to-detail, company Clark Kent Creations did installing your new patio.  :)

Give us a call.  A free consultation is just a phone call away.

But just don't ask me to mow your lawn ...  :)

0 Comments

Happy Labor Day!

8/30/2013

0 Comments

 
Picture
Hard to believe, but it was just three months ago that I was writing a few random musings regarding Memorial Day as we approached the Memorial Day weekend and the start of summer. Unfortunately it’s now time for Labor Day, meaning the end of summer is here.

But just to give a little symmetry to the season, I figured it only fair to offer a few random musings regarding the other summer bookend…
 
*  The first recorded observation of Labor  Day was in New York City in 1882, organizied by a carpenter’s union secretary named Peter McGuire.
Labor Day was first recognized nationally in 1894, following a bloody labor strike when US forces opened fire on striking workers at the Pullman Railroad Co.  This bloody confrontation forced  President Grover Cleveland to appease the national labor force by signing a bill into law recognizing Labor Day as a Federal Holiday.

*  I’ve always found it a bit ironic that to celebrate the work ethic of American Labor, we celebrate by taking the day off.  Not complaining, just a bit ironic

.*  “Labor Day, when we briefly pause from  demonizing unions to enjoy mattress sales in their honor.” – Anonymous

*  There’s been a lot of talk over the past few years regarding the decline in American manufacturing.  But did you know that as of the 2010 census, manufacturing jobs still make up the highest percentage of jobs among US men, with 11.3 million manufacturing jobs.
 
*  10.3 million Americans are self-employed.  Just think, if it wasn’t for me I would’ve had to type 10,299,999

*  Want a longer summer?  Try New Zealand.  They don’t recognize Labor Day until the 4th Monday of September.  Of course it’s the southern hemisphere, so they’re actually just giving themselves a longer winter.

PictureFDR quote, from FDR Memorial, Washington DC

    *  New York has the highest percentage of unionized workers at 25 percent.  The lowest?  North Carolina at 3 percent.

    *  The National Labor Relations Act of 1935 is widely recognized as the cornerstone of modern  labor law, signed into law by labor-friendly president FDR.  The workforce gained even more strength and support shortly thereafter, when manufacturing jobs spiked due to WWII.

    *  “If all the cars in the United States were placed end to end, it would probably be Labor Day Weekend.” -- Doug Larson, American newspaper columnist

*  To most Americans today, Labor Day symbolizes the unofficial end of summer, the start of the school year, and the start of football season.  Time to get back to business (of course for us landscaping types, that’s been going on all summer anyway).
 
*  My agenda for the weekend includes being incredibly lazy, hitting up the pool for the last few times, maybe a  fishing excursion with the kids, and living in denial that summer isn’t actually coming to a close.  And yes, I'm excited for football season, and my Wolverines taking the field, and postseason baseball, and warm cider on cool nights, and hayrides, and all the other fun parts of fall.  But for now, I'm milking summer for all its worth.

*  Whatever your plans, stay safe and enjoy the waning days of summer.

0 Comments

Hardscaping Tools Part II -- The Five "Must-Have" Power Tools in my Arsenal

8/23/2013

6 Comments

 
So last week I shared my top 5 hand tools that I couldn’t imagine doing what I do without having these tools
available.

And I promised a follow-up post highlighting my top 5 power tools.  Here you go.

Picture
Cordless Drills.  If I could only have one power tool, this would be it.  It seems like nearly every day, on nearly every job, this tool comes in handy for one task or another.  They’re relatively lightweight, easy to use without having to keep up with a power cord, can be used as a drill or a screwgun just by simply changing the bit, and hold a charge decently enough that you don’t need to worry too much about changing out the batteries.  Heck, I’ve even used it with a wire brush attachment to clean stone.  And I can’t possibly imagine building a deck or a fence without one of these bad boys.

Picture
Grinder.  While the cordless drill is perhaps the most used of all my power tools, the grinder is perhaps my favorite and perhaps most versatile.  Whether its cutting rebar, cutting stones, polishing stone, rounding edges on freshly cut pavers, or smoothing out unsightly or awkward bumps on stones, this is such a handy tool it’s ridiculous.  When we do irregular shaped flagstone patios, this guy inevitably gets a workout as we have to trim and cut stones to fit together.  And a whole lot of bang-for-the-buck too.  A decent DeWalt model runs about $70.  But be careful!  This is an exposed diamond blade designed for cutting stones. Imagine what it could do to your foot if you’re not careful.  And all the goggles/dust mask precautions should be taken as well.

Picture
Brick saw.  While the grinder is easy to use and carry around, the brick saw is a beast that takes two people to move around comfortably.  But the results for a bricksaw can’t be replicated, and if you’re cutting pavers you need one.  Unless you want to look like an amateur.  This is a wet saw designed to keep dust down and keep the blade cool for long durations of cutting.  The pump pulls water out of the attached tub and spits on the spinning diamond blade as it cuts.  When the day is done, the water in the tub is a mess of brick or paver slurry that needs to be cleaned thoroughly to avoid pumps or lines getting clogged with debris. Even the clean-up can take upwards of an hour.  But the results speak for themselves.  And when you’re enjoying your beautifully detailed paver patio, you’ll forget all about lugging the beast of a saw around or cleaning it up.

Picture
Plate Compactor.  Anybody who has ever installed a successful hardscape will tell you the money lays in the base prep. No matter how pretty all that stonework looks, be it manmade pavers or natural stone, it’s of little value if it can’t hold up over the test of time.  And the best way to ensure its longevity is to make sure the base prep is more than adequate.  A proper hardscape install will include a minimum of 4” compacted base rock.  And by compacted, I mean REALLY compacted.  That hand tamper may do fine for a few household DIY projects, but if you don’t get your base prep completely compacted, nature and time will take care of it for you.  Which means your patio will settle.  Not good.  
 
Every single hardscape job we do includes a base layer compacted with our handy plate compactor. I once described this to a client as a lead weight with a lawnmower engine attached.  It’s a little more than that, but run a plate compactor over loose gravel, add a little moisture, and you’ll see exactly how much gravel can compact. And if you still think your hand tamper is doing the job, try running the plate compactor over your handtamped gravel.  What do you know, it still had some more settling to go.  A valuable tool indeed.

Picture
Skill Saw.  If the grinder is the go-to tool for masonry, than certainly the skill saw wins the award for carpentry.  And even though any carpenter worth his weight in nails will have one in their arsenal, it’s not just for cutting wood.  Swap out the wood-cutting blade for a diamond blade, and you’re right in business for cutting bricks or stone.  A must-have for anybody in the trades.  Period.

So there you have it -- 5 must-have power tools if you're working in the hardscaping trades.  And like last week's hand tools, there are certainly some omissions on this list; Reciprocating saw (sawzall) and cut-off saw come to mind quickly off the top of my head.

What tools could you not get by without?

6 Comments

Hardscaping Tools --  Five Basic Hand Tools I Couldn't do Without

8/16/2013

0 Comments

 
I don’t have to tell you that I have a lot of tools.  13-plus years of running my own landscape construction business will do that.  Over the years I’ve accumulated quite the collection.

Some tools are used on a near-daily basis; others sit idly like the 25th man on the bench waiting for his all-important pinch hit appearance.

But regardless of how much the tools get used, there is always a certain job that requires just the right tool for just the right job.  That one shining moment, at least as far as the tool is concerned.

A few months back, a stoneworking colleague of mine (Hi Matt!) wrote on his blog about the various types of trowels he uses on a regular basis, and how they are used.  I commented that if he were stranded on a dessert island and could only have one tool, what would it be?  (You’ll have to check his blog for the answer)  Which got me to thinking, what are my go-to tools?

In otherwords, if the tool police came and confiscated all my tools but a few, what would I really need? 
 
To simplify the list, I’ll break it into a two-part series.  This week I’ll focus on basic handtools, next week we’ll look at my power tools …
Picture
Shovels.  How could I not start the list with THE basic staple of the landscaping
business.  On any given job, no matter what we’re doing, we’ll have at least one round and one flat shovel on site per worker.  The round shovels are better for actual digging, the flat shovels better for scooping gravel or loose soil.  These things get used daily.  And the average lifespan in our industry is about two years.  When picking your shovels, I like the old school wood handles. Spend the extra few bucks for the higher quality.  It’s worth it.


Picture
Margin trowel.  This was my answer for my deserted island trowel.  This handy little 5” x 2” trowel is quite versatile, and works great for nearly any phase of mortar work.  And it fits quite nicely into my side pocket, which makes it all the more handier.  Another one of those tools where we pretty much have one for every worker.


Picture
Chisel hammer.  If you’re doing stonework, you need one of these. Period.  This is your basic regular-sized hammer, but instead of the crowbar claws on the back side of the hammer, there’s a 1” stone chisel.  Great for roughing up a freshly cut piece of stone, or splitting a piece of flagstone that’s been scored.  Save your carpentry hammers for what they’re intended for – carpentry.  If you’re doing masonry, this is your tool.

PictureMy 15-yr-old workhorse of a wheelbarrow
Wheelbarrow.  If you’re moving large quantities of, well, anything pretty much, you need one of these.  Or a few of these.  With a few caveats.  Like the shovels, buy the higher end ones.  The cheap-o’s will fall apart the first time you load them with stone or anything heavy.  I used to be able to get really nice solid metal-framed wheelbarrows when we lived in CA. That was 10+ years ago, and I still have one of my originals that is a key part of my fleet.  A few years ago I bought another one online that I thought was the same as my originals.  The design was the same, but the quality was greatly diminished.  It lasted maybe a year.  Maybe.

Most of the ones I see available today, even the so-called “heavy-duty” ones are wood framed.  Not bad for moving soil around, but if you plan on moving stone, mixing your mortar and/or concrete in the wheelbarrows, or using them to schlep loads of concrete during a pour, you can’t just keep your fingers crossed and hope for the best.  You need to know they’ll hold up.  Get the strongest ones you can find.  And don’t rely on the inflatable tires that come with most wheelbarrows.  Pay the extra $30 for a “flat-free” solid rubber tire. Even then, the bearings may eventually go, but you can’t be worried about flat tires when you're mid-concrete pour.

Picture
Digging bar.  Another really versatile tool that gets used almost daily.  Whether it’s prying up stone or chunks of concrete, loosening up compacted soil when digging a post hole, or chopping roots well below the surface, these solid steel bars are about 6’ long, and come with a point on one end and a chisel on the other.  Beefy tools, no doubt, and not for lightweights.  But effective all the way.

So there’s my Big Five for handtools.  I know some of you may have some feedback to my omissions, or comment on my inclusions. And to be fair, there’s a whole bunch more that I use regularly that didn’t make the list.  But I’m limited to just five, thanks to those pesky tool police, so something was bound to be left off the list.

What are your Big 5 for handtools?
 

0 Comments
<<Previous
Forward>>
    Picture

    Company

    Clark Kent Creations, LLC is a full-service landscape construction company servicing the Pennsylvania communities of Delaware County, Chester County, The Main Line, and the University City, Art Museum, and Manayunk/Roxborough neighborhoods of Philadelphia.  In addition to this blog page, additional information regarding the company and our services can be found on the subsequent pages of the site.
    Picture

    Author

    Clark Linderman is the president of Clark Kent Creations, LLC, a landscape construction company based in Swarthmore, PA.  He is a proud graduate of the University of Michigan.  In addition to his passion for all things outdoors, he counts Michigan football, Phillies baseball, Superman memorabilia, Memphis R&B music, and good craft brews among his many interests.  He currently resides in Swarthmore with his wife, Sheila, two sons, his dog Krypto, and a really, really messy garage full of work supplies and toys.

    Picture
    Contact Us:
    Clark Kent Creations, LLC
    Swarthmore, PA
    Design and Construction to Maximize Your Outdoor Experience

    707-290-9410
    clark@clarkkentcreations.com
    Serving Delaware County, PA

    View my profile on LinkedIn

    Categories

    All
    Business And The Front Office
    Carpentry
    Environmental Issues
    Fencing
    Guest Posts
    Hardscaping
    Inspiration And Design Ideas
    Places & Local Interest
    Ramblings
    Seasonal
    Snack Break
    Water Features

    Archives

    July 2015
    September 2014
    February 2014
    January 2014
    December 2013
    November 2013
    October 2013
    September 2013
    August 2013
    July 2013
    June 2013
    May 2013
    April 2013
    March 2013
    February 2013
    January 2013
    December 2012
    November 2012
    October 2012
    September 2012
    August 2012
    July 2012
    June 2012
    May 2012
    April 2012
    March 2012
    February 2012
    January 2012
    December 2011

    Like my Blog?

    If you like the content of my blog posts, here are a few other blogs that I check in on regularly:

    Stone Soup:  A Master Stone Mason shares his craft.

    Arcadia Gardens:  Plenty of great tips about horticulture and landscape design.  A great blog (even though she's an MSU Spartan!)

    Revolutionary Gardens:  A Virginia-based landscape designer shares his work and ideas.

    Rockin Walls:  A certified dry stone mason from Maryland shares his projects and tricks of the trade

    If you have or know of a blog that you think I might be interested in, just let me know.  If I like it I just may add it to the list!

    RSS Feed

    All content ©2013
    Clark Kent Creations, LLC
Proudly powered by Weebly